Page 211 - Catalog
P. 211

CABLERAIL BY FEENEY®


            Step-by-Step Installation for Metal Frames


            Installing the Standard 1/8" Cable System is easy. Just follow these simple steps:
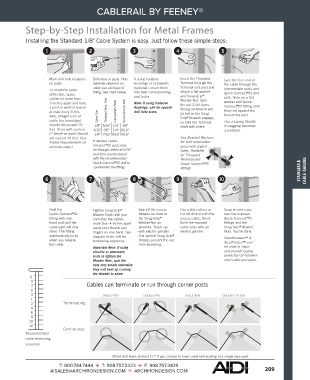
                    1  1              2  2              3  3              4  4              5  5


                     Mark drill hole locations  Drill holes in posts. Hole   If using Isolation  Insert the Threaded   Lace the free end of
                     on posts.         diameter depends on    Bushings or Grommets  Terminal through the   the cable through the
                                       cable size and type of    (optional), insert them  Terminal end post and   intermediate posts and
                     To minimize cable   fitting. See chart below.   into their corresponding  attach a flat washer
                                                                                                       ®
                     deflection, space                  post holes.        and Snug-Grip     Quick-Connect SS end
                                                                                     ®
                     cables no more than                                   Washer-Nut. Spin    post. Slide-on a flat
                     3 inches apart and have            Note: If using Isolation  the nut 2 full turns.   washer and Quick-
                                                                                                   ®
                     a post or vertical spacer          Bushings, call for special  Strong resistance will   Connect SS fitting until
                     at least every 3 feet.    Threaded Term. Post  Intermediate Posts  Quick-Connect Post  drill hole sizes.  be felt as the Snug-   they rest against the
                     Also, straight runs of   Cable Size                   Grip  threads engage;   face of the post.
                                                                              ®
                     cable (no turns/dips)                                 so hold the Terminal   Use a Lacing Needle
                     should not exceed 70    1/8"   5/16"   1/4"   3/8"    shaft with pliers.   if snagging becomes
                     feet. Runs with corners   3/16"   3/8"   1/4"   9/16"                   a problem.
                     (2 bends at most) should    1/4"   7/16"  5/16"  9/16"
                     not exceed 40 feet. (See                              Use Beveled Washers
                     Frame Requirements on   If desired, Quick-            for stair termination
                                            ®
                     previous page.)   Connect SS posts may                posts with angled
                                       be through drilled at 5/16"         holes. Available
                                       and then counter-bored              for Threaded
                                       with the recommended                Terminal and
                                       Quick-Connect SS drill to           Quick-Connect SS
                                                ®
                                                                                     ®
                                       countersink the fitting.            fittings.                                         STAINLESS &   CABLE  RAILING
                    6  6              7  7              8  8              9  9             10  10


                     Hold the          Tighten Snug-Grip    Saw off the excess   Use cable cutters or   Snap on end caps
                                                   ®
                     Quick-Connect SS   Washer-Nuts until you   threads as close to    cut-off disk to trim the   over the exposed
                               ®
                     fitting with one   can’t flex the cables   the Snug-Grip     excess cable. Grind   Quick-Connect SS
                                                                                                       ®
                                                                   ®
                     hand and pull the   more than 4 inches apart   Washer-Nut as   flush the exposed   fittings and the
                     cable tight with the   using your thumb and   possible. Touch-up   cable ends with an   Snug-Grip  Washer-
                                                                                                    ®
                     other. The fitting   fingers on one hand. See   with electric grinder.   electric grinder.  Nuts. You’re done.
                     automatically locks   diagram to the left for   The special Snug-Grip    SteelRenewal™ &
                                                                        ®
                     when you release    tensioning sequence.   threads prevent the nut      SteelProtect™ can
                     the cable.                           from loosening.
                                       Important Note: If using                              be used to clean
                                       electric or pneumatic                                 and provide lasting
                                       tools to tighten the                                  protection of stainless
                                       Washer Nuts, spin the                                 steel cable and parts.
                                       nuts very slowly otherwise
                                       they will heat-up causing
                                       the threads to seize.
             11
      11  11  9                      Cables can terminate or run through corner posts
       9  9   7 5
       7  7   3
       5  5
       3  3   1            Terminating
       1  1   2
       2  2   4
       4  4   6
       6  6  10 8
       8  8
      10  10  12           Continuous
      12  12  Recommended
            cable tensioning
            sequence
                                               Offset drill holes at least 1/2" if you choose to have cable terminating at a single pipe post.
                         T: 800.784.7444    T: 908.757.2323    F: 908.757.3439
                      AISALES@ARCHIRONDESIGN.COM    ARCHIRONDESIGN.COM                                       209
   206   207   208   209   210   211   212   213   214   215   216