
|
|
|
|
|
|
|
Do you want to be a better CNC'er in 37 Seconds? Get Better Tool Life, Surface Finish, and Material Removal Rates Fast. It's that easy. You can install and get results now. |
October Through December 2006 CNC Blog Archive
12/21/06
Final Push for CNC Lathe
I went carefully over what's left to do to finish my lathe conversion. If I push hard, I think I can be done by end of February. It's been a long haul, mostly because I don't get as much shop time as I would like and I keep jumping into other smaller projects such as the mill power feed and power drawbar projects.
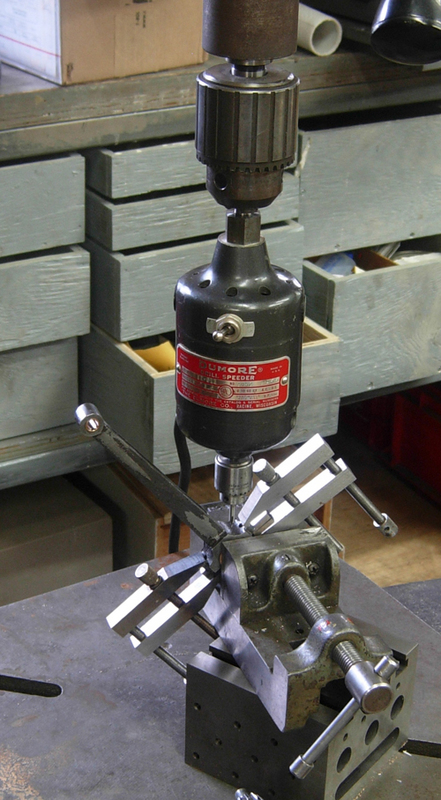
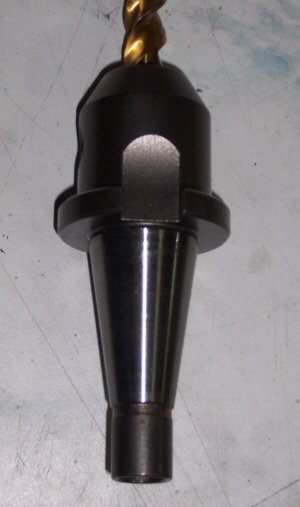
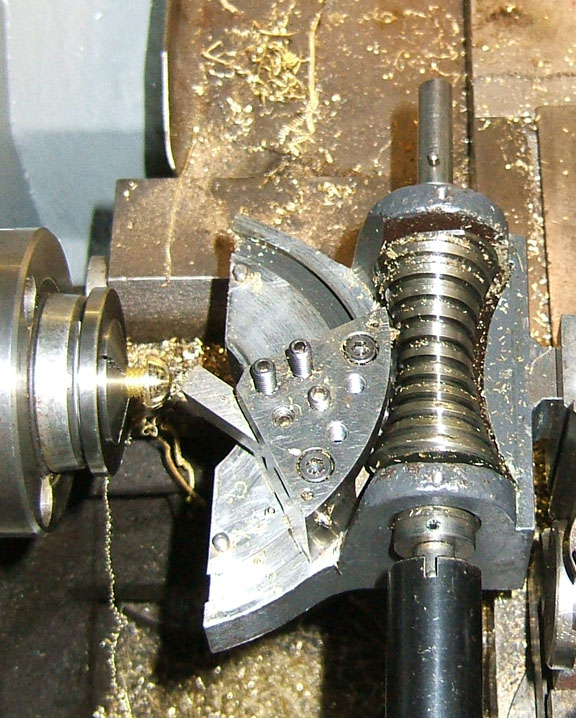
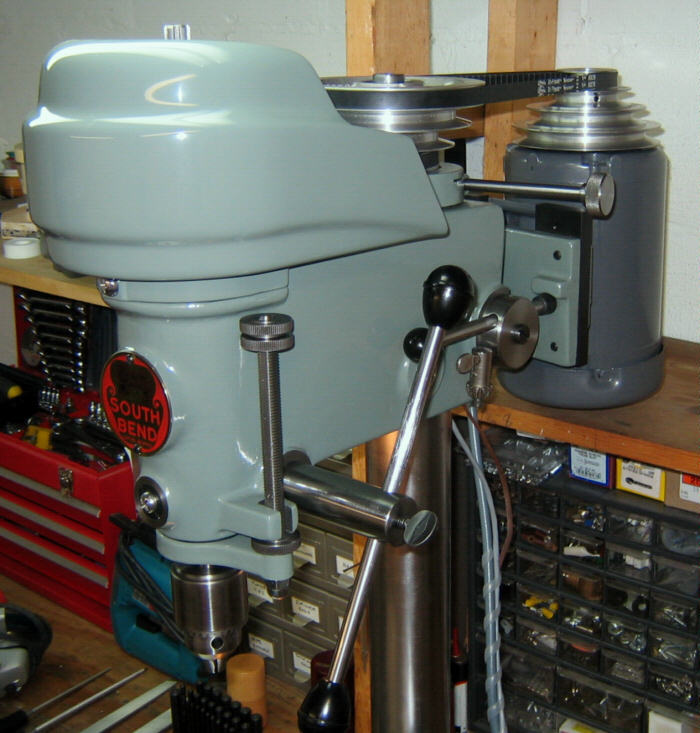
Drill Press Speeder
This is a cool gadget, made by Dumore, that goes in your drill press chuck and lets you run tiny little twist bits at 20,000 rpm:
12/20/06
Gravity Operated Center Punch
I use center punches a lot, particularly as transfer punches. One of the challenges is in wielding the necessary hammer to tap the punch if your hands are already very busy holding proper alignment of about four pieces. I use a little piece of brass lathe stock as a hammer and that helps some. I bought one of the Starrett 18AA center punches that fires itself. I haven't had a chance to use it yet, but you have to push it hard to fire the punch. It is double action, in firearms terms. It would have been so much nicer if there was a way to cock it and then fire it later with a light touch. This would make it easy to leave a punch mark with hands full. Now along comes another solution. I came across this "gravity operated center punch" while trawling the web for something entirely different:
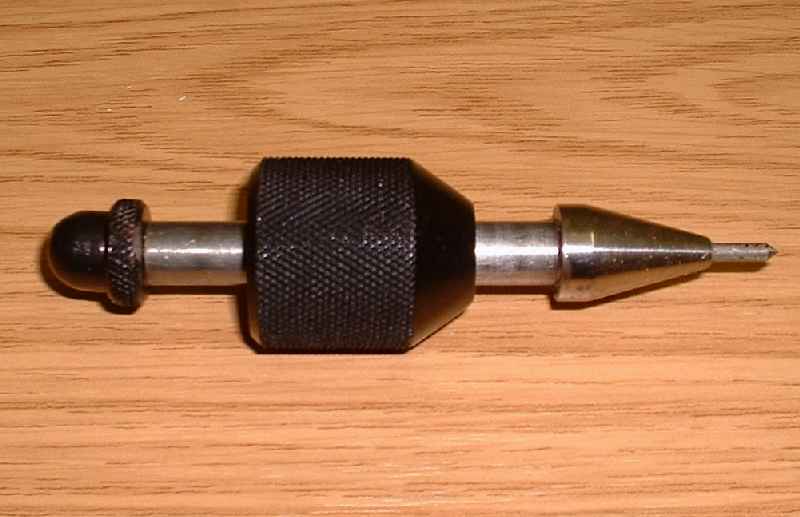
It's kind of like a miniature slide hammer. I might try making one on the lathe, can't be too hard, and just see how I like it.
Another Home Shop Hall of Famer!
My Home Shop Hall of Fame has been a very popular feature of the web site since its inception, and garners a lot of traffic. There's a new shop that I've added that shows what you can do with good organization, great machines, and just a little bit of space. I wish my shop were even one quarter as tidy!
A Monarch 10EE lathe and a Deckel CNC mill: very nice!
Even Faster R8 Toolchanges?
Since building my power drawbar, toolchanges on the mill have gotten a lot faster. One of the last remaining slow steps is lining up the key on the R8 holder with the little key pin that's way up inside the spindle. If you happen to remember which way the one you took out was oriented, you can stick the new one in just about right and off you go. It had occurred to me that one could also put a mark of some kind on the spindle, but you'd have to bend down to find the darned mark.
Now along comes another possibility. It seems a guy had a problem with his pin and wanted to replace it. Low and behold Aaron Moss, who was the man behind IH Mills, pops up and says, don't bother, tool changes will go faster without it. Hot diggidy! So, I read over on the Lathemaster Yahoo Group another fellow is having almost the same kind of trouble. He has figured out that if you extend the quill, a slot is exposed on ZAY mills such that you can access the bolt that acts as a pin without even removing the spindle from the head. Hot diggidy again!
I haven't tried it yet, but if I get bored down in the shop I'm going to crank that quill down and have a look at 'er. Sure sounds like a good idea to me!
I'm a Paid-Up Alibre User...
I hadn't finished my evaluation, but I got one of those "offer ending" soon deals from them to purchase Alibre Design (the parametric CAD program) together with their sheet material layout tool for $495, which seemed a relative bargain. I've been slowly trying to learn Alibre so I can gauge how best to use it. Many people swear it is a far better solution than Rhino for mechanical drawings, but I am so far a lot faster on Rhino. We'll see. If it's a write off, I'll just consider that I've given myself a bit of a Christmas gift that didn't quite pan out.
12/18/06
Got Started Organizing CNC Mill Conversion Pages
After updating my CNC Lathe conversion "To Do" page, and ordering some Igus chain for the lathe project in the process, I got to thinking I ought to start organizing the web pages for my mill. This way I will have a place to put my notes and do my planning for the conversion. I may even start some of the activity a little sooner. For the mill, I want to completely finish the electronics before I tackle the mechanical conversion, though. Once I tear down the mill, I want to be able to assemble it again and be running full CNC without a lot of fooling around. Given that I purchased the IH CNC conversion kit, I am hopeful this is a possibility. We'll see.
Meanwhile there is much planning to do! I leave you with this sketch of how I plan to organize the electronics in the Rittal NEMA enclosure I have for the purpose:
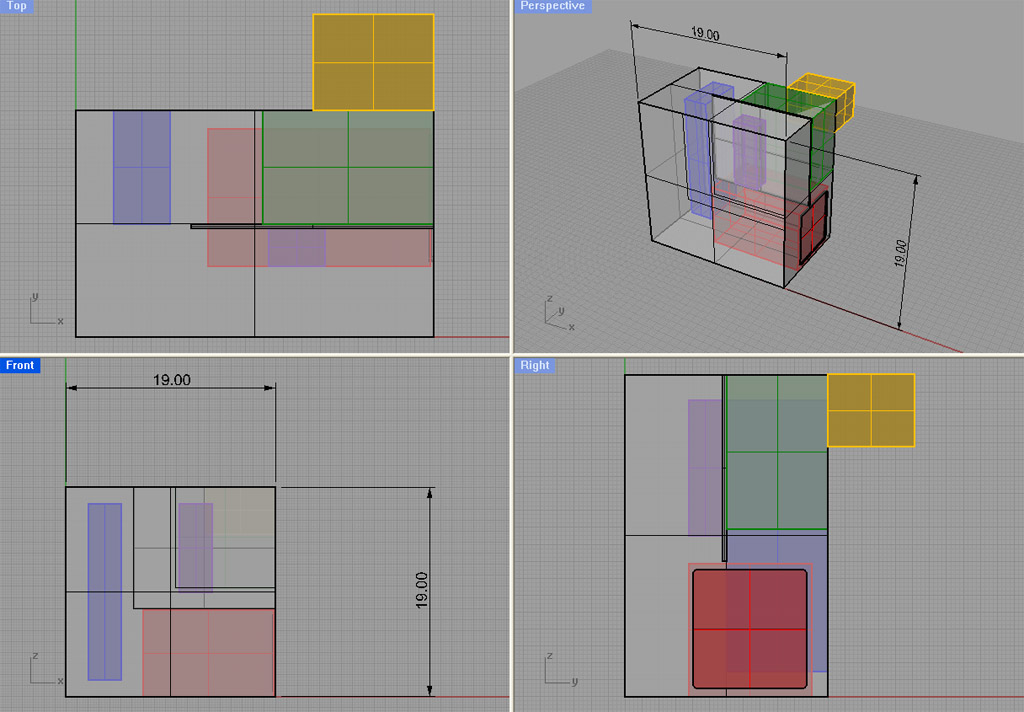
Sketch of the component layout inside the Rittal enclosure for my CNC Mill's electronics. Red: PC, Blue: GeckoDrives mounted on a heat sink, Purple: GRex, Green: DC Power Supply, Gold: Externally Mounted Hitachi VFD
12/17/06
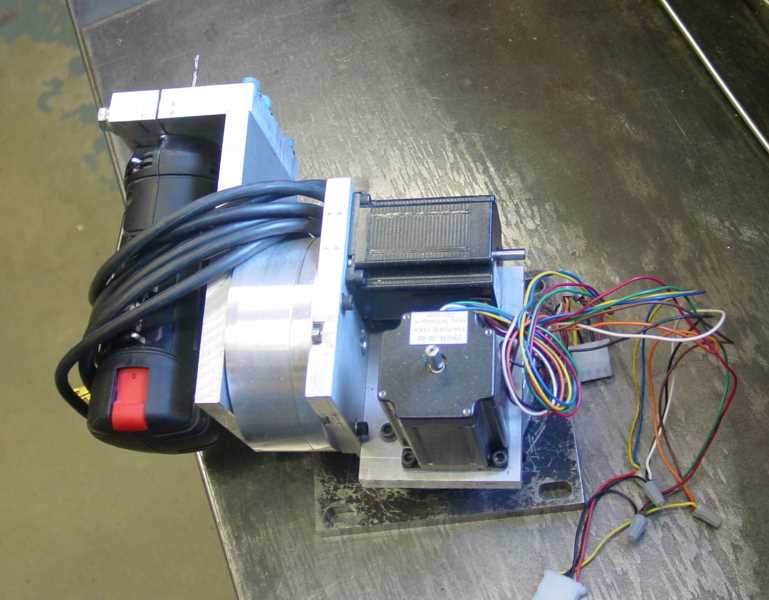
The Powered Drawbar is Done!!! How Did I Live Without It???
Changing tools is suddenly dramatically faster. There is no groping for wrenches or hammer tapping to get the tool out of the taper. Just press "OUT" and the old tool drops into your hand in 2 or 3 seconds. Insert a new tool in the spindle, press "IN", and the tool is torqued down in another 2 or 3 seconds. You gotta love it!
12/15/06
#30 Taper Belt Driven Mill Head Sketch
I've added some sketches on this mill head idea to the Belt Drive page. Here is one example:
NMTB 30 Taper Belt Driven Mill Head...
12/14/06
Alibre Notebook
I am trying to evaluate Alibre Design to see whether its a program I would find useful. Towards that end, I am keeping a notebook of my progress learning the program. Why Alibre? Lots of folks think it is a better solution than Rhino for doing mechanical work, and that Rhino should be reserved for free flowing curves. It is a parametric CAD program like Solidworks (the industry standard), but is reasonably priced like Rhino. In fact, you can download and use Alibre Xpress, the low end version, for free.
New #30 Taper Mill Spindle Came Today!
I got the spindle from Industrial Hobbies and the bearings from McMaster-Carr. Nice combo. The finish on the spindle is nicer than what IH pictures on their web site. Now I'm champing at the bit to turn it into a mill head! Just have to wait until I finish my other projects though. I need to research carefully how the bearings needed to be fitted to both the spindle and the bores in the mill head I will fabricate. The bearings are SKF's, a 7206 and 7207 angular contacts. Their specs indicate a pretty high speed is possible, so hopefully my goal of 6000-8000 rpm will be doable. I should think so in this application which is pretty lightweight.
Building the mill head will largely be a matter of fabricating a box. I need to build a box that will properly house the spindle, bolt to the existing dovetail assembly that the current head bolts to, and that will be nice and rigid. I'm thinking of making it out of some pretty substantial aluminum, perhaps some 1" thick stock or even thicker at top and bottom. I'm thinking of aluminum because it doesn't have the problem of internal stresses moving it after it is machined, so it will stay true. While I'm at it, I think I'll set up this head so it gets trammed in once, and then stays put. There's no need to have a swivel head on a CNC machine, as well as no need for a quill which just reduces the accuracy and rigidity of the head anyway.
By taking this approach, I also avoid having to turn down the shaft of my larger motor to fit the IH gearhead. I can just specify a pulley for the timing belt that fits the motor as is. I've started up a new page to track my notes on the belt driven head. Still lots to research and other projects to finish before I dig in!
12/13/06
A Centering Scope from a Webcam
Here's a nice piece of software to facilitate the project. Mach 3 will also display a webcam image so you can line up, but this software has a lot more clever features around that.
How Much Torque on the Drawbar?
I found myself in a discussion of how much torque might be needed on a drawbar for a mill, and specifically, whether that torque ought to vary based on cutter shank size when using R8 collets. I just crank mine down "tight", but I got curious about whether there was a "right" way to do this. I checked my newfound Bridgeport Mill documentation (see below, I got a CDROM version) and found that Bridgeport makes no recommendation other than to tighten with a wrench the "normal amount." Hmmm. Well, you Google for nearly anything, so I went looking. Sure enough, there is an academic research paper out there that touches heavily on the subject. There conclusion was that more is better where spindle accuracy is concerned. They got appreciable improvement when going from 8 N/m to 26 N/m of torque. That's basically an increase from 6 foot-pounds to 19 foot-pounds. Given that most people's drawbar wrenches are likely less than a foot in length, you could figure that something approaching 20 lbs of pressure on the wrench might be about right.
I'll have to adjust my impact wrench based power drawbar. Seems like its maximum torque of 90 foot pounds would be too much.
Some New Books of Interest
I am a confessed book horder and think nothing of spending far more than I should on the little bundles of wood pulp. I can't help it, there is nothing I like better than to learn something new and a book is typically a lot more satisfying to me than the miles wide but inches deep internet. I would therefore like to report on 5 different tomes, 2 in the actual historically correct wood pulp format, and 3 others in CD-ROM format.
The Clock and Watchmaker's Guide to Gear Making, by Robert D. Porter
This is an absolutely fantastic book in my opinion. It is crammed full of wonderful detail on how to make gears, escapements, and the other essentials needed in clock and watch making. The focus is on work being done on a small (watchmaker's) lathe with a milling attachment. There are several useful tooling projects such as a fixture to cut a precise radius on a form cutting tool that may then be used to produce an involute gear cutter. Full details are provided on these tooling projects as well as how to make involute gear cutters of both the many fluted and fly cutter designs, right down to hardening the cutters before use. Another interesting tooling project is something he calls a "center post distancing tool" which is an aid to precisely positioning the holes needed for the gear axles relative to one another.
In addition to the tooling chapters, there are detailed worksheets that one may use to walk through the calculations needed to machine a specific gear, and there is a full project that involves building a nice looking skeleton clock from scratch. I got my copy of the book by searching for it on Amazon.
Bridgeport Manual Mills, Bridgeport CNC Mills, and Tool & Cutter Grinder Mk4 CD ROM Manuals
I got these CD's from Mary Poppin's Bag, which I believe is frequent HSM poster John Stevenson's wife. I have enjoyed reading through machine tool manuals and gotten quite a lot of knowledge from them. My last experience was a Hardinge publication that taught me a tremendous amount about the 5C collet system. These CD's come filled with Adobe Acrobat copies of the original manuals. Here are some brief remarks on each.
The Tool and Cutter Grinder CD has quite a few different documents, all very useful to one who wants to learn about these complicated little machines. There are manuals for everything from the mighty Cincinnati T&C grinders to the lowly Harbor Freight Deckel knock-off. There is also quite a lot of general information related to grinding in the machine shop ranging from selection of grinding wheels to a chapter on precision grinding from a textbook. Lastly, there is a complete set of plans for the Bonelle T&C grinder, which an HSM could make. It looks like quite a capable machine and one I'll have to research a bit further if I decide to start building a T&C grinder.
On to the Bridgeport Manual Mill CD. These machines and their shameless clones from Asia are so ubiquitous I feel every would-be machinist needs to know something about them. Lots of interesting goodies on this CD including the original Bridgeport patent, drawings for quickchange system sold by Bridgeport, a complete set of maintenance drawings, manuals, accessory catalogs, and more. Excellent stuff!
Lastly in the CD ROM collection, I have the Bridgeport CNC Mills CD. Here you will find manuals for Boss, Series II, and R2E3 machines. These are ideal candidates for a home shop if one can be found whose mechanicals are sound, but with a bad controller. It is a relatively straightforward task to replace the controller with a PC and Mach 3 based controller and thereby restore the machine to full operation. Older CNC mills with bad controllers can be had very cheaply, and are usually not considered as valuable as a manual mill because nobody wants to expense and hassle of a controller refit. The parts haven't been made for years in many cases.
These three CD's are all excellent reference material for an HSM to have around.
The Home Shop Reader's Tip Book
This is book is a compendium of reader's tips from the popular HSM online forums. While the book has many excellent tips, I have to rate it as my least favorite of the choices here. The reason being that it is a good deal shorter than I had envisioned--at about 50 pages it is the length of one of their magazine issues. In addition, I had seen quite a few of the tips presented already. Now the latter is just my personal problem as I am a relentless collector of this information and in fairness it did all start in the bulletin board which I read religiously. I also felt it was a bit tacky to charge book prices for it and then run Grizzly ads. Nevertheless, the tips are quite valuable, and you may wish to acquire a copy for your own library if you like to have such tips at hand.
CNC Cookies
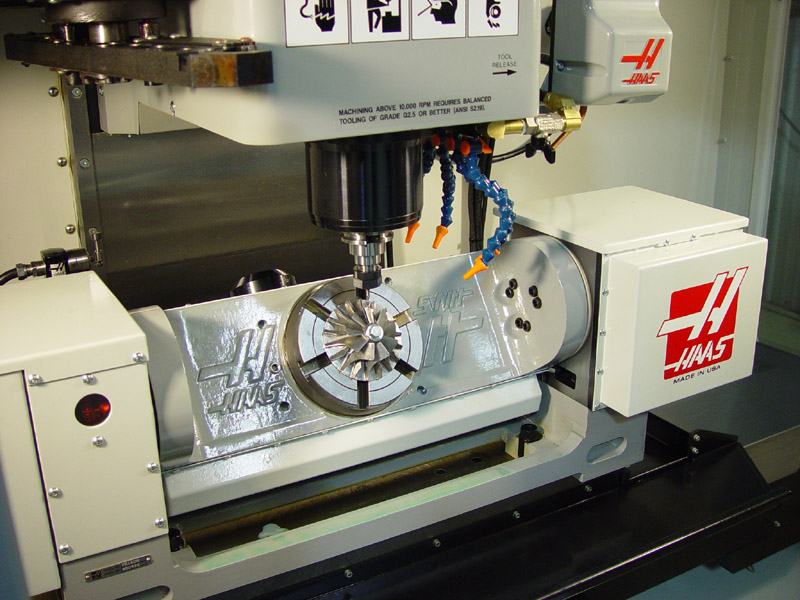
Probably 90% of what home shop machinists make seems to fall in the category of "tooling" or "model engines". I'm always excited to find something completely unrelated to those themes, and this one is a great idea. How about custom CNC logo'd cookies?

One of the things that inspires me about Home Shop CNC is the idea that it puts the power of manufacturing in the hands of the masses. It doesn't take a $40,000 Haas vertical machining center (and many consider Haas to be at the "bargain" end of commercial CNC!) to do interesting work. This fellow has an old Bridgeport mill he converted to CNC doing the work. Great job Vince!
I love to cook, and it would be great fun to be able to apply custom designs like this to the food. It's easy to imagine creating a "Bob's BBQ" branding iron for steaks, or "Kathy's Kookies" cookie mold like Vince has done. I can see something like this going over well for special entertaining events that honor a person, accomplishment, or organization.
Turner's Cubes as Christmas Tree Ornaments
Here's a cool idea I saw recently to create some Christmas ornaments on a CNC mill:
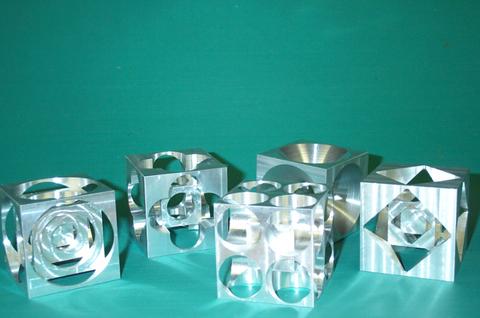
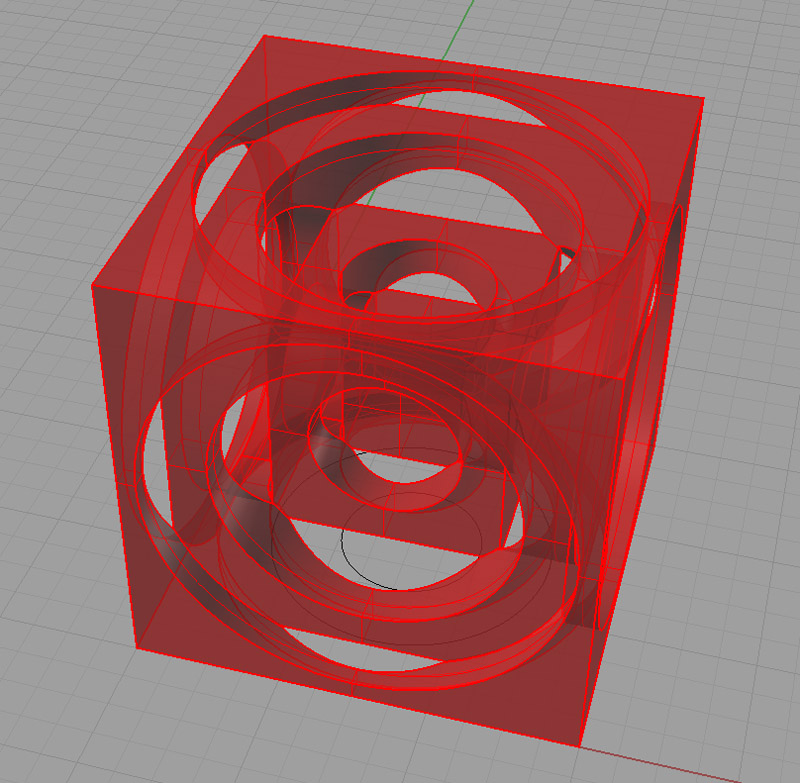
This was the first time I had seen patterns on these cubes other than just the circular style on the left. I decided to try modeling these in Rhino just to get a feel for them. Given a CNC, they shouldn't be hard to make at all, and they're quite unique looking.
The essential geometry is called out by the little red boxes in this drawing:
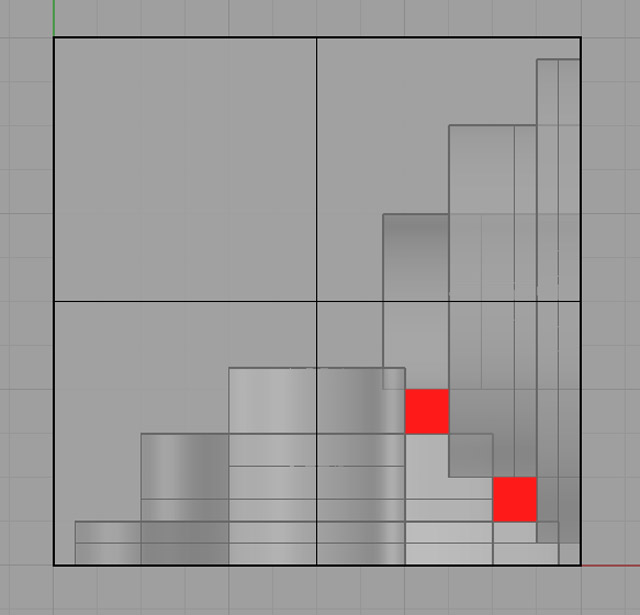
Make sure the hole diamater and depth leave enough material to hold the next nested cube inside...
Here is the finished cube along with some sample dimensions you may find useful in making your own Turner's Cube:
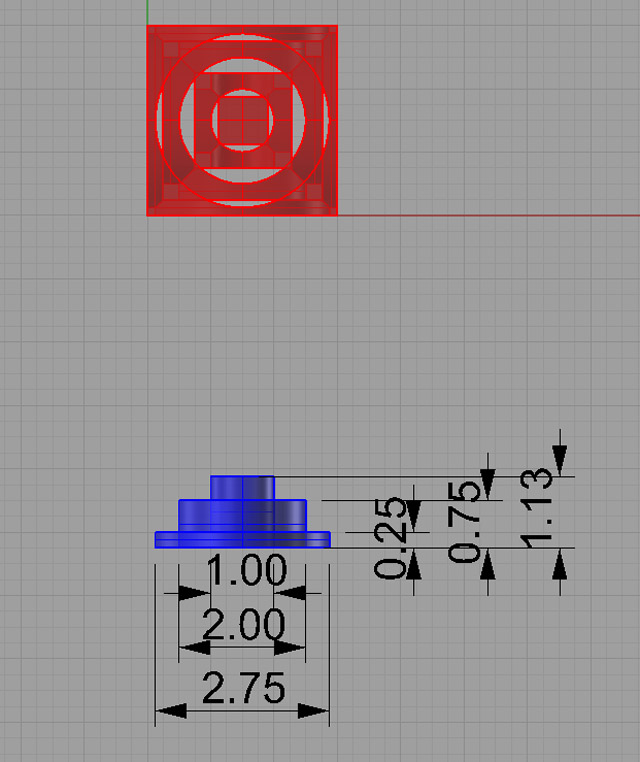
The cube itself is 3" square...
The Turner's Cube is Diabolical!
12/11/06
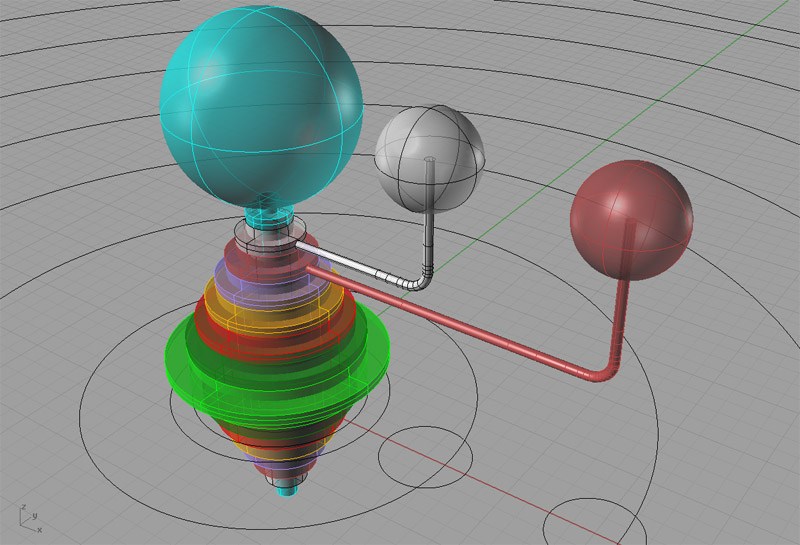
Antikythera Zodiac Sketches
I am continuing to play around with a design for an astronomical clock and did some more sketches. Having done a basic orrery (planet simulator), I designed the baseplate for the orrery, which lays out the Zodiac as well as the months. Here are some of the latest sketches:
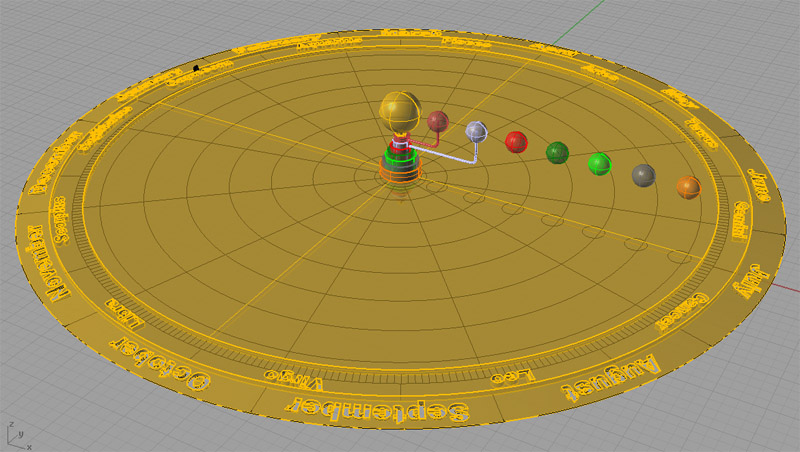
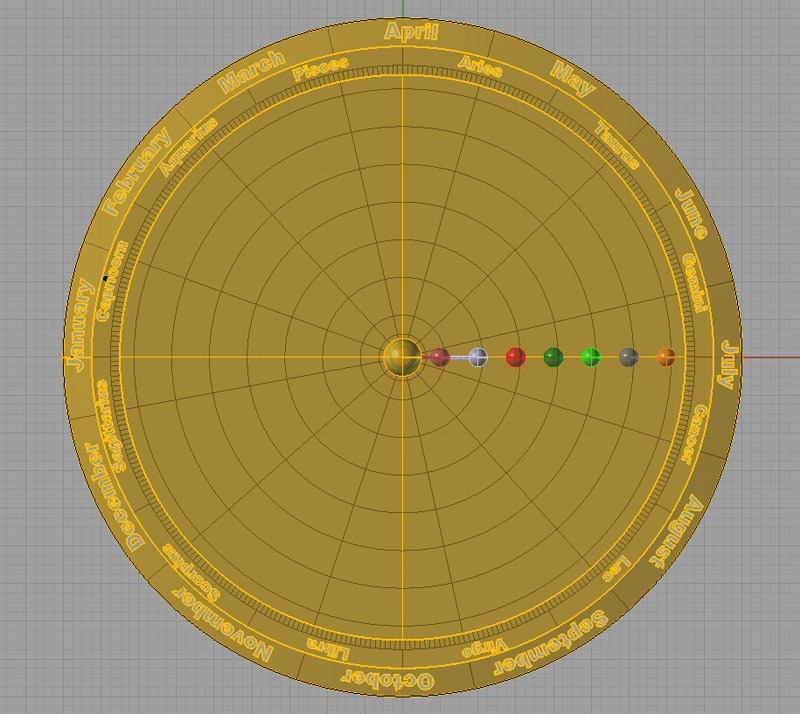
This is still very much a conceptual sketch, and there are some distinct problems with it as it currently stands. I want to create a clockwork that has elements of the new and the old. For example, there is a decided astrological bent in tracking the motions of these heavenly bodies through the Zodiac. This is relatively easy to do with Sun and Moon, but very difficult for the planets, which move in fits and starts across the sky as they lap each other around the Sun.
Because the clockwork needed to simulate planetary motion from an Earth-centric point of view is so hard, I am considering various ways to "cheat". Doing it right means simulating the epicycles popular in Ptolemaic astronomy of the Ancient Greeks. Each planet must not only circle the Earth, but also travels in a smaller circle as well. My idea to cheat is to combine the more modern orrery, which is a more accurate simulation of planets circling the sun, with a couple of additional dials or even bodies that will circle the center but represent the position of the Sun and Moon against the Zodiac. To obtain the position of a planet in the Zodiac, will require sighting from the Earth to the planet and extending that line to the Zodiac to see where it lands. The Sun and Moon will be read directly.
I don't know yet whether I like that approach, or whether I'll try something else, but I'm going to draw it out a bit and think about it.
A couple of other features of the drawings above. First, the smallest hash marks represent days as measured by the Egyptian calendar. This calendar simply divides the year into 365 equal length days and dispenses with the idea of a leap year, thus simplifying the clockwork considerably. The Sun Signs of the Zodiac are overlaid against the days in their proper positions along with the modern calendar's divisions into months. Note that things will be off a year every so often relative to the modern month, but the heavenly positions will be correct according to the Egyptian calendar's days. Given that the whole thing will be about 15-20" in diameter, it will be plenty close enough to be interesting and accurate to naked eye precision.
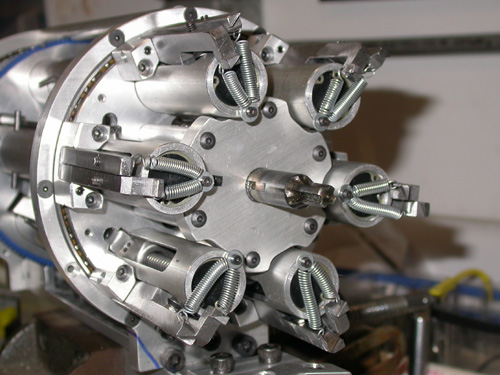
NMTB 30 Spindle for the IH Mill!
Industrial Hobbies is having a going out of business sale, and one of the things they are offering is an ISO 30 or NMTB 30 spindle for the IH Mill. At $65, how could I resist? This is a better spindle taper than the classic Bridgeport R8, and is really the preferred taper for building a toolchanger for this mill. Aaron also recommended a set of angular contact bearings from McMaster-Carr that cost another $100, so I ordered those too. What I'd really like to do is take these goodies and create a belt driven head for my mill that's capable of higher rpm's than the current geared head. The more rpm's the merrier so far as I am concerned. I can always use a VFD to cut down on the rpm's if need be.
Anyway, this will be one of those very long term projects. I had to act now to get my hands on one as they were in limited supply and he is going out of business. We'll see what comes of it.
NMTB 30 vs R8 Comparison of Scale...
12/09/06
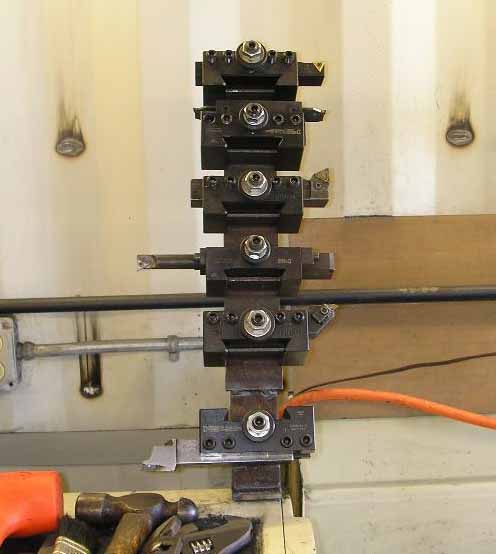
R8 Quick Change Tooling Systems
While reorganizing my list of individual sites, I recently came across Jeff Albro's list of quick change tooling systems suitable for small mills. As you know if you've been reading along, I am currently working on a powered drawbar for my mill, which is another approach to being able to change tools rapidly in the mill. One system really suited my fancy, and that is the Mach-1 tooling system. These guys had the bright idea to just add a retention knob to an R8 shank and supply the appropriate "grabber" mechanism in place of the old threaded drawbar. I love this idea!
Seems like something an enterprising HSM could make for themselves. Given the ability to make more retention knobs and thread them into off-the-shelf R8 tooling, it would give you immediate access to the huge array of Bridgeport compatible tooling at low cost together with this great way of quickly swapping tools.
I'll have to look at this again at a later date. For now, I am almost done with the powered drawbar and will use it for awhile to see how I like it.
12/08/06
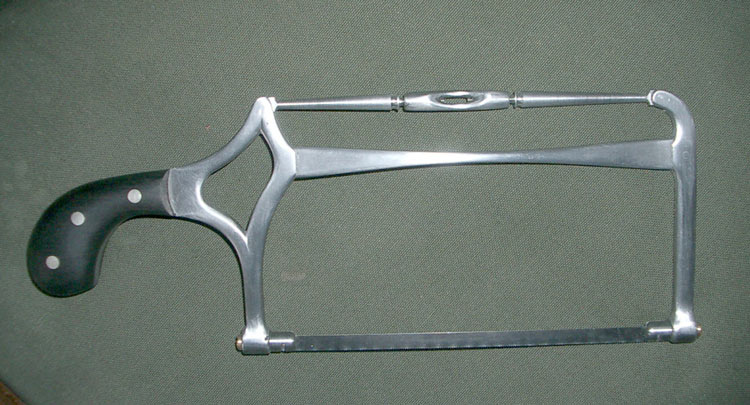
Handmade Hacksaw
Here's a real nice project a fellow made in his shop:
12/07/06
Think CNC Mill!
I'm thinking a little bit about my CNC Mill conversion these days. I ordered a 1 KVA toroidal transformer to build the power supply from Antek on eBay. This is the same guy I purchased my rack mount chassis for the CNC Lathe from. I'll be building the mill driver electronics in a larger enclosure. I've got some NEMA-style boxes I got a deal on, and one of those should work well. My order of projects at the moment is Powered Drawbar, CNC Lathe, and then I want to get going on the mill CNC conversion. Since I bought Aaron's kit, I am hopeful it won't take nearly so long as the lathe has. I've also learned a lot that I think will enable me to move faster.
Design & Manufacturing Techniques
I started a series of pages to keep a notebook of tips to save time and reduce costs in manufacturing.
12/06/06
Some Antikythera "Antics"
I did some more design work on my astronomical clock and made a few new doodles, such as this orrery mechanism:
Man, I would just love to be able to pop some brass stock into my CNC Lathe and have those nested hubs pop out perfectly finished and sized with minimal effort!
11/30/06
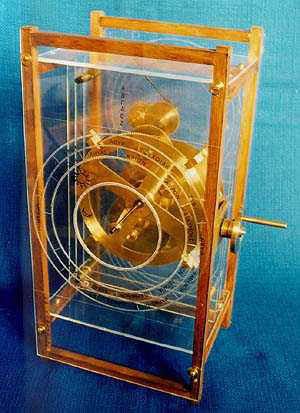
The Antikythera Mechanism
The Antikythera Mechanism is unique ancient orrery-like device; the oldest of its kind. I'd like to build something like it one day. It is essentially a clock, but far more interesting than most clocks one sees.
CNC Soccer Ball?
This was an interesting and unusual piece of work I came across. Apparently it was done for some sort of government contract:

Amazing, and nicely gold plated as well. Got to love those black budgets!
More EFI Manifolds...
I describe the 351C EFI manifold I sketched out below. Recently, I came across a fellow who is doing something similar for a BMW V8. Very cool!
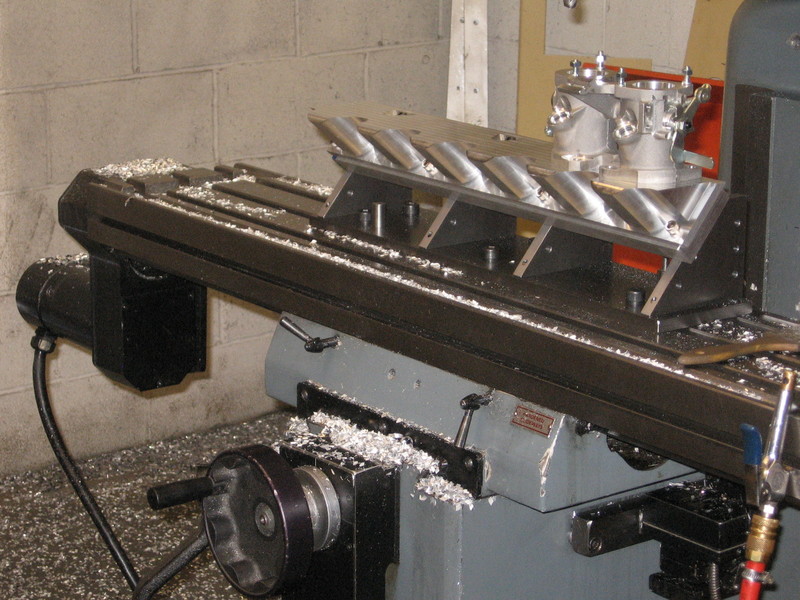
Angle milling fixture is interesting. He's gone to a lot more trouble to carve out the aluminum that isn't doing anything.
Here they are installed on a block...
11/26/06
Gunsmithing Tools for Machinists
While I was recently in San Francisco I came across a book I hadn't seen before that is quite good called Gunsmithing Made Easy by Bryce Towsley. Lots of pictures and the projects are interesting. The thing I liked best about it though were the tool ideas it contained. I went searching on the web for some of these tools and immediately came upon MidwayUSA, which appears to have much better prices than the old standby of gunsmiths, Brownells. Much of what I was looking for was priced better than Brownell's at list and even more interesting, a lot of it was also on sale. Here are some of the interesting things I purchased:
| Starret Automatic Center Punch: Readily available elsewhere, but I got sold on one reading the book, and MidwayUSA has them. |
| Wheeler Engineering Professional Gunsmith Screwdrivers: Much has been written about screwdrivers for gunsmiths. Suffice it to say they are very particular and don't want to strip a bolt or mar the finish of the gun they're working on. These special screwdrivers are supposed to be a big improvement over the average mechanic's style screwdriver and I had to try them. |
| Forster Gunsmithing Screw Assortment: I never have enough hardware! |
| Forster Swiv-O-Ling Vise: A cool looking little vise for working on small parts. |
| Wheeler Engineering Torque Wrench Screwdriver: Another odd gadget the book sold me on--a torque wrench for driving screws to precise torque settings. |
Highly recommended!
Still Trying Out CAD/CAM Software
As you may know, I use Rhino 3D quite a lot and I own a copy of OneCNC for CAM as well. Every now and again, I get frustrated with what I've got and want to see how green the grass is on the other side of the fence. Recently, Rhino was giving me fits with "naked edges" and other surface modeling complexities I could well live without, so I undertook the free trial of Alibre Design to see whether it would be any easier. So far, the answer is negative, but I haven't really gotten too far. I wanted to just recreate the fuel injection manifold I did in Rhino 3D as a test. The trouble is, so far Alibre is only operating as Alibre Xpress and not Alibre Design, so I only have 2.5D capabilities and can't draw the manifold. I did a little work with it, and feel I would like the parameteric aspects. I am hoping to get the trial version of Alibre Design to work, but its going to take a support call, I just know it.
While I was at it, I downloaded the demo version of Visual Mill. You can't post anything, but you can at least look at toolpaths and see what it would be like to live with this CAM program. From what I have seen so far, I quite like Visual Mill. I find it a touch more intuitive than OneCNC, but so far I haven't done much with it either, so it is premature to reach a conclusion.
One thing that is certain about these CAM programs, or at least both OneCNC and Visual Mill: they don't think about the problem the way I do! For me, I draw a finished solid model in Rhino 3D and then want to just push a button and profile out the model to look like what I've drawn. Most of the time the CAM program doesn't even want to look at it. It errors out with cryptic messages like "not all regions level in Z" or worse. I find that the solid model is too much information for these programs. They'd be happier with just a simple surface. If you are fooling with one, think about breaking things down to that level.
One problem with that if you are a Rhino user is that you will tend to discard what you think of as intermediate "scratch" objects, and it is those objects that the CAM program prefers to see. The curves you extrude are pretty crucial to have around. More work needed to be definitive here. I need to get my mill CNC'd so I can try out the results too.
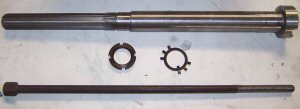
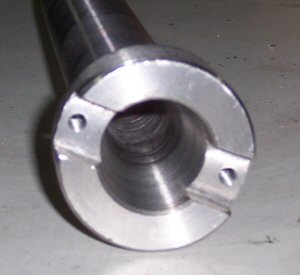
Mill Centering Device
A fellow over on the Home Shop Machinist board just post some pictures of his simple mill centering device. I use something similar I call a "positioning spud". The advantage of his is the stepped design lets you insert it into almost any sized collet or mill holder conveniently:

Stepped Shaft Mill Centering Device...
I like his design, although I don't think I'll need one like his. If my Powered Drawbar project goes according to plan, it will be so easy to swap tools in the R8 spindle that I'll just keep my spud in a mill holder ready to go at all times and use the powered drawbar to quickly effect a swap.
Industrial Hobbies is Closing its Doors
I returned from a weekend in San Francisco this Thanksgiving week to discover this sad news. As you know if you've been following my exploits, I really like my Industrial Hobbies mill. I have purchased the CNC conversion kit from Aaron, though I haven't yet installed it. Now I am receiving the sad news that he plans to shut down. I don't really know what to say about this, but I am disappointed. Aaron says he's doing it because he can't compete with the Chinese imports, which specifically means Tormach mills. I certainly plan to keep plugging away with my mill, but it's a shame to see it. There will, of couse, be other manufacturers with similar mills, so parts won't be a problem. It is, after all, just another ZAY mill, and companies like Lathemaster are importing them constantly.
11/24/06
Hardinge DV-59 for CNC Conversion?
A fellow over on Practical Machinist (some would say "THE" fellow, but I digress) recently asked what these lathes were good for as they have no leadscrew and hence no power feed. They're extremely well made, and fairly abundant in the used machine marketplace. Given that one would replace the leadscrew with a ballscrew, perhaps they're a good CNC conversion candidate, especially with an Accuslide-style gang tool setup.
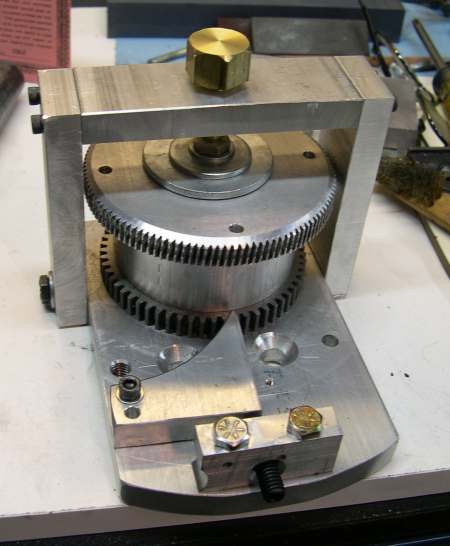
Clever Idea: Gear Indexing Jig
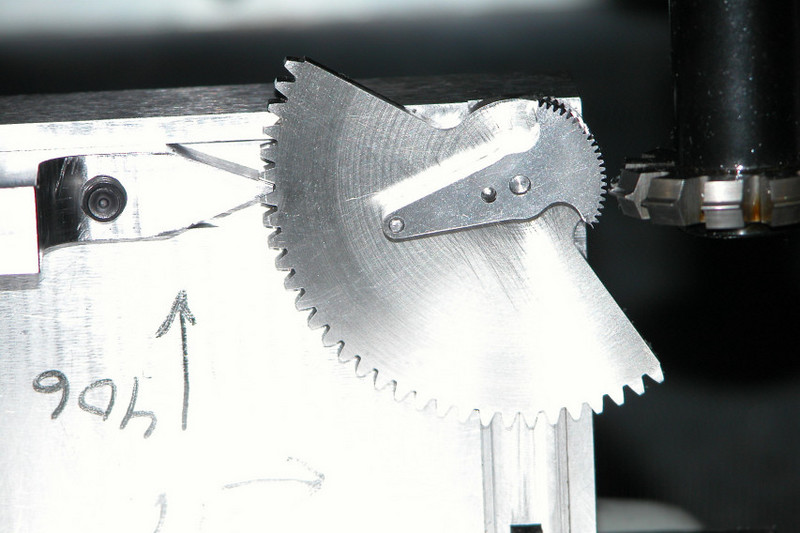
I thought this one was really slick. This fellow needed to cut some gear teeth into a part, but apparently only a sector, not all the way around. He made this little jig to assist:
Another fellow noted that this holds the key to fixing bad teeth in a gear. Weld them up, and then index off the good teeth on the other side of the gear.
11/22/06
Power Feed Mode in Mach 3
I recently suggested a new feature for Mach 3 that I call "Power Feed Mode." I don't know if Art will go for it or not, but let me explain the gist of it here.
As you may know, I've recently gotten a power feed attachment working for my IH Mill. I've really enjoyed using it, and it has added a lot to the mill. I've always been interested in conversational CNC, which is the ability to make the machine perform without having to write a complex g-code program beforehand. There's always times when you need a little one off machine operation, and it often seems easier to throw the part into a manual machine than deal with CNC. Many commercial shops keep at least a manual lathe and often a mill too for just such occassions. One constantly hears CNC newcomers asking how they can keep the handwheels on their machine.
The thing is, having gotten used to my power feed, it would be so easy to make manual machinists comfortable on a CNC machine if it had a user interface similar to the power feed. A manual mill power feed is a simple device. It has a lever to control direction that keeps driving the feed in that direction until you switch the lever back to stop or hit the limit switch. There is a knob that controls the speed the axis moves as well as a button to override the knob's current setting and move at maximum speed to do what the CNC'ers call "jogging".
Now imagine a power feed mode in Mach 3. In addition to the Manual and Automatic screens, there would be a Power Feed screen. On it would be:
- DRO's w/ Zeroing
- Jog: Can keep the current jog control, or just put a "jog" button onto the power feed control.
- Power Feed: Looks just like the jog control but keeps a power feed feedrate parameter.
- Feed override: Varies the power feed feedrate.
- Soft Limits: This is a feature not found in manual mills that would be very handy. The soft limit should allow the power feed to stop and start at an exact location.
- Peck Drill Function: Another thing not found in manual settings. Set a depth and hit the peck function and you get a peck cycle at the power feed feedrate.
I think this kind of thing would be hugely valuable to Mach 3 users, and would serve as an easy way for the manual machining community to get into CNC while being highly productive at every step of the way. Why would you need a manual mill or lathe if you had this functionality in Mach 3?
11/18/06
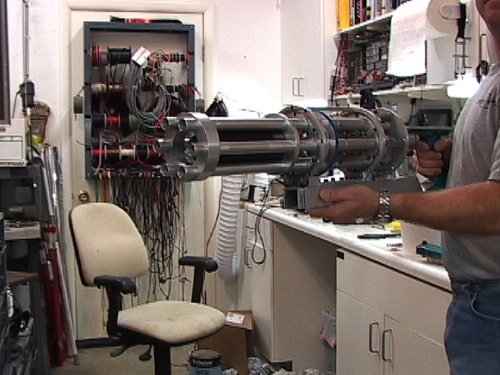
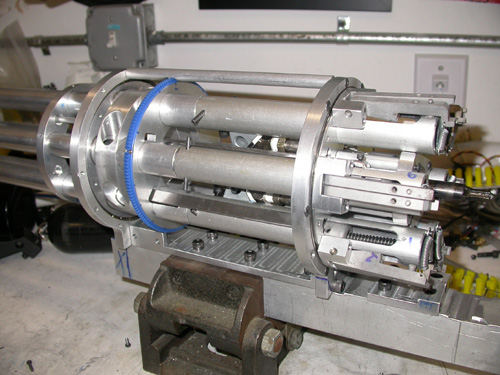
A Paintball Minigun?!??
Awesome! There's a video of it firing on his site too.
Light At The End Of The GRex Tunnel
From the posts on the Yahoo Message Board for Mach, it looks like there is a lot more interest in GRex brewing. One fellow completely echoes my sentiments on the real advantage of the GRex when he says, " It was a complete JOY to toss out my 2 parallel ports and replace those connections with 1 eithernet cable." Amen, brother!
The GRex's real advantage is the ease of interface with the PC coupled with the huge amount of I/O capacity it provides right out of the box. You can eliminate 2 parallel ports and a ModIO card. My CNC Lathe control panel would be a real pain without GRex's huge I/O capacity.
In addition to all the, GRex provides much higher bandwidth and potentially much higher performance. It can simply handle a lot more pulses than Mach 3 can deal with on a parallel port. This makes for much faster and smoother motion. According to some accounts, the GRex is capable of driving the same stepper motors to higher speeds because the pulse train is so much cleaner than what comes over a parallel port.
The are a few real issues with GRex at the moment. The Mach 3 + GRex combination is experimental according to Art, and is not really a finished work. Documentation is scant to non-existent. Features such as threading on the lathe that work fine with Mach and a parallel port are not yet enabled with GRex. The GRex itself is undergoing some updates and revisions. Let's hope all the additional activity on these boards will spur Art and Mariss to finish the job and make GRex a first class CNC solution with Mach 3.
11/17/06
Polygon Turning???
This is a wild technique I learned about just today. Using a lathe and live tooling, it is possible to cut polygonal flats on the workpiece while it is spinning in the spindle. Makes no sense, right? Well, here is a little animation that gives a simplified view of how it works:
http://video.google.com/videoplay?docid=-7831550688320827327
Making this trick work seems to be a function of synchronizing the cutter's speed to some ratio of the spindle's, and then using the right kind of magic cutter to pull it off. Polygon milling heads seem to have 1, 2, or 3 inserts evenly spaced on a pretty large diameter. So, refering back to the animation, the idea is that the cutter has to take a full pass on the length of the flat (which will be slightly concave), and then the next flat has to be positioned before the next cutter is tee'd up.
Let's say we have a 3" diameter cutter with 3 inserts, and we want to cut a hex on a 1/2" shaft. The distance around the circumference of the cutter between inserts needs to be traveled in the same time that the spindle travels the distance between two flats. For this example, the cutter has to travel 1/3 of its circumference in the same time that the spindle travels 1/6 of it's circumference, or the cutter must travel 2 times faster than the spindle in this example. The two have to be precisely synchronized, much as in cutting threads.
One insert and a 2:1 speed ratio gives you 2 flats on the cylinder. 2 inserts mounted 180 degrees apart gives you a square at 2:1. 3 inserts and 2:1 gives you a hexagon.
Polygon Turning, also called Polygon Milling, is faster than indexing the spindle for conventional milling, and also produces a better surface finish.
Very cool stuff!
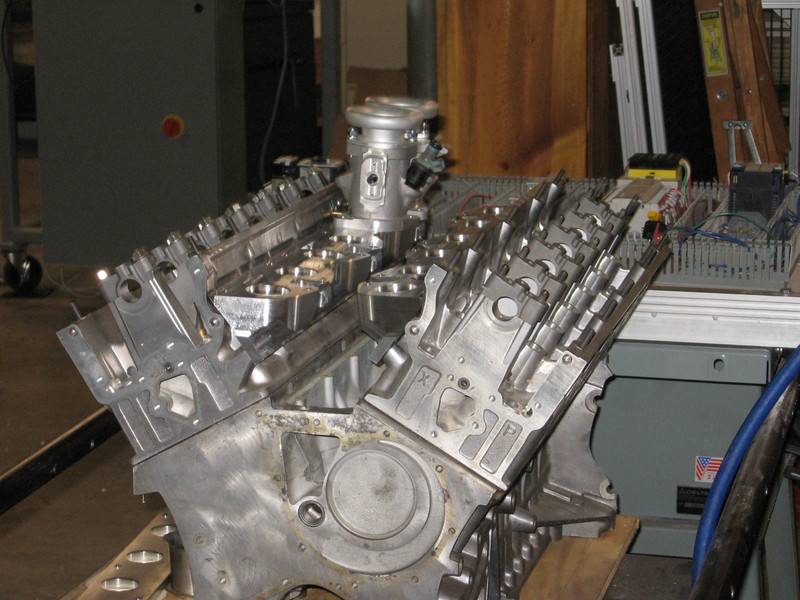
Ford 351 Cleveland Electronic Fuel Injection
Someday, I want to create a complete fuel injection system for one of my engines. It will either be one for my 427 side oiler in my Cobra, or one for the 351C I'm building for my Hot Rod. I did some doodles in Rhino to see how one might work:
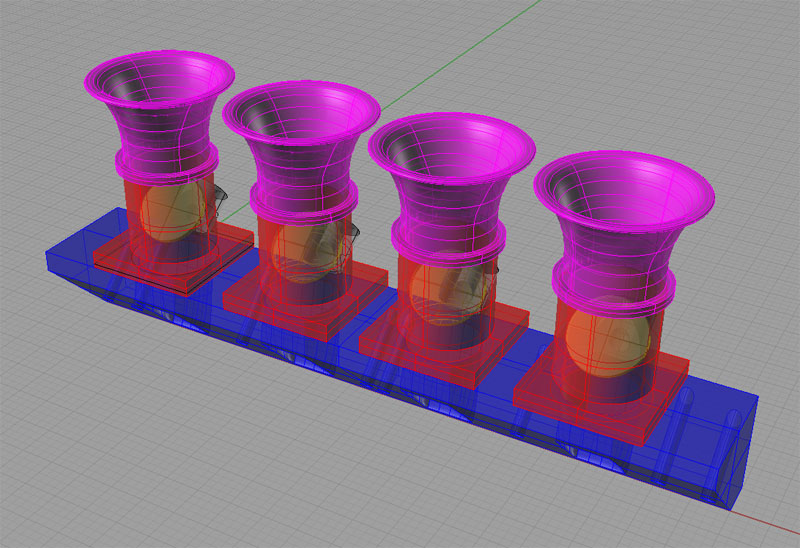
Whoa! That's a Bad Mamma Jamma!
11/13/06
Playing With Blocks (2-4-6 Blocks, That Is)
I always look carefully when an experienced machinist is showing how he has done something. Here is the Fidgiting Widgitmaster showing how he squared a 6" x 6" plate in his vise using 2-4-6 blocks to lend support (they stick up out of the vise pretty far otherwise):
Squaring a plate in the vise with the aid of some 2-4-6 blocks for support...
Made we want to go buy a set of 2-4-6 blocks, although they sure aren't cheap!
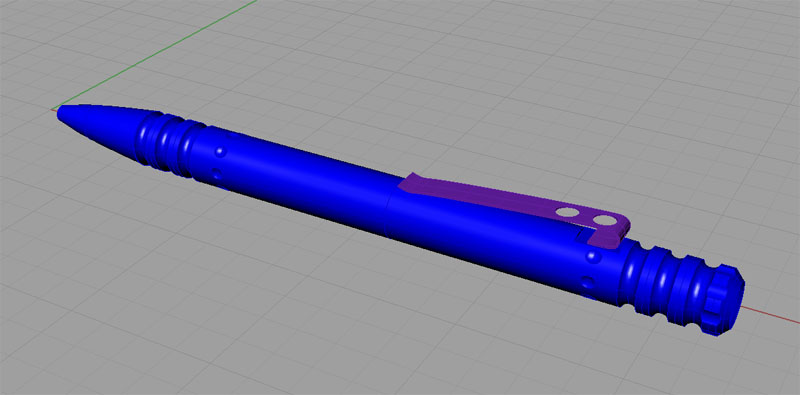
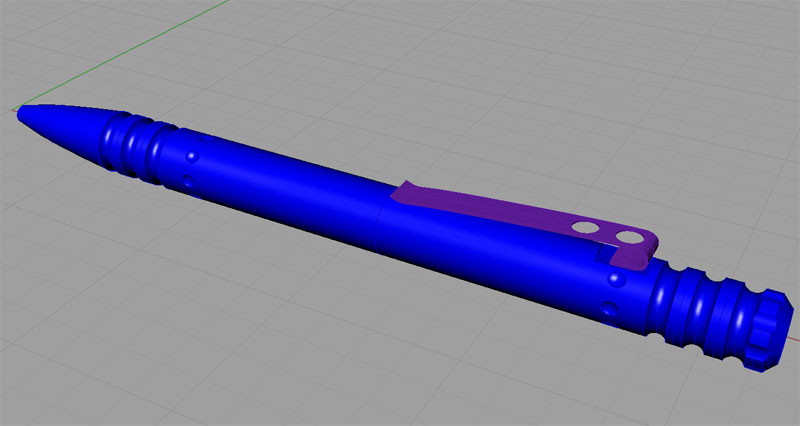
A High Tech Pen
Here is a little doodle of a pen I did in Rhino 3D. I think it would make a good beginner's CNC project for my CNC Lathe once I get it up and running.
11/11/06
A Backyard Monorail!?!!
How cool is this, a backyard monorail!
An ambitious project, but really neat.
The Tech Shop: A Health Club for Machinery Geeks
The Tech Shop is a very cool idea, and one I hope we might see more of. It's a facility set up for members like a health club where you can gain access to all the things everyone in this hobby (and several others) loves--milling machines, lathes, blacksmithing, lost wax casting, etc., etc. In addition, they offer classes to train you how to use all these fun toys.
I think there is a mini-trend in more exotic do-it-yourself that could just turn into a megatrend. Look at how successful the new Make magazine has been. I'm interested in the whole home shop CNC phenomenon, and it is amazing what level of quality and capability one can produce in one's own garage with a little ingenuity. There is a book out called Fab by some MIT folks. They're working on a project to see what the minimum set of tools and skills is that would allow a third world village to produce virtually anything it might need.
The idea here is that mechanical fabrication may go the same route that silicon fabrication has gone--all the value is in the ideas, not the factories. The factories are hugely expensive, but completely generic in capability, and they will produce whatever the widget is at the absolute lowest cost, with lower costs every year ala the "Moore" cycle. Why can't this be possible for mechanical creations just as it is for silicon? CNC and lower cost CAM software will make it possible for more people to do what used to take highly skilled machinists with millions of dollars of aerospace quality CNC to do.
There are two enablers necessary to make this happen. First, it has to be easier for someone to do. The key here is making CNC easy. Mach 3 is a great step, but we also have to make programming G-Codes easier. That means great inexpensive CAM software. There is a competitive war brewing at the low end of the CAM world that might just make that happen. We've already seen tremendous reductions in the cost of CAM, but it needs to go lower still. We need the Mach 3 equivalent at a price under $1000 and a very easy to use interface. It's possible the existing players will get there, but it is also possible some sort of Open Source project could do it too, similar to the EMC project, but hopefully not on Linux.
Second, it has to be cheap enough for broad adoption. There are two paths to this. First, the tools themselves keep getting cheaper. Look at the Tormach mill, for an example of an inexpensive (by CNC standards) ready to go CNC mill. KDN Tools has a $3000 mini CNC mill that looks like a great step towards the even lower cost end of the spectrum. Who will be first to break the $2000 barrier with a ready to run small mill, perhaps based on the Sieg?
A second path will be neighborhood collectives like The Tech Shop. Imagine being able to purchase a membership like a health club at a nearby facility that has Haas, Hurco, and other brand new CNC machines. These are machines of tremendous capability that most hobbyists could not purchase on their own. Let's say the same facility also has a room with PC's all set up running Solidworks and one of the easy to use CAM software packages. Again, we are talking thousands of dollars and more than most hobbyists can touch. Now add classes and folks working there full time to show you how to work the stuff and help you with problems. Suddenly, anyone would be able to work on a fun project for their own use or even a prototype of a new product for a business they're trying to start up.
If you are really more into the design than the machinery, you might have the CAD stuff at home, and carry your disk into the club to run it through CAM and then onto the Haas to make the part. Think about that. You could spend what it costs for a SolidWorks (or your other favorite CAD program) plus the club membership, and be making parts with professional machine shop capabilities without having to spend what it costs for even one decent machine tool. Pretty cool!
Community colleges that have appropriate programs should add a "Machine Club" offering. It will drive more traffic through their classes as well as raise more money to expand the programs. Local machine shops should back these kinds of activities by offering machines they intended to be rid of, expertise, and lastly offering to manufacture any prototypes produced in quantity. It's a source of business and networking, and these hobbyists are in no way a competitive threat.
Cooperative programs like these can really change the playing field and slow down or reverse the steady trend to do it all overseas.
11/10/06
Got a Note from Peter Homann of Homann Designs
Peter is a very sharp guy and makes some great products, especially the ModIO board that lets you augment a parallel breakout board so it can have some real I/O capability. He's coming out with a little board that will be essential to my GRex lathe project. It is basically something you can put between the GRex analog output (0-5V) and a VFD or other motor controller in order to let Mach 3 control your spindle speed. I'll be watching it closely!
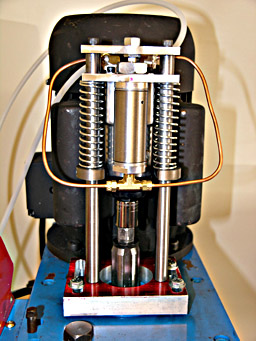
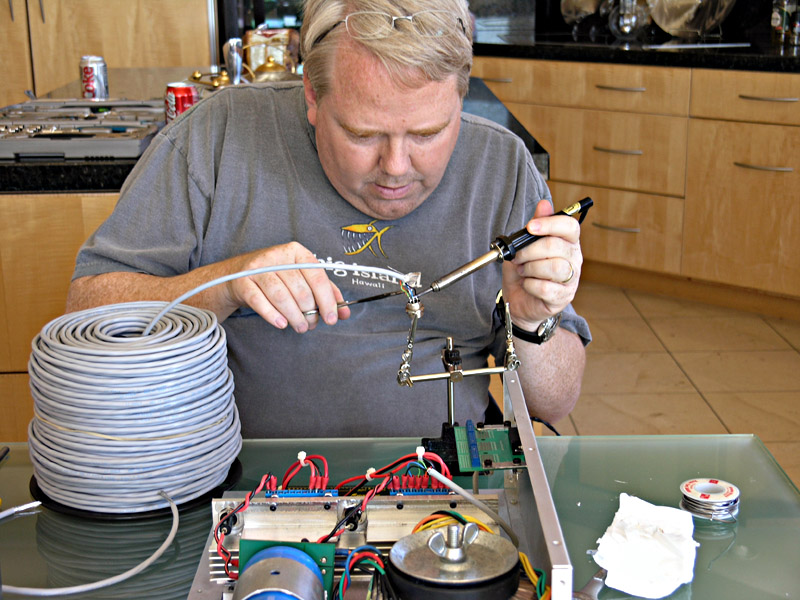
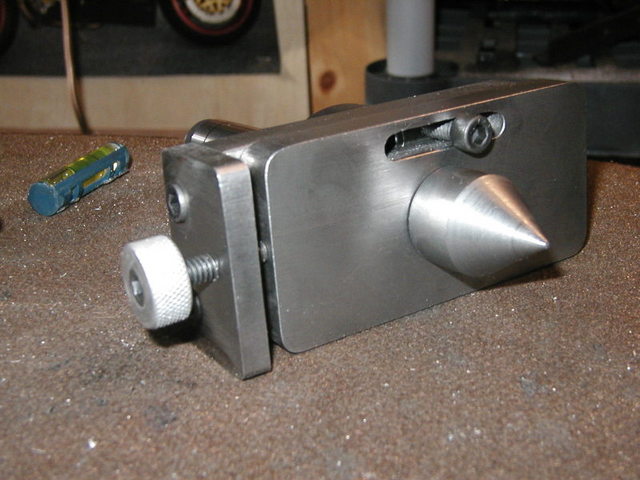
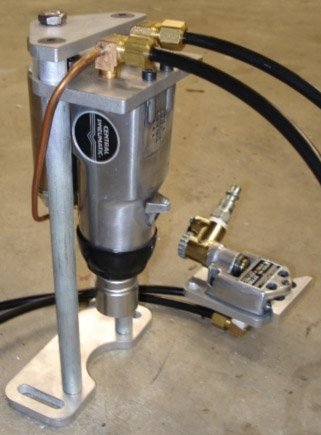
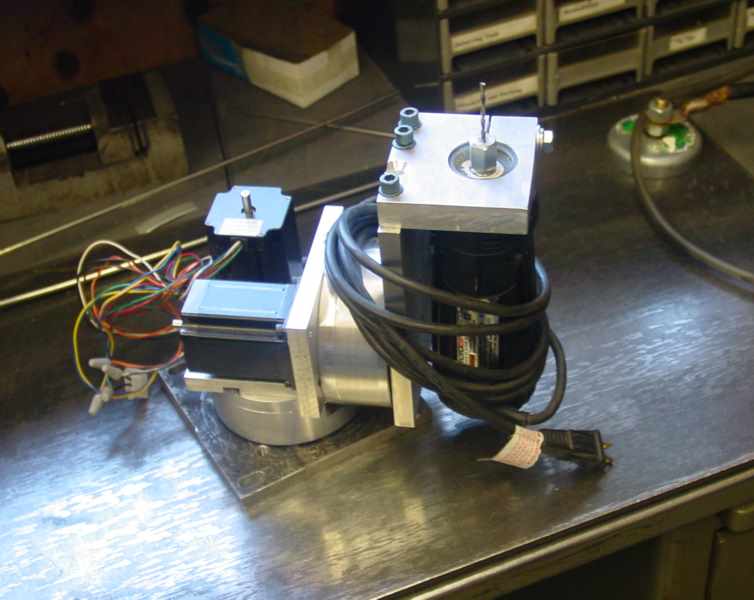
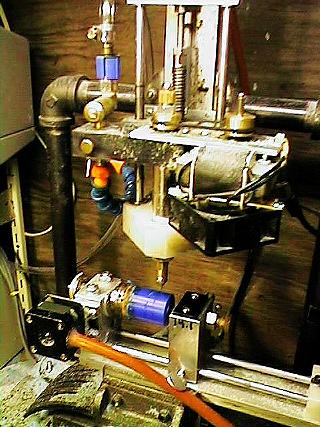
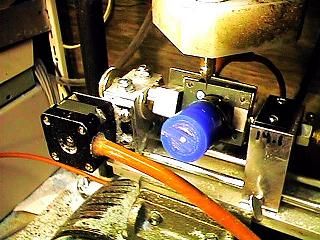
Build a Powered Drawbar
I keep a lot of projects going, if you hadn't guessed. It alleviates boredom, allows me to always have some quick and easy if I don't have much time available in the shop, and is generally fun. I was quite excited to spin motors on the GRex, but now I have a lot of work to do to harden the chassis so it can survive down in the shop with metal chips flying everywhere, and I wanted something I could finish a little faster. Besides which, I got a couple of packages in the mail:
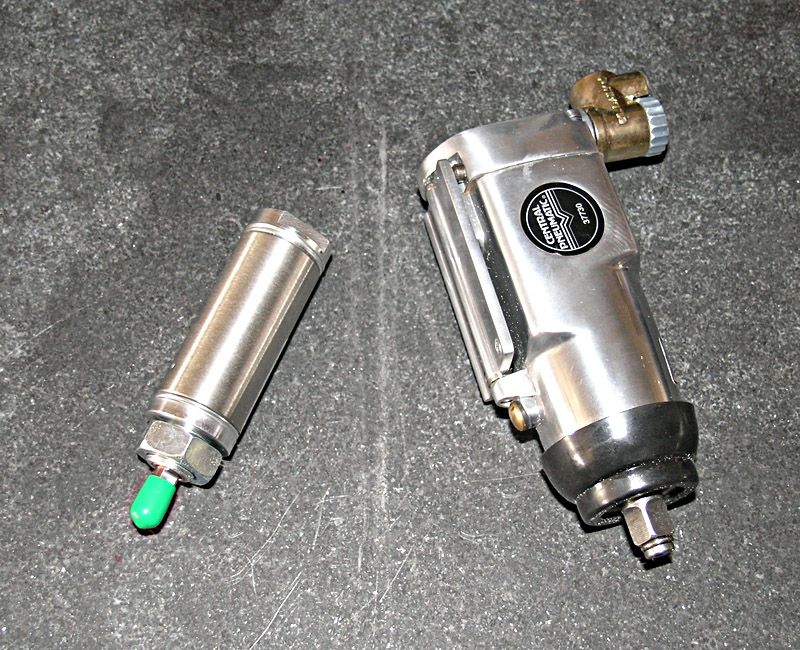
The guts of the powered drawbar: air cylinder and impact wrench...
I can already tell I'm going to like this thing a lot. I dragged my 3/8" air ratchet into the shop with a 16mm socket on it and I've been using that on the drawbar. Even just doing that by hand makes changing tools go a lot faster. Having a purpose-built powered drawbar should be even better. Check out the article and follow along. It is far from done as I write this, but I am making steady progress!
BTW, I am getting a lot of use out of my X-axis power feed already working on the drawbar project. That was an extremely beneficial project. I love those projects that suddenly make nearly all operations on a machine dramatically more efficient. Probably the best example on my lathe was adding a quick change toolpost.
11/06/06
GRex is Spinning Motors!
Somewhat mindlessly, I will admit, but I have the prototype driver electronics chassis sitting on my desk and connected to two stepper motors for the X and Z axes of my lathe. Mach 3 will talk happily to this Frankenstein contraption and the motors spin merrilly along!
The path to reach this stage has been a lot of work, but I must say it has also been remarkably straightforward and predictable. There were only two points so far where I've had any troubleshooting to do. First was getting Mach 3 to "talk" to the GRex over a LAN connection. That wasn't too bad, the clue was in Art's video tutorial introduction to using Mach 3 with the GRex. I ran the GRex Firmware Loader and found that while it detected the GRex, it could not communicate with it. The clue was that the IP address it discovered the GRex on was just too different than what my own computer was running. For technical reasons, that presented a problem. I manually reset the GRex's address to an open IP address I found using the "ping" command and simply incrementing the address of my computer until I found an opening. Suddenly, all was right between Mach 3 and GRex. Excellent!
At that point, I flipped over to jog mode and was able to job one axis quite handle, but the other would just sort of rumble. Clearly a wiring issue. I ohmed it out with my multimeter and sure enough didn't have it quite right. By reversing two connections from the Gecko drive to the motor cable, I was now able to job both axes. Soon tiring of that, I got into Mach's motor tuning menus and maxed out the acceleration and velocity while setting things to the equivalent of a direct driven 16 TPI leadscrew on both axes. At max jog, the system thinks it is doing 100 inches per minute!
I wanted to calculate how many rpm those step motors were turning, and this took a bit of doing, but it comes out to around 1500 rpm. I have to believe it will be difficult or impossible to move the machine at anything like these maximized results because the motors are running without any load on them at all. Still, it is greatly entertaining to watch them spinning their little hearts out on command!
The smaller of the two motors gets pretty hot rapidly. Remember, a step motor has current running to it even when it is at a standstill, so they will rapidly reach their operating temperature and stay there once powered up. I haven't yet decided for sure, since I haven't left the system on for more than 5 minutes at a trial, but I suspect I need to change the current limiting resistor on the Gecko drive for my smaller motor and give it a little bit less current.
At any rate, I am greatly gratified by this progress to date. I now need to set about completing the electronics enclosures and hardening them to survive in my shop environment, after which I can see about mounting the motors to the lathe and getting on with some real trials. There is still quite a lot of work to be done, but it is becoming more and more tangible.
11/05/06
A Bigger Lathe
There always has to be a "next big tool purchase", right? I've decided mine is likely to be a bigger lathe. My Lathemaster 9x30 has served me quite well, and it's well on the way to being a little CNC lathe, but I confess to having lathe envy for something a little more beefy. I'm thinking of a machine somewhere in the 12x36 to 14x40 range, although I do sometimes fall back to Monarch 10EE and Hardinge HLV-H range. The latter are two lathes very similar in capacity to my current 9x30, but far more robust. In their time they were the ACME of super precision toolmaker's lathes. Unfortunately, they are finicky beasts that will require restoration, and while they will be magnificent once finished, I am not entirely sure they will substitute for a lathe that truly has larger capacity. I also know somewhere in the back of my mind that one day I will purchase and retrofit a true CNC lathe, which again, would make the Hardinges and Monarchs somewhat redundant. At least that's what I'm thinking today, and I will admit my mood changes as each new opportunity presents itself.
What sort of lathe am I looking for, you wonder? Well, therein lies the big question, and much arm chair browsing of catalogs and web articles will be needed to settle it. Ideally, I would love to find a screaming deal on an almost new Nardini or Mori Seiki. They're wonderful well-made machines. I've not too much interest in the South Bends, as they require restoration, after which you have a basic meat and potatoes lathe. For me, that's not worth the restoration effort, and I can toss a lot of older American iron into that same category. The Nardinis and Moris are recent enough that they may still be in good condition, and I might get some use from one without a load of restorative work that I have little time for (far too many projects already, you see).
Failing the Nardini or Mori, there is another rung down of better made Taiwanese lathes, sometimes new, sometimes used. Here we have Birmingham, Cadillac, Hwacheon, and similar makes. Lastly, there are varying degrees of fit and finish available on a variety of brand new Chinese lathes of the appropriate capacity. For example, Harbor Freight (generally considered bottom of the heap) has their 14x40 on sale as we speak and I have one of their 15% off coupons as well. Taken together, that gets me a brand new 14x40 for right at $2500, which seems a screaming deal. I'd have to have the machine in hand and fiddle with it a bit to tell whether it was a screaming deal or a poorly made mis-mash of parts, which is what holds me back.
In terms of cost versus quality, I have the following way of looking at these lathes:
Super Premium Monarch, Hardinge |
Super precision, best made, hard to restore, and costly. A perfect Hardinge goes for $15-25K depending. Monarchs are $8K to $10K. Restorable examples are much less, but a lot of work. |
Premium Mori Seiki, Nardini |
These are extremely nice lathes that go for $4K to $6K used with tooling. They are not all that common and can be pretty worked over. |
Nice Asian Cadillac, GMC, Birmingham, Hwacheon Old American Iron South Bend, Logan, Clausing |
The nice Asian machines are often made in Taiwan, and are copies of good designs made in Japan. They cost a bit more, but it can be worth it. Old American Iron will make a great lathe, but takes restoration. These machines have been worked hard since the 50's or 60's. Would be a good choice if you find one that's in good shape and wouldn't need a rebuild. |
Cheap Asian Grizzly, Harbor Freight, Jet |
Rock bottom prices on new machines. Probably ought not to buy a used one. |
I guess I'm just going to have to chew on this one a while longer before reaching any decisions!
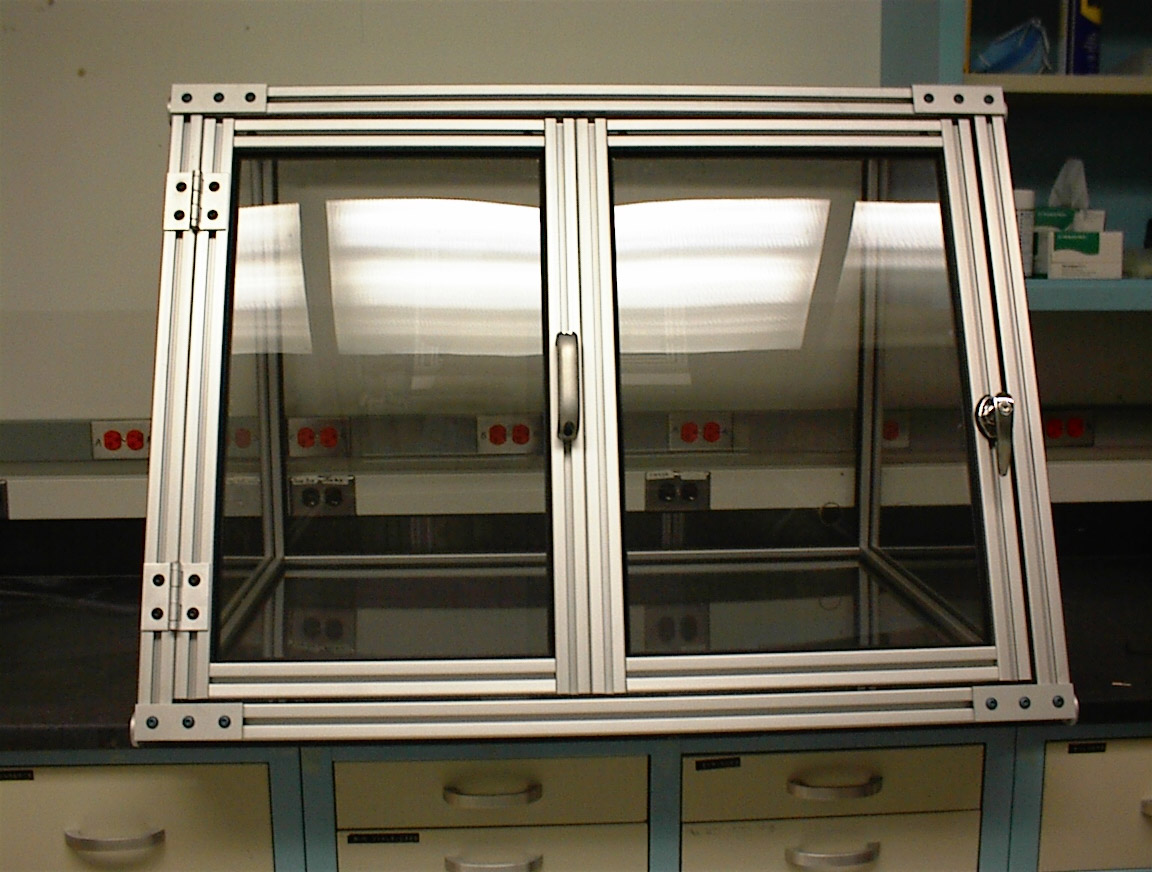
Aluminum Extrusion CNC Enclosure
I've been thinking about doing something similar for my lathe or mill:
11/04/06
Another New Project!
I know, I know, I need to finish some of the ones I already have started. In reality, this is one such, you just hadn't heard about it. I'm adapting a Bridgeport power feed to my IH Mill so I don't have to turn the handwheels all the time. I just finished the adaptation and it is sweet having a new power feed on my X-Axis!
Of course I'll be pulling it off when I CNC the mill, but that will not be for a little while yet.
Adapting a Bridgeport power feed for the IH Mill...
10/28/06
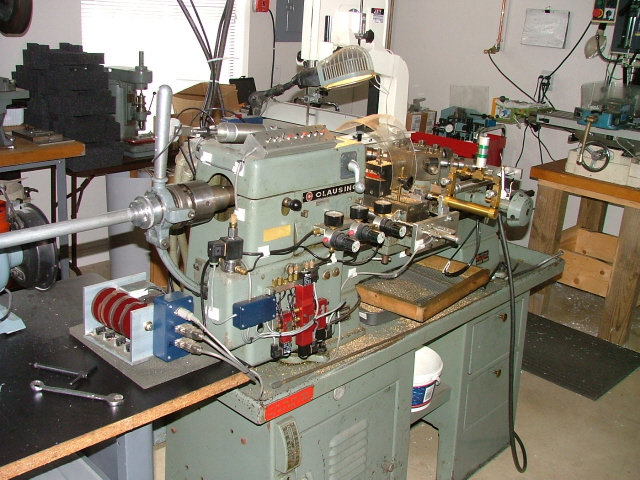
More Lathe Progress
I made quite a bit of progress on my lathe. I got the connectors for both motors wired up in the driver box, and I got nearly finished making the cable for one motor. Surprising how long it takes to do this stuff the first time (in a long time for me), but once you've done a connector you pick up quite a bit of speed. As I was working on it, I remembered how much I hate soldering connectors. It has been quite a few years since I had to mess with one. I used to have a part time job in college as a computer service technician and I would periodically have to make up parallel or serial cables. Yuck!
Soldering a connector next to a 500' roll of shielded 6 conductor 22 AWG cable...
10/27/06
It's Christmas Time!
I got a bunch of boxes all at the same time today! A nice haul:
- A couple of indexable chamfering tools I bought cheap on eBay.
- A package from Harbor Freight containing a little impact wrench for my power drawbar project and a cheapie Asian tapping head to play with. I heard a good recommendation for the latter on Practical Machinist, so I thought, "What the heck, I'll try one!"
- Another eBay steal: a box of a dozen Carr-Lane fixture clamps that I got for cheap. These are handy for making clamping fixtures or anything else where a toggle clamp is needed. I got 'em for about $1 apiece. No idea what I'll do with them--they go up on a shelf until I think of something good.
I'm pretty excited about the power drawbar project. After looking over the butterfly impact wrench (a pretty nice piece, BTW), I ordered up the air cylinder needed from Air Cylinders Direct. I guess I'll have to get started fabricating it once that cylinder arrives.
10/26/06
A Good All-Round Steam Engine
As I was commuting home from work today, I found myself daydreaming about what sorts of things I could make with my CNC Lathe once I finish it (sometime in the next Millenium I suppose!). As so often happens, a crazy thought popped into my head, unbidden and unasked for by me: Would it be possible to create a clever model steam engine that could be entirely created on a lathe, yet would retain a lot of the aesthetics of the classic steam engine models by companies like Stuart? This was a challenging thought. After all, those engines are made from castings, and a lot of the pieces aren't shaped anything like what we're used to seeing on a lathe. In other words, they looked hard to make by cutting a spinning piece of metal, no matter how complex the profile that one could program with the aid of CNC. Still, this became a puzzle, and once that happens, I had to worry it to death until I made some progress. First, the ground rules for the puzzle. It must be possible to create the steam engine without recourse to milling--not even a milling attachment on the lathe. It is acceptable to do all of the normal lathe operations such as turning, facing, and boring, and clever setup on the lathe is also allowed, such as offset turning to create crank eccentrics. In addition, I decided to allow drill press to do things like drill bolt circles for the cylinder head to cylinder mating. Intriguing? I thought so.
I have by no means completed a design, but I did some doodles in Rhino that have convinced me this might make a fun project for a CNC lathe. The basic trick of it is to do interrupted cuts on pieces that were already flat before we put them into the lathe. For example, a piece of ground plate (available ground right from your favorite supplier). We spin said plate, and we can contour the long dimensions of it as we please. I first thought of this in conjunction with the main supporting beam for the cylinder. It looks like this in my Rhino doodle:
Good All-Round Steam Engine Main Beam: Entirely Turned on a Lathe...
One of the elements required by this design, which is rather like turning a rocket nozzle, is the idea of boring to create an inside contour, and in this case, doing so with an interrupted cut. I don't know how well it would work in practice, but it sounds feasible, at least sort of. At any rate, I found the smooth curves engendered by the use of lathe were quite aesthetically pleasing to my eye. I don't know if I'll ever finish designing this engine, let alone building it, but it was an entertaining way to spend an hour and a half with Rhino. One of the more challenging design elements will be to come up with a suitable slide valve that can be entirely constructed on the lathe.
Here is the final doodle so far with cylinder and bearings for the crank:
10/24/06
Hurco VM-1 Upgrade
A fellow on CNCZone was talking about his plan to upgrade from an IH Mill to a Hurco VM-1. He had an early CNC conversion, and I guess there were a lot of problems with it. I'm glad I haven't seen anything similar! Anyway, he is planning to upgrade to a Hurco VM-1 he says. I wanted to see what that was and came across this picture of its massive frame:
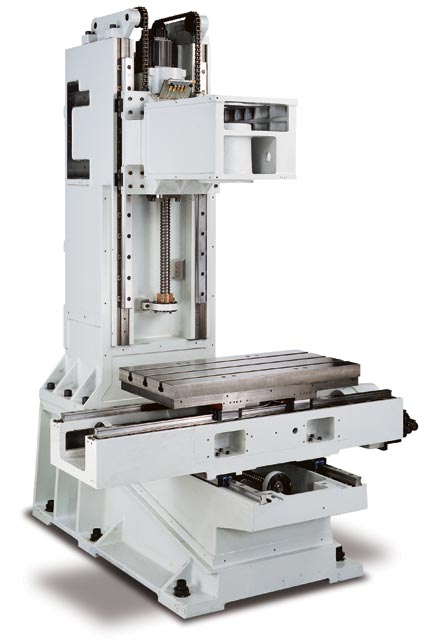
Hurco VM-1 Frame. Makes it clear how linear slides are used on a commercial machine...
That picture really made it clear to me just how massive a commercial CNC mill is, even a smaller, lower end one. You can see clearly the mass of the castings, how linear slides are mounted, and even some interesting detail on the counterweight system for the head (see the roller chains there).
10/24/06
Machining Thin Parts on the Lathe
Here was an interesting idea that generated quite a bit of controversy. This fellow machined the hard jaws of his 3-jawed chuck to make it easier to hold thin workpieces:
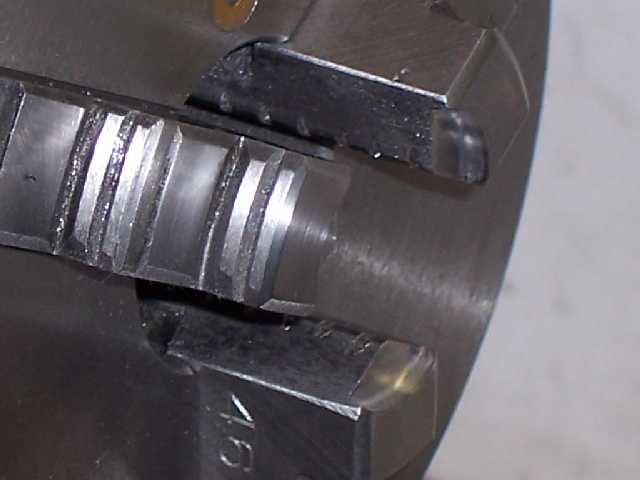
See the slight steps cut in the ends of the chuck jaws?
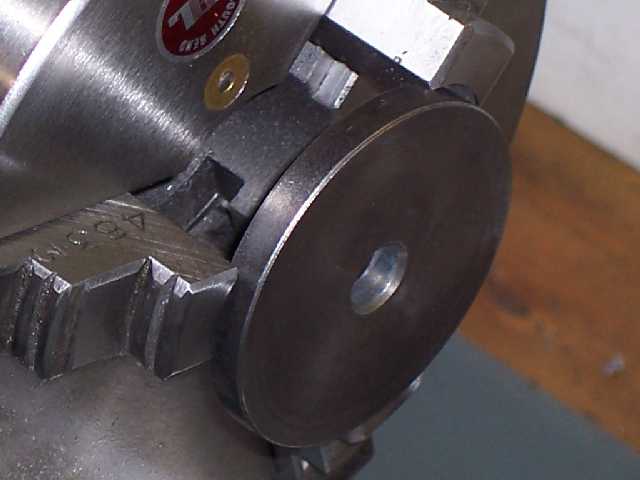
And here is what they're good for...
I see this as a handy thing to do in the home shop. The fellow who wrote about it was taken to task, with posters feeling like this sort of thing had no place in a "real" machine shop and that someone would be fired for doing it. The bone of contention was machining the hard jaws. Some chucks have "top" jaws that bolt onto the hard jaws and are intended to be machined. You'll have to decide for yourself if you like the idea of making this modification, as it is irreversible short of buying a new set of jaws. OTOH, it does look handy!
If you choose to do it, this fellow tightened the chuck on a piece of shaft that was inside the spindle (you have to cut with the jaws tightly loaded on something or it won't be accurate in actual use), and he used an end mill in the tailstock to rough it out. He then finished the job with a carbide tipped boring bar.
10/23/06
Nifty Tailstock Taper Set Over Gizmo
I came across a fellow (called "Sidegrinder") who made a nifty gadget for doing tapers using a tailstock set over gadget. Here's how he did it:
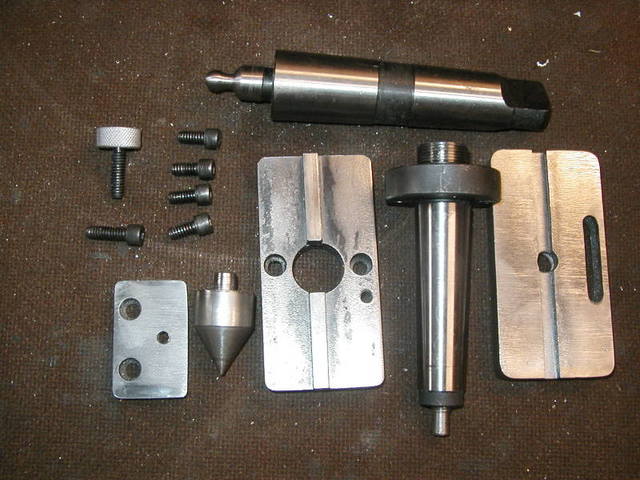
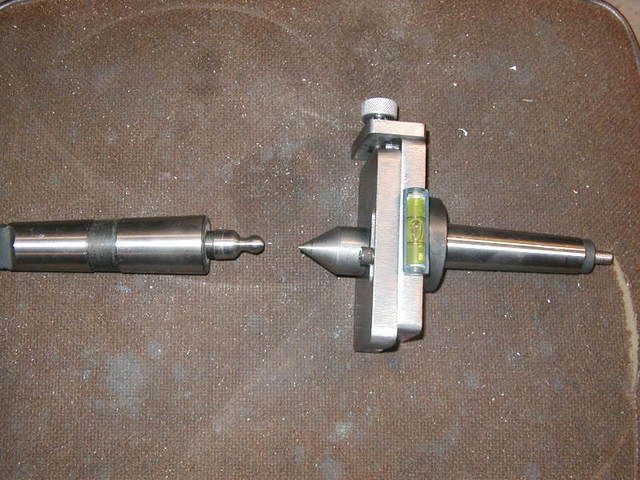
The mechanism is relatively simple, as you can see. Basically, the tailstock center can be slide an adjustable distance off center. At the spindle end, a ball shaped center accomodates the workpiece rotating at the angle which creates the taper. The level is provided so that the attachment can be leveled when installed so the results are reproducible. I had read about doing this sort of thing, and once saw a guy using a boring head he'd salvaged for the offseting, but this is the first purpose-built fixture I had seen. Very nicely done, and a pretty easy project to reproduce in the home shop.
10/22/06
New Toy Lust: Electric Pallet Jack
After the delivery people left a box at the bottom of my driveway again, I have developed a new toy lust. I want an electric pallet jack. These babies are all you need to move heavy machines from point A to point B. Consider this 2 picture sequence on how to rig and move a big milling machine:
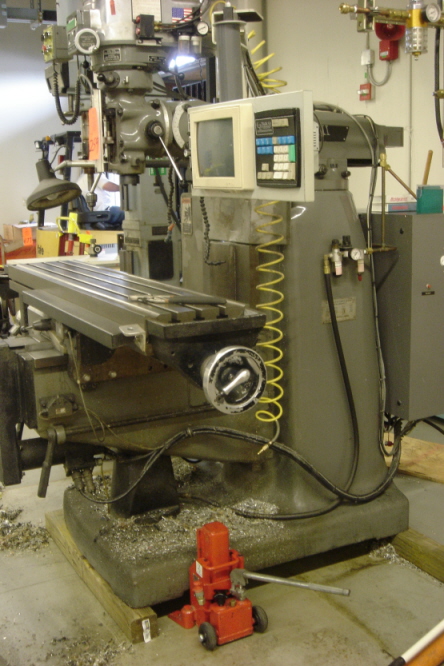
Get it up on 4x4's with a couple of toe jacks...
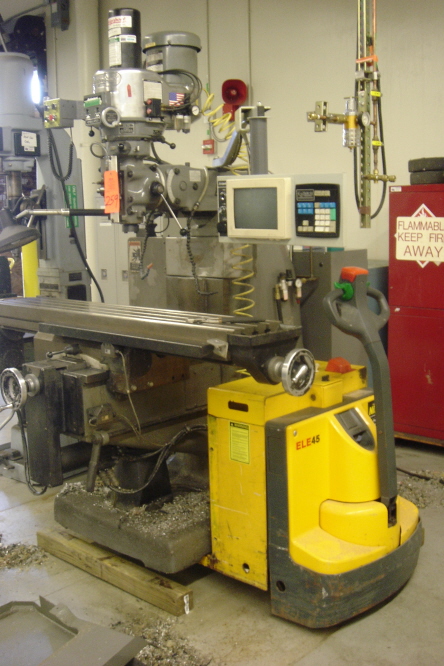
Slip the electric pallet jack under it, hit the lift switch, and you are ready to roll...
I need to do some research on these things and find one that can make it up my hill with some semblance of a load, but this would sure be the cat's meow, wouldn't it? By the way, rigging heavy equipment is very dangerous! Make sure you know what you are doing, and remember, I don't, so don't listen to me about how to do it!
CNC'ing a Hardinge Lathe?
If you wanted to convert a Hardinge, which one would you go for? The HLV-H is legendary, but I think the TFB-H is a better bet for this application. The primary difference is that it has no thread cutting gearbox (you won't need one with CNC), which makes it less desirable for the manual lathe crowd.
CNC'ing a 9x20 Lathe
This fellow, "Ron111" on CNCZone, did a very nice job on a 9x20 lathe. Took him almost no time too. I'm jealous!
Both axes are direct drive. Darned cool, eh?
Worm-Driven Ball Turning Attachment
You can find a lot of ball turning attachments for the lathe if you search the web, but this one is quite different than any I had seen before. It's called the "Habit" radius dressing fixture. The fellow that had it was using it on a lathe, but from the name I almost wonder if it was intended as a radius dresser for grinding wheels. No matter, here is what it looks like:

Internals are a simple worm gear arrangement. The concave arrangement is called a "double enveloping worm and gear"...
It seems to me that a worm-driven arrangement like this could potentially produce a finer surface finish than the average ball turning mechanism. Something similar could be used on a mill for rounding tasks as well, although I guess a rotary table already counts as "something similar."
South Bend Drill Press Restoration
There is no denying the appeal of good American Iron (or European either for that matter) when it comes to machine tools. As you probably know, all of my machines are Asian imports, at least at this stage. I do marvel over the fit and finish of the old tools, particularly when nicely restored. I recently came across a neat South Bend benchtop drill press that a woman named Paula restored. Here are a few snapshots:
I Want CNC Without The CNC
I came across yet another thread on adding stepper motors to drive a lathe's axes without having to use CNC.
There is a Yahoo Group that concerns itself with electronic leadscrew drives:
http://tech.groups.yahoo.com/group/e-leadscrew/
An article will be appearing in the November issue of the magazine "Circuit Cellar" describing their results.
I started out on this path, and it is pretty easy to design a simple circuit to generate pulses at a rate consistent with a rheostat with switches to control direction and throw it into neutral. In other words, to create a power drive. It's considerably more trouble to synchronize for threading, so in my mind this makes a better technology for cross feed. In the end, I concluded that you do 90% of the work needed to just CNC the lathe in the first place.
After looking at the "CNC Conversational Programming" options in Mach 3, it seemed clear you wouldn't even need to be a g-code programmer to derive benefit. Here is the list of wizards for the lathe in Mach 3:
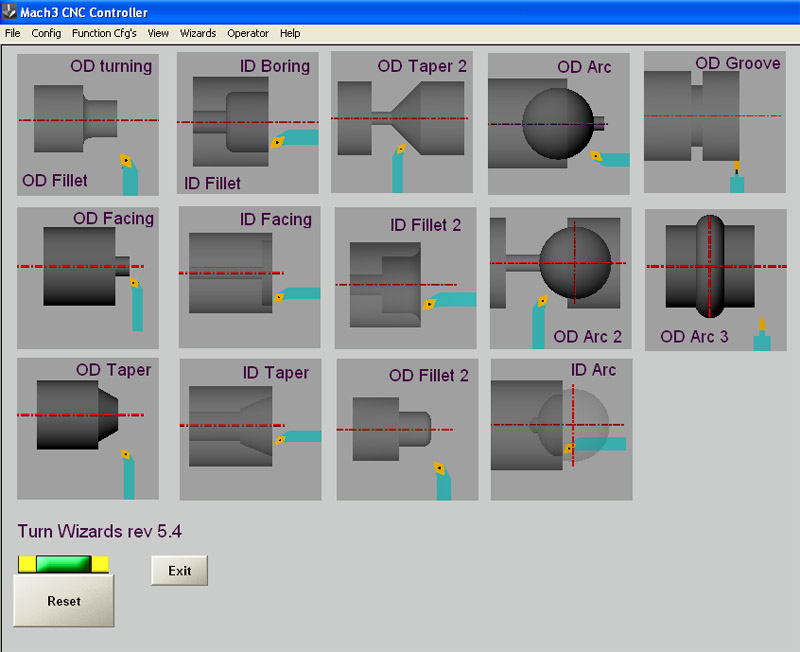
Lathe wizards available in Mach 3: A lot of these would be difficult to do manually!
Here is the taper wizard:
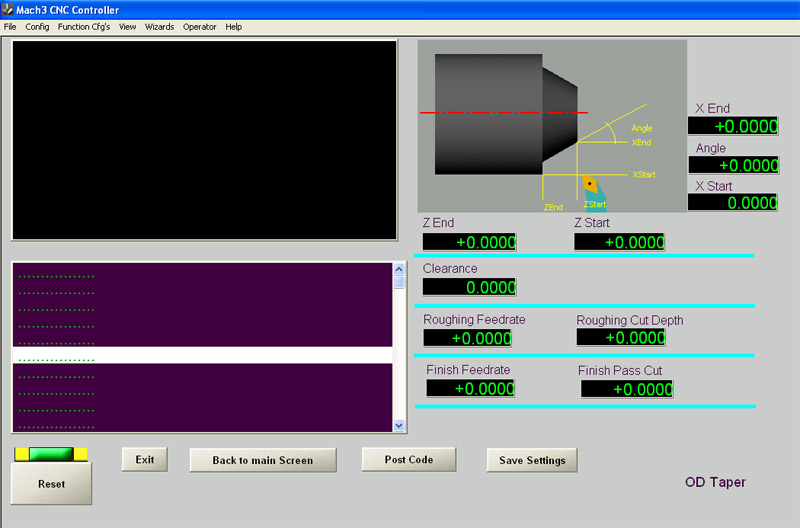
Taper Wizard in Mach 3...
Pretty darned easy, isn't it? Some angles, your starting and ending locations along the length of the part, feed rates, yada, yada. You are looking at the lathe taper attachment of the digital age. No programming required, but some computer familiarity is definitely a must.
10/16/06
CNC Master Checklist
It's just what it sounds like: a checklist of all the different things to think about for your CNC project. Check it out!
10/15/06
Damascus Steel
Have you ever seen Damascus Steel? It's one of the most beautiful materials I've yet to come across. I first saw it looking at slices of an iron meteorite at a gem and mineral store nearby, and was fascinated by the intricate banding. Rolex makes a watch face for their Daytona of the same material. But this kind of material is not limited to heavenly bodies. It can be made, even in the home shop, and people have been doing so for some time. I won't try to deliver a coherent history in this brief note, but I did want to show you some pictures and gather up some of the links I've been pursuing to learn more about Damascus Steel. It turns out you can purchase billets of the stuff from a variety of sources, including eBay. It isn't at all cheap, but you would use it to make a fancy custom knife or other decorative project. I have added some sources for Damascus billets on my suppliers page near the bottom.
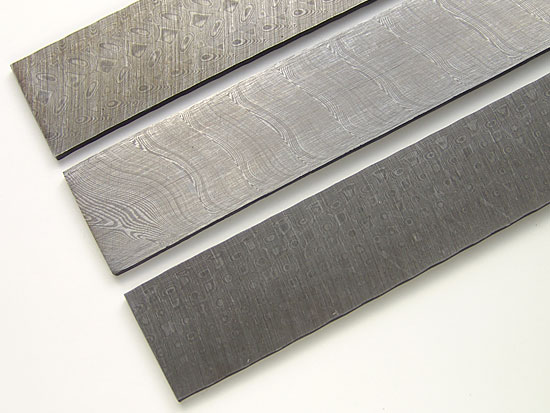
Basic Damascus billet material before etching from www.knifekits.com (great site, BTW!)...
To really bring out the Damascus pattern requires an etching process that affects the different metals in the Damascus billet slightly differently. Here are some amazing etched nickel steel Damascus patterns:
 |
 |
 |
 |
Etched Damascus Nickel Billet...
Looking at the etched sample, now you can see what all the fuss is about! That sample came from Jim Ferguson's "Twisted Nickel" site. He has made many beautiful knives and talks about how to make these billets. It's well worth a visit to see what he's up to.
At some point I'd like to make some knives, including some that incorporate Damascus steel as a decorative element. So much to do, so little time!
Where Does All This Stuff Come From?
It occurs to me that some may wonder where all this stuff comes from. Let me describe my learning and editorial process. I read a number of online machinist discussion groups daily, especially Home Shop Machinist, Practical Machinist, CNC Zone, and several Yahoo Groups such as the Mach 3 group and the Gecko support group. In addition, I will frequently go out and research various topics by searching such forums and by using Google. I don't have time to write everything interesting I encounter up for the blog or the other CNC Cookbook pages. When I find something interesting, but don't write about it immediately, I jot down the link together with a description in a big MS Word document. That document runs to over 20 pages of links that I will someday get around to incorporating here, but that meanwhile I have scanned and filed away in the back of my mind.
Delay On Make Timer Relay for E-Stop Circuit
I did some more planning on the driver electronics for my CNC Lathe conversion, and I think I now have the E-Stop circuit fully worked out. I won't bore you with details here, but you can read about it on the driver electronics page if you are interested. A useful device I found for the system is called a "Delay On Make Timer Relay". This is a 2 pole device that waits a determined amount of time once current is applied to one pole before letting the current reach the other pole. It's an easy way to inject a time delay that can be adjustable between two components. In this case, I am using it to delay power to the spindle and step motors long enough to make sure the GRex is booted up and ready to control them properly.
10/13/06
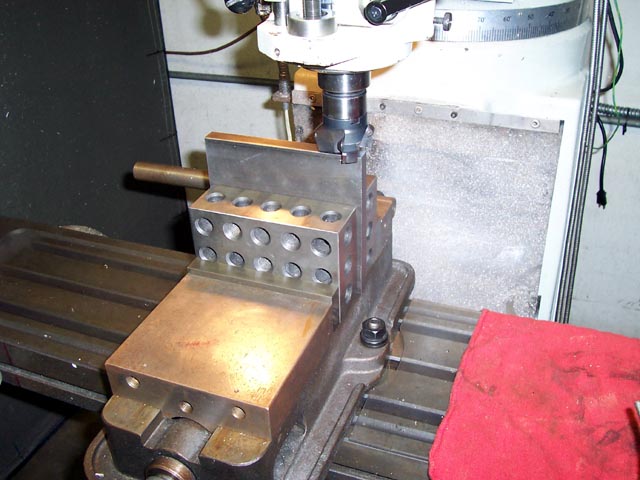
Fixture for Machining Intake Manifolds
Not much to say about this, just a tilting table on a mill:
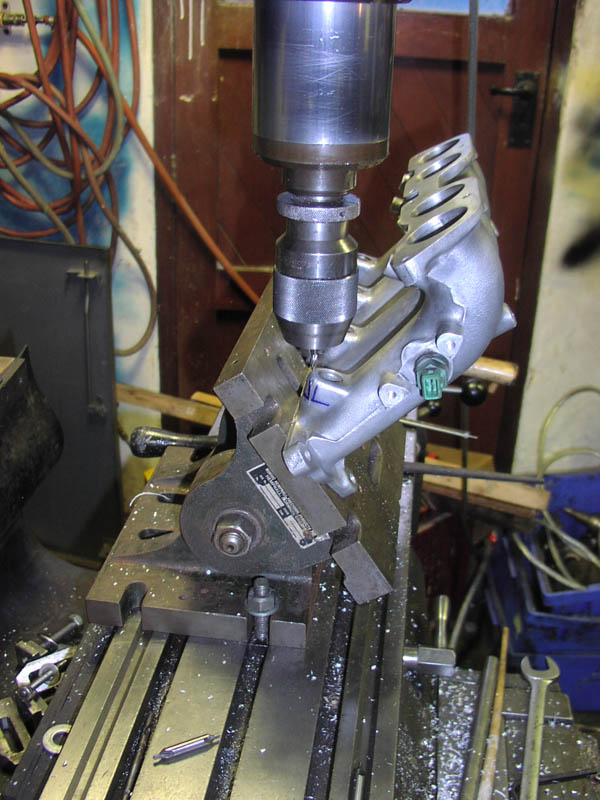
Injector Manifold Machining Setup
Another Brilliant John Stevenson Idea: Tailstock DRO
I recently adapted some cheap imported DRO scales to my mill, and have gotten a lot of use out of it. John Stevenson has done the same for a lathe tailstock:

Cheapy tailstock DRO: Brilliant!
I've seen a lot of guys put a dial indicator on the tailstock, but this seems so much more useful. For one thing, I am frequently drilling, boring, or tapping a much greater distance than the dial indicator reads very well. Yes, I can set it all up and just use the dial indicator to tell me when I've "touched" the right spot, but this is so much more convenient.
10/12/06
Power Drawbars
I really like the idea of a powered drawbar for my IH Mill. Seems like it really speeds up tool changes. Guys who have one say it is the best thing since sliced bread, and for a lot of older CNC machines like the Tree 325, there was no toolchanger, only a powered drawbar. There are a couple sources of plans for these on the web. For example, here is one that claims to be the simplest and cheapest:
Simplest, cheapest, powered drawbar you can build!
This is the new simplified design from www.homeshopaccessories.com. This guy has some really cool plans, included a full automatic toolchanger for small mills. I had already purchased his somewhat more sophisticated drawbar design. I shelled out tonight for the simple plans too. I'll see which style I like better before building one. I can tell you the fancy one is slick and looks easy to build, though this design does look even easier. The fellas on Practical Machinist certainly endorsed it--that's where I first heard a simpler one was available. Those import butterfly impact wrenches are certainly dirt cheap from a bunch of sources.
Ring Rolling On A Mill
Here's a cool thing to do if you have a horizontal mill:
Folks comment that these mills are incredibly strong. They seem to sell cheaply and are less desireable than vertical mills. Their hogging capacities are supposed to be amazing. Makes me wonder why nobody bothers CNC'ing them?
10/9/06
CNC'd Clausing 13" x 24" Lathe
Ran across this cool pic of a Clausing lathe that a fellow converted to CNC:
Clausing lathe converted for CNC...
Love the bar puller and air operated collet chuck, all homebrewed.
10/6/06
High Speed Spindle Page
Added a page to the CNC Cookbook to keep up with high speed spindles. Here's a new one I came across just today:
10/5/06
First G-Code
I got OneCNC working for my lathe projects today. Posted a program to profile a pen:
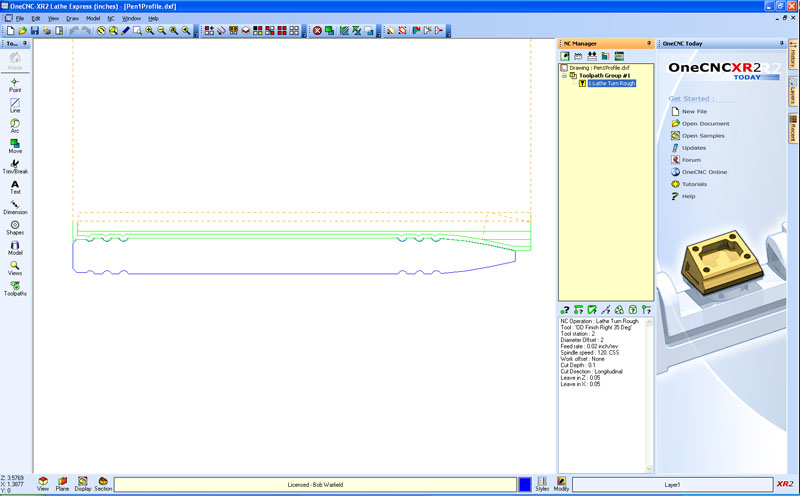
Posted a program to profile a pen: Pretty cool!
Here was the original pen design in Rhino3D:
Check out the OneCNC Walkthrough page to see how I did it.
The Great Breakout Board I/O Mystery: Where's the Cheap USB Alternatives?
Parallel ports are a pain, and they are becoming more and more obsolete day by day, yet there continue to be very few good alternatives to using one to connect Mach 3 to your machine. I can't understand why there aren't more USB devices. It's really cheap to get a USB "breakout board" from places like kadtronix. Their board is nice and small and offers 16 digital I/O connections per module. At $69, it won't break the bank either. Measurement Computing makes another similar module, this time with 24 connections for $99. Analog I/O (so you can have a knob for feedrate override or send a speed back to your spindle motor's VFD) are also readily available. You can get these things to fit a DIN rail, so they're nice and modular, small and fit into you driver chassis.
It seems like all one would really need is a suitable Mach 3 plug-in, and you'd be off and running.
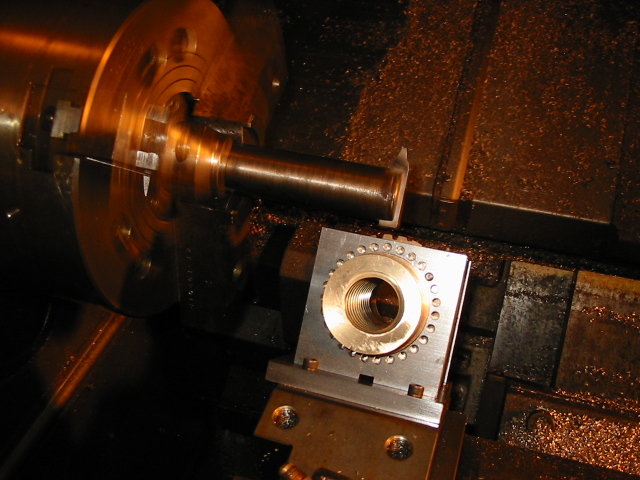
Worm Gears
Gears are a fascinating topic, and worm gears are some of the most interesting. I was recently searching around to read about making worm gears on the web and came across some nice threads. First one was on HSM and revealed the following nifty fixture for the job:
This fixture mounts to the lathe cross slide, and a single point cutter goes in the spindle. A shim under the fixture establishes the correct helix angle...
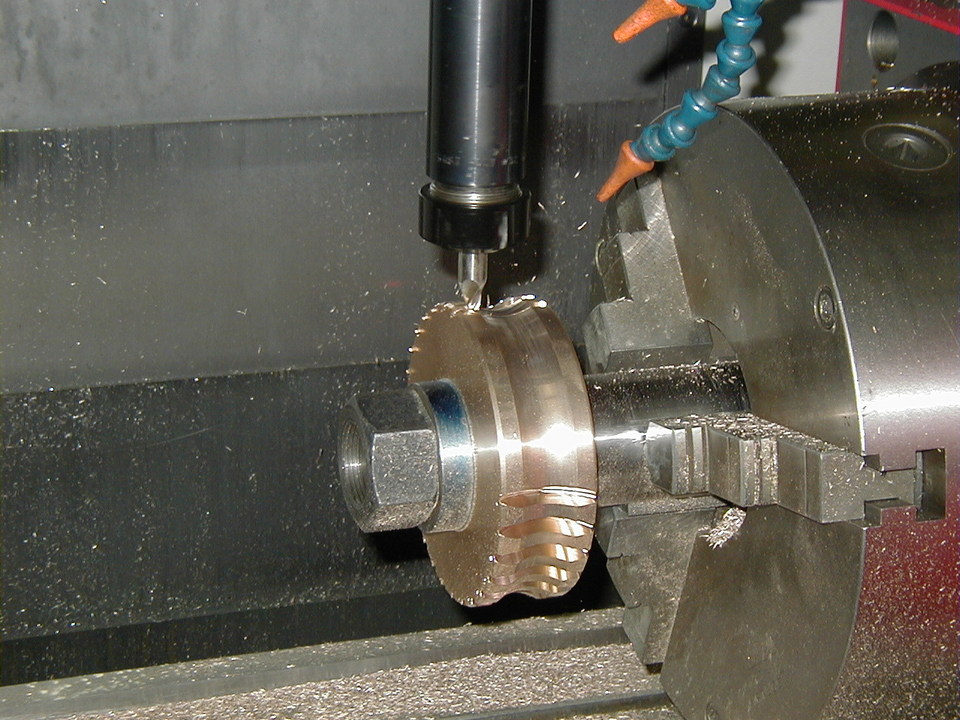
The next thread was in Practical Machinist, also very good and included a CNC fixture:
Mounted on the cross slide again. You can see the ACME single point fly cutter being used...

A side view of the indexing holder...

The finished worm wheel: sweet!
From the same thread, Hu Flung Dung employs a Haas mill with 4th axis:
Roughing with a 15 degree tapered end mill...
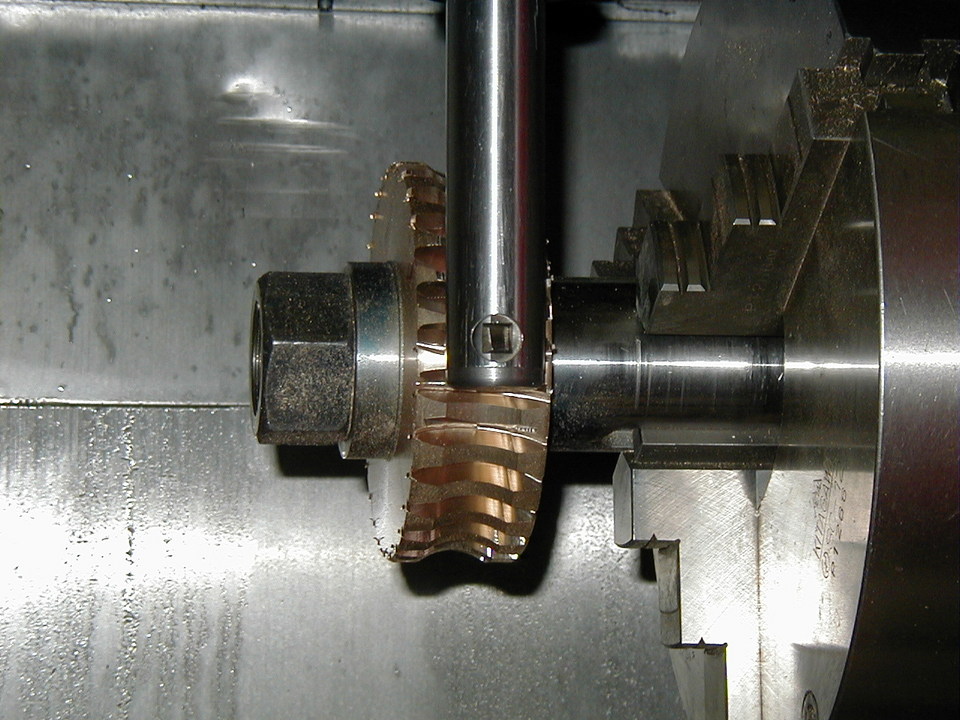
Fly cutter for the correct ACME shape...
By all accounts, the mill version was tough! Be sure to read the thread, many secrets documented there. Somehow I think the lathe version had to be easier.
5-Axis Machines at Home!
These are always crazy to see. Here is a fellow's shop made 5-axis head I saw on CNCZone:
Looks easy to build, and uses a Roto-zip as its high speed spindle. I wonder how well it worked in practice? It's not direct driven, which is good (resolution would be poor for a direct drive design I think), but not clear what the ratio is or how it works (probably timing belt drive). He says he sold it for $500 on eBay.
Of course the master at 5-axis for the home is Rainnea.
What the heck would you do with a 5-axis mill in a home shop? Well Rainnea and this fellow make jewelry, among other things. It's amazing work, and the thought of taking one of those intricate Rhino models all the way through to finished jewelry is intriguing. The latter fellow's mill is particularly amazing, being as how he as a 5-axis mill capable of this level of fine work that is essentially made from pipe fittings:
Pipe Fittings!
trunnion Table...
It's 5-axis by virtue of the crossed rotary axes that are a classic trunnion table design similar to what many full scale 5-axis mills use. For comparison, here is a Haas trunnion table:
Cutting a turbing on a 5-axis trunnion table...
The pipe fitting mill (he calls it his "vise mill") is just an amazing bit of McGyvering.
10/2/06
Up Your Organization
It's a never ending battle to get organized and stay organized. I find that before I can have "everything in its place" I first must have a "place for everything". Towards that end, I am always interested in the storage ideas people come up with out there. Here are just two worthwhile thoughts along these lines:
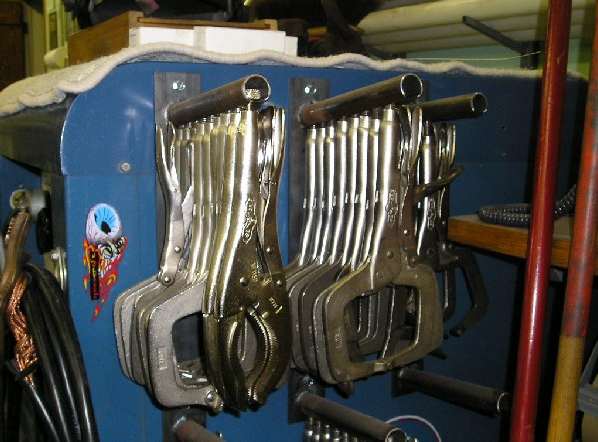
A vise grip rack...
A QCTP tool holder rack...
Along the lines of the QCTP rack, I have also seen racks for tool holders that attach to the side of a mill. All good ideas! I know I also need something to help keep up with all the loose mill cutters, as well as some sort of rack for my files. The list goes on...
Bar Pullers
These fascinating gadgets are used to enable a lathe to grab onto bar stock that goes through the spindle bore and pull some more stock out of the bore so a new part can be made. This lets a moderately long piece of stock be placed in the chuck so that multiple parts can be made without having an operator reload more stock for each part. www.barpuller.com has some nifty units that I was looking at. Check out their videos yourself. The "crocodile" model that works in conjunction with parting off seems particularly clever.
Bar feeders offer even more capacity for unattended operation, but they require a lot of room and don't seem like the sort of thing a small operation would need.
10/1/06
Tandem High Speed Spindle
I've seen a lot of articles about mounting a high speed spindle of some kind to you mill head to get higher speeds:
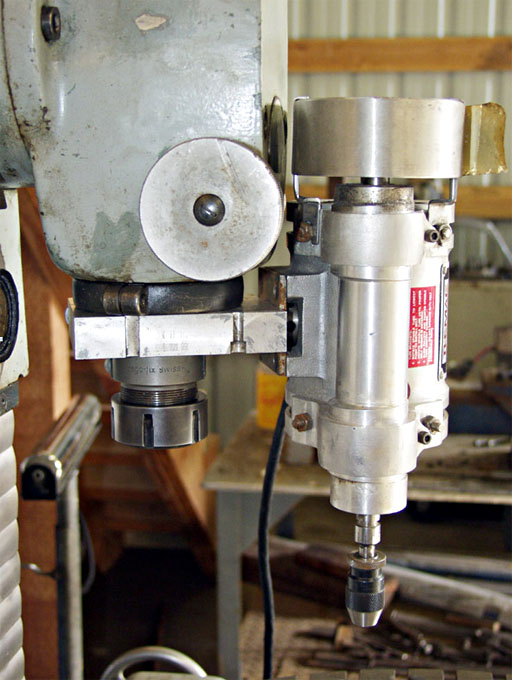
High speed spindle attached to mill head...
Most mills are doing good to get to 4000 rpm. Mine does 1600, or 3200 if I put a 3000 rpm electric motor on it. Such speeds are just not fast enough for small cutters, especially on aluminum. For example, free machining steel wants somewhere in the neighborhood of 100 to 150 feet per minute, which on a 1/8" diameter cutter suitable for profiling, requires up to a 4500 rpm spindle speed. Aluminum wants 300 SFM, which gets us to 9300 rpm. Not many mill spindles in HSM hands will do that!
The solution is to strap an alternate spindle to your quill, especially for doing fine profile work a small end mill. This is an interesting pasttime, and adds considerable flexibility to a milling machine. There are also devices called spindle speeders/increasers/multipliers that are just gearboxes that attach to your existing spindle and give more speed for smaller cutters.
Some folks have even attached routers of various kinds to their spindle. There are a variety of smaller spindles such as routers or the Bosch Roto-Zip-like tools (the Proxxon is a nice model) that get you anywhere from 15,000 to 30,000 rpms. Makita makes a high quality 30,000 rpm die grinder that is another possibility. It's worth a look and a bit of fabrication so you can try High Speed Machining (HSM) in your own shop!
Here is a typical thread on this subject from CNCZone.
Turned File Handles
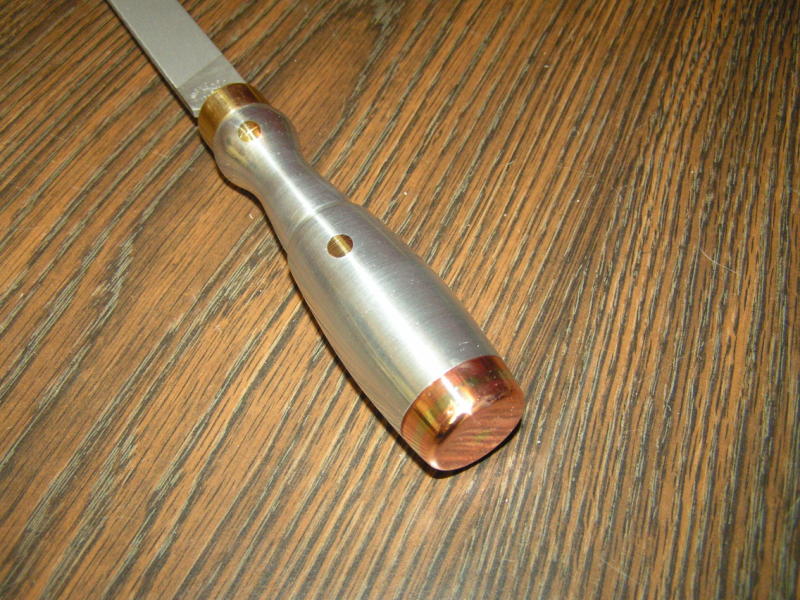
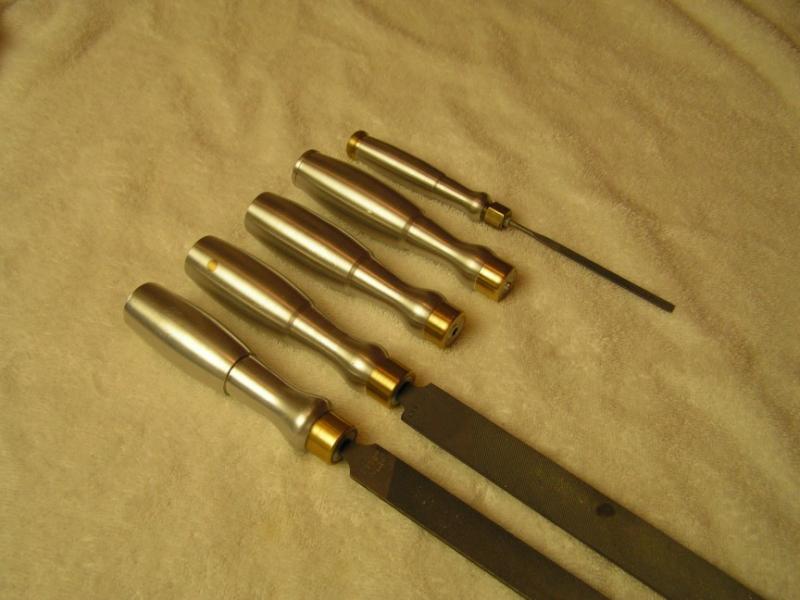
I came across these beautiful turned file handles on the Lathemaster Yahoo Group. A fellow named Marv Stovall did them. I thought they were really nice, and immediately wanted a set for myself. This will make a good project to try my CNC Lathe on when I get done converting it.
At the same time, I'd love some kind of rack to make it easy to organize the files. You need a collection of different styles, shapes, and sizes, and it's hard to keep them all neat. According to Guy Lautard, he knows a guy that keeps his in pipes filled with heavy cutting oil. I have found that the heavy oil works as good or better than chalk to keep files from loading up, and it would surely protect them.
BTW, I like Nicholson files. For filing on the lathe, there's nothing like their lathe pattern file either. makes for some really smooth work.
In the meanwhile, I bought a box of cheap wooden handles off eBay for my files, which are way better than nothing. I've added these to my Projects Wish List for future attention.
|
Do you want to be a better CNC'er in 37 Seconds? Get Better Tool Life, Surface Finish, and Material Removal Rates Fast. It's that easy. You can install and get results now.

|
||||||||||||||||||
| ||||||||||||||||||


