
|
|
|
|
|
|
|
Want to be a better CNC'er? Get our weekly newsletter plus a package of greatest hits, special tips, and more, all for free. I'm Ready to Be a Better CNC'er, Hook Me Up! |
First G-Code and OneCNC XR2 Lathe Express Walkthrough
October 5, 2006
I posted my first g-code tonight using OneCNC, my CAM program. Let's walk through the process and take a look at the code. I'm working on a design for a pen, which I think will be a cool CNC project for my lathe.
Step 1: Design the Pen
I'm not going to spend any time telling you how I did it, I'll just show the finished design. The program I'm using is Rhino3D, which I highly recommend.
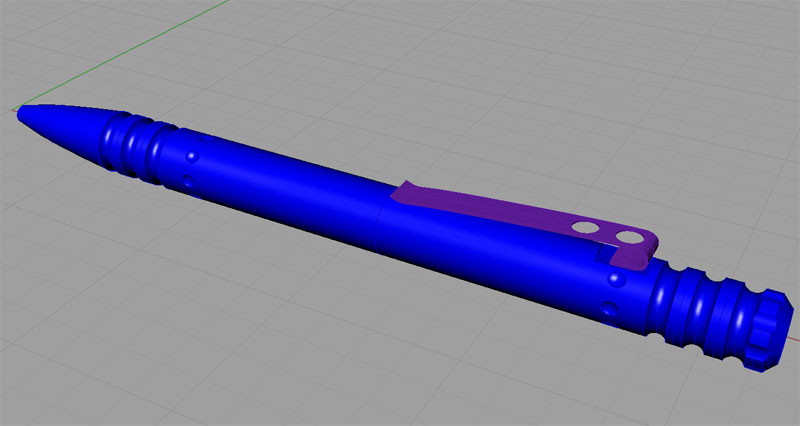
The pen as a 3D model in Rhino3D. Pretty cool, eh?
Step 2: Import Profile into OneCNC
OneCNC will like working with a profile best as it doesn't care about the fancy 3D model. So, I took the model back apart in another file (sigh, remember to keep the curve next time!) until I had a 2D profile of the pen. I saved that from Rhino, fired up OneCNC, and loaded it in:
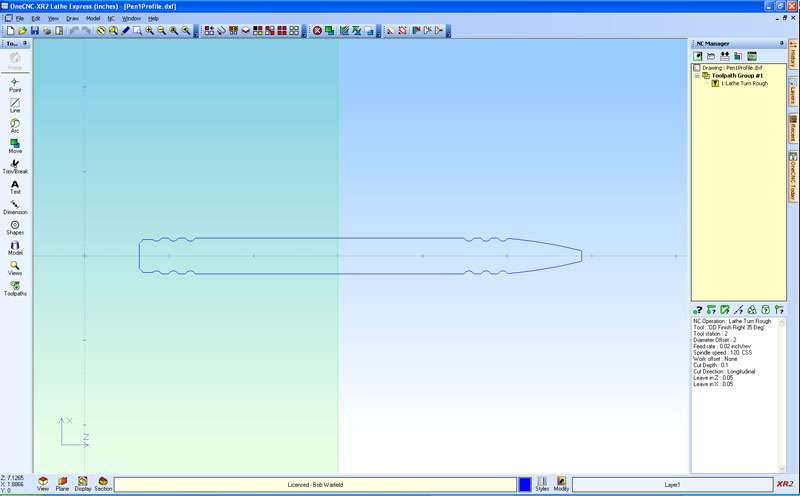
Simple profile loaded into OneCNC...
Step 3: Tell OneCNC to Create a Toolpath
On the side of the screen the yellow area is the NC Manager, which is where your toolpaths are created and managed. You tell OneCNC to create a new toolpath and you'll get the following dialog box asking what kind of toolpath is desired:
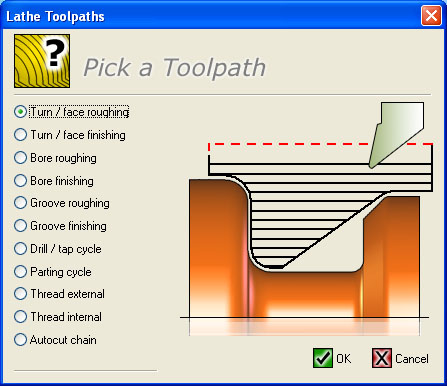
A number of different toolpath possibilities exist for the lathe...
I chose Turn / face roughing, and the next step is to show OneCNC what part of the profile to cut. Begin by showing it where to start:
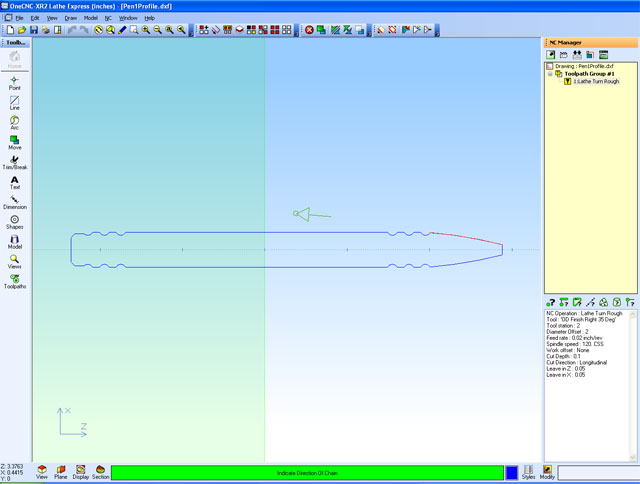
Toolpath started on far right, initial segment marked in red, direction of cut shown by arrow...
Left click the starting point and then drag the mouse until the arrow points in the direction you want to cut. Next you have to tell it where to quit cutting:

The toolpath is now marked in red...
The path is now marked in red. We're going to cut the whole profile in one shot. Given that you mark the beginning and end, you could use several different tools or other operations if you wanted to.
Step 4: Fill in the Remaining Options
Now that it knows what toolpath you'd like, it's time to fill in the rest of the options. These come up as a series of dialog boxes, much like "Wizards" in other programs. The first thing to do is decide what lathe tool you'll be using:
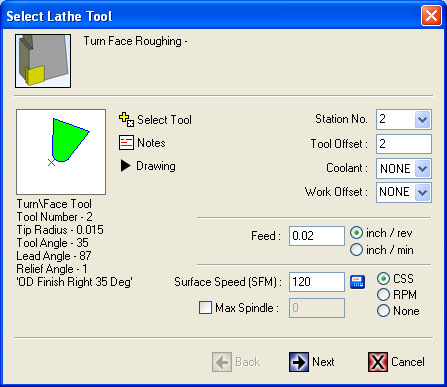
Select which tool to use...
There is a tool table that you can add to and modify. Tools not in the library that comes with OneCNC may be specified by creating a drawing of the tool so OneCNC knows its shape and dimensions, and filling in the rest of the data. You can see from this dialog that we're going to cut without any coolant at a feed rate of 0.02" per revolution, at a surface speed of 120 SFM in Constant Surface Speed Mode (meaning the spindle will vary speed as you move closer or further from the axis).
Next up is determining the toolpath boundary. You can control where the tool moves as its cutting in terms of its retraction. I just left the defaults:
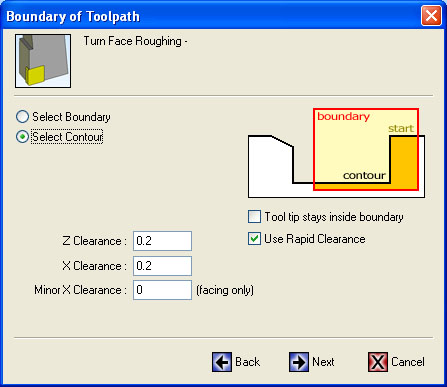
Determine toolpath boundary when retracting between passes...
And the last dialog is called "Turn and Face Options". It's used to specify the style of roughing, allowances to leave for finish pass, cut direction, and cut control. I selected a "Cycle w/ finish" style, which builds the finish pass right into this run so I don't have to go back and do a separate finish pass. I'd have more control with the latter, but I don't need it just fooling around here:
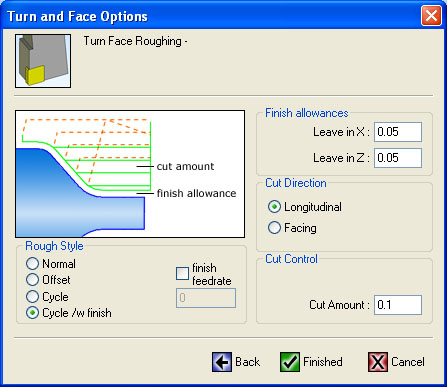
Turn and Face Options Dialog...
I hope you can tell that this is really easy. You drag out a toolpath on the drawing, select a few parameters in a dialog, and you are done. That's the magic of CAM versus manual programming!
Step 5: Backplot and Simulate the Cut
Having created this toolpath, you can now backplot and simulate. Backplotting draws lines on your drawing that show the successive cutter passes:
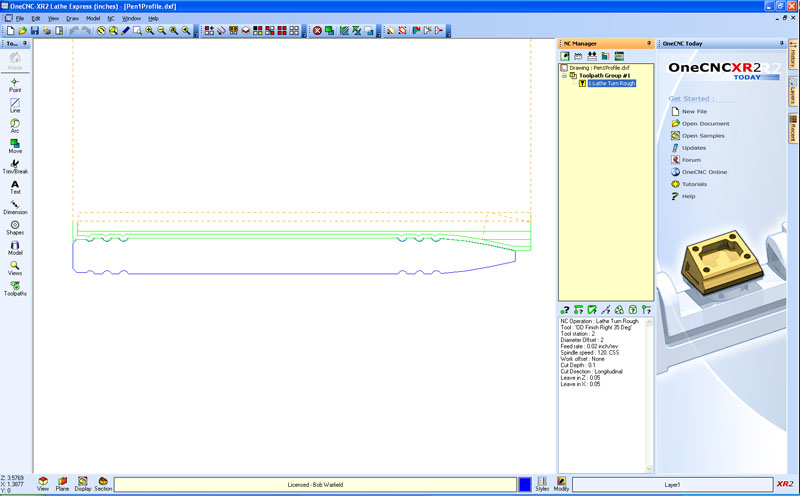
Backplot of the toolpath. Green are cutting passes, dotted red are the retract passes to line up for the next cut...
A simulation is an animated movie that lets you see what your program will do.
Last Step: Post and Look at the G-Code
A post is the command used to cause OneCNC to generate the G-Code. It comes with a slick editor for viewing that code. Posts are typically customized for the particular machine controller you're using. Mine's not setup yet, so this is just generic g-code. I'll want to revisit this before I cut for real, but it is certainly interesting to look at:
%
O0000
N10 (PART - )
N20 (FILE - C:\DOCUMENTS AND SETTINGS\BOB WARFIELD\MY DOCUMENTS\CNC TOOLS\RHINODRAWINGS\PENS\PEN1PROFILE.DXF)
N30 (AUTHOR - DEFAULT)
N40 (GROUP - TOOLPATH GROUP #1)
N50 (POSTED - THURSDAY, OCTOBER 05, 2006 22:12)
N60 (CREATED - THURSDAY, OCTOBER 05, 2006 22:07)
N70 (SYSTEM- ONECNC-XR2 LATHE EXPRESS - VERSION 7.36)
N80 (NOTES - NONE)
N90 G00 G40 G20
N100 G28 U0.
N110 G28 W0.
N120 (OD FINISH RIGHT 35 DEG)
N130 T0202
N140 G99 G96 F0.02 S120
N150 M03
N160 G00 X0.3948 Z6.0651
N190 G71 U0.1 R0.12
N200 G71 P210 Q560 U0.05 W0.05 F0.02
N210 G01 X0.0625 F0.02
N220 Z5.867
N230 G03 X0.2088 Z4.9904 K-1.3048 I-5.1191
N240 X0.2033 Z4.9775 K-0.0012 I-0.015
N250 G01 X0.1833 Z4.9613
N260 G02 X0.2012 Z4.8902 K-0.0282 I0.0382
N270 G03 X0.2098 Z4.8766 K-0.0136 I-0.0064
N280 G01 Z4.7915
N290 G03 X0.2043 Z4.7798 K0. I-0.015
N300 G01 X0.1828 Z4.7624
N310 G02 X0.2012 Z4.6921 K-0.0274 I0.0388
N320 G03 X0.2098 Z4.6785 K-0.0136 I-0.0064
N330 G01 Z4.5896
N340 G03 X0.2043 Z4.578 K0. I-0.015
N350 G01 X0.1828 Z4.5606
N360 G02 X0.2012 Z4.4902 K-0.0274 I0.0388
N370 G03 X0.2098 Z4.4766 K-0.0136 I-0.0064
N380 G01 Z1.2915
N390 G03 X0.2043 Z1.2798 K0. I-0.015
N400 G01 X0.1828 Z1.2624
N410 G02 X0.2012 Z1.1921 K-0.0274 I0.0388
N420 G03 X0.2098 Z1.1785 K-0.0136 I-0.0064
N430 G01 Z1.0934
N440 G03 X0.2043 Z1.0817 K0. I-0.015
N450 G01 X0.1828 Z1.0643
N460 G02 X0.2012 Z0.9939 K-0.0274 I0.0388
N470 G03 X0.2098 Z0.9804 K-0.0136 I-0.0064
N480 G01 Z0.8915
N490 G03 X0.2043 Z0.8798 K0. I-0.015
N500 G01 X0.1828 Z0.8624
N510 G02 X0.188 Z0.8013 K-0.0274 I0.0388
N520 G03 X0.1924 Z0.7907 K-0.0106 I-0.0106
N530 G01 X0.1924 Z0.6774
N540 G03 X0.188 Z0.6668 K0. I-0.015
N550 G01 X0.1699 Z0.6487
N560 X0.3948
N570 G70 P210 Q560
N580 (END TOOL)
N590 M09
N600 G28 U0.
N610 G28 W0.
N620 M05
N630 M30
%
Cheers!
|
Do you want to be a better CNC'er? Get Better Tool Life, Surface Finish, and Material Removal Rates.
|
||||||||||||||||||
| ||||||||||||||||||


