Programming Haas CNC Machines: Haas's Unique G-Codes and Other Differences
CNCCookbook's G-Code Tutorial
Haas makes some of the most popular CNC machines in the world, so knowing how to use their unique g-codes can be an important skill. The good news is that Haas has taken one of the smartest approaches I can think of in creating their unique g-code dialect.

Haas: Smart strategy when it comes to their CNC G-Code dialect...
They started with the world's most popular dialect, Fanuc (what the bulk of this course is concerned with) and built on top of it while maintaining compatibility. They didn't make any arbitrary changes and they largely added good value and convenience.
This is a smart strategy because it means most Fanuc g-code will just run on a Haas, yet they still have some great advantages to talk about due to the special codes they've added. It also means that the vast cadre of folks who know Fanuc g-code programming are ready to be productive day one on Haas machines, and they can pick up the things Haas added as they need to.
This article is all about picking up those things today, so let's get started.
What are the Haas Unique G-Codes for Mills?
Here's a quick overview:
- G12/13: Circular Pockets
- G51: Scaling
- G53: Non-Modal Machine Coordinate System
- G68: Rotation
- G101: Mirror Image
- G150: General Purpose Pocket Milling
Now let's go through and break down each one to see how it works.
G12/13: Circular Pockets
Circular Interpolation or Helical Interpolation is something we see often in CNC programming. It's a case where an endmill is programmed to follow a circular or helical path to make a much bigger hole than the diameter of the endmill.
These special Haas g-codes make it easy to perform the operation. G12 cuts in a clockwise direction while G13 cuts counter-clockwise. Here are the words you'll use to create the pocket:
D*: Tool radius or diameter. If you use D00, it tells the Haas not to use cutter compensation. The D-Word is modal, so if none is specified, the last value of D will be used.
F: Feedrate
I: Radis of the first circle (or finish if no K). I must be greater than Tool Radius but less than K.
K*: Radius of the finished circle.
L*: Loop count for repeating deeper cuts.
Q*: Radius increment or stepover. To be used with K.
Z: Depth of cut or increment
* = The word is optional and can be left out.
To use these g-codes, start by positioning the tool above the center of the circle. You have a choice--you can either remove all the material inside the circle, or you can cut the circle's radius only. If you want to just cut the radius, use an I value set to the radius and do not specify a K or Q value. If you want to remove all the material, use I and Q values less than the tool's diameter and a K value equal to the circle's radius.
Here's a sample program that just cut's the radius:
%
(SAMPLE G12)
T1 M06 (Select tool 1) ;
G00 G90 G40 G49 G54 (Safe startup) ;
G00 X0 Y0 (Rapid to 1st position) ;
S1000 M03 (Spindle on CW) ;
G43 H01 Z0.1 (Tool offset 1 on) ;
M08 (Coolant on) ;
( Cut the circle ) ;
G12 I0.75 F10. Z-1.2 D01 (Finish pocket CW) ;
G00 Z0.1 (Retract) ;
G00 Z0.1 M09 (Rapid retract, Coolant off) ;
G53 G49 Z0 M05 (Z home, Spindle off) ;
G53 Y0 (Y home) ;
M30 (End program) ;
%
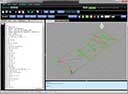
And here's a backplot in G-Wizard Editor of that program's toolpath:

G51: Scaling
G53: Non-Modal Machine Coordinate System
G68: Rotation
G101: Mirror Image
G150: General Purpose Pocket Milling
Try the Free Trial Version of G-Wizard CNC Program Editor...

No credit card required--just your name and email.
Next Article: Thread Milling