Tag That Photo User Guide - Part 4
Search and Photo Viewer
Searching Your Photo Library
TTP's powerful search feature helps you find photos in seconds using multiple criteria.
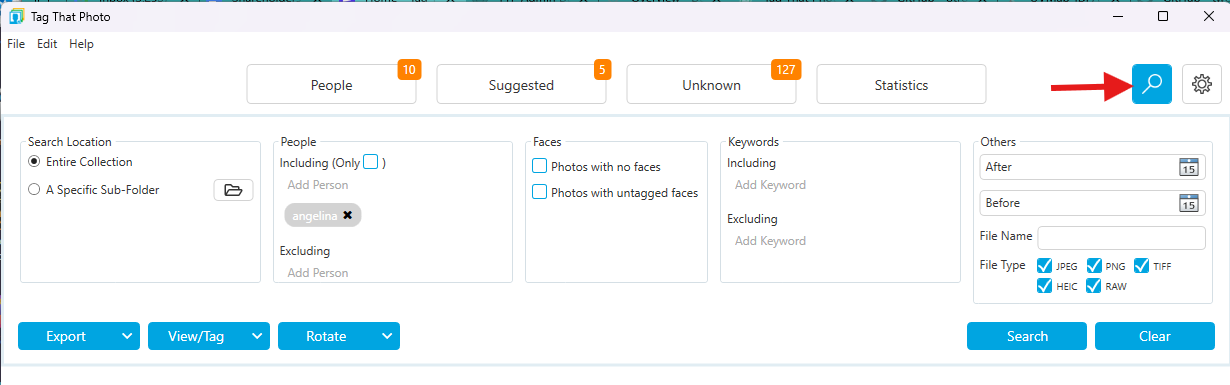
Search Criteria
Build searches using any combination of:
Folder and File Name
- Select specific folders or search entire library
- Enter partial file names to narrow results
- Useful for finding specific photo sessions
People
- Include People: Photos containing selected people
- Exclude People: Photos NOT containing selected people
- "Only" Checkbox: Photos with ONLY the selected people (no others)
Example Use Cases: - Find all photos with both John AND Mary - Find photos with Sarah but NOT John - Find photos with ONLY your children (no other people)
Tags (Keywords)
- Include Tags: Photos with specific keywords
- Exclude Tags: Photos WITHOUT specific keywords
- Wildcard Search: Use asterisk (*) for flexible matching
Wildcard Syntax: - * = matches any characters - Place at beginning, end, or both
Examples:
| Search Term | Matches |
|---|---|
family* | "family picnic", "family vacation", "family reunion" |
*vacation | "summer vacation", "family vacation", "beach vacation" |
*2024* | Any keyword containing "2024" |
birthday* | "birthday party", "birthday celebration", "birthday 2024" |
*beach* | "beach vacation", "our beach house", "day at the beach" |
How to Use: 1. Type your wildcard search term in the Tags field 2. Press Enter 3. All matching keywords are included in search
Practical Example: You've tagged events as "Smith Family Reunion 2020", "Smith Family Reunion 2024", "Jones Family Reunion 2023". Search for *family reunion* to find all family reunions.
Date Range
Select photos within specific date ranges: - Use date pickers for start and end dates - Leave one side open for "before" or "after" searches - Combine with other criteria for precise results
Photos with No Faces
Check this box to find: - Landscape or architectural photos - Photos where face detection missed faces - Photos to verify detection completeness
Tip: Use this to check folders and ensure no faces were missed during detection. If you find faces that should have been detected, use Photo Viewer to manually add them. Click the View/Tag pull-down menu to open one or more search results in the Photo Viewer. You can batch tag them from there.
Photos with Untagged Faces
Find photos containing faces that haven't been identified yet: - Useful for quality control - Helps ensure complete tagging of important people - Combine with folder filter to check specific photo sessions
File Type
Filter by specific image formats: - JPEG - PNG - TIFF - RAW formats - HEIC
Duplicates Only
Use the Duplicates only checkbox to focus search results on duplicate image groups:
- Results display one row per duplicate set (instead of one row per physical file)
- Makes duplicate cleanup and export decisions much faster
- Works well with folder/date filters when reviewing large libraries
Executing Searches
- Set your desired criteria
- Click the Search button
- Results appear in the main area

Working with Search Results
Viewing Results
Search results display as thumbnails with: - Selection checkboxes on the left - Photo preview - File information - Context-specific rightmost column: - Num of Dups when duplicate grouping is enabled - Last scan details in standard result mode
Sorting Results: Click column headers to sort by: - File name - Date taken - Folder location - Last scan date - Num of Dups (when duplicate grouping is enabled)
Tip: In duplicate cleanup sessions, sort by Num of Dups first so you can process the largest duplicate sets quickly.
Folder Navigation Panel
Use the folder tree on the left to: - Filter results by folder location - Expand/collapse folder hierarchies - Quickly focus on specific photo sessions
Selecting Photos
Select Individual Photos: - Click checkbox next to each photo
Select Multiple Photos: - Hold CTRL and click checkboxes - Click first photo, hold SHIFT, click last photo to select range
Select All: - Click checkbox at top of column
Batch Operations
With photos selected, you can:
View/Batch Tag
Open selected photos in Photo Viewer with batch tagging enabled: 1. Select photos 2. Click View/Batch Tag button 3. Photo Viewer opens 4. Tags applied affect all selected photos
Rotate Images
Rotate selected images in 90-degree increments: - Left rotation (-90°) - Right rotation (+90°)
Requirements: - Metadata writing must be enabled in Settings - Rotation updates orientation metadata so images display correctly in other applications
Format-Specific Notes:
TIFF Files: - TTP correctly reads and writes orientation metadata - Windows thumbnail generation may not respect rotation - Full-size display in TTP Photo Viewer shows correct rotation
PNG Files: - Some PNG files cannot be rotated via orientation metadata - Rare issue only affects PNGs without EXIF sections
RAW and HEIC: - Cannot be rotated using TTP at this time - Rotate outside TTP if needed - Requires rescan and JPG thumbnail regeneration after external rotation
Export Images
Export selected photos to another folder:
- Select photos to export
- Click Export button
- Choose destination folder
- Photos copy to destination
When exporting from duplicate-grouped search results:
- TTP exports one file per duplicate set
- The exported file is the oldest/original physical file from that set
- This avoids accidental duplicate copies in export folders
Duplicate Filename Handling:
Previously: Files with duplicate names would overwrite each other
Now (3.4): TTP automatically adds number suffixes to preserve all photos: - photo.jpg - photo_1.jpg - photo_2.jpg - etc.
This ensures no photos are lost during export, even when consolidating from multiple sources with same filenames.
Best Practice: Export to folders NOT managed by TTP to avoid confusion and prevent TTP from detecting exported images as new photos.
Use Cases: - Creating photo books (gather selected photos in one folder) - Preparing slideshow sets - Sharing specific photo collections - Backing up particular photo sessions
Double-Click to View
Double-click any photo thumbnail to: - Open Photo Viewer - View full-size image - See all faces and tags - Navigate through all search results
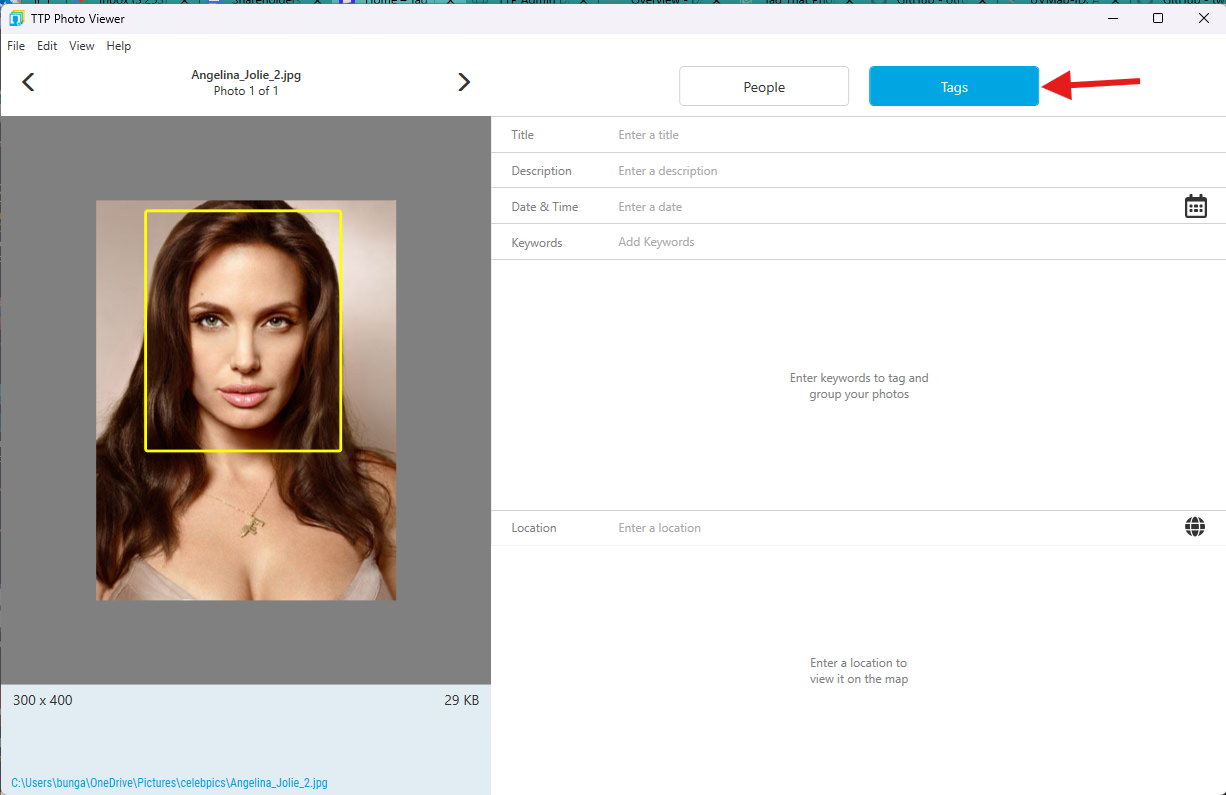
Photo Viewer
Photo Viewer is your detailed view for individual photos, providing full access to faces, tags, and metadata.
Accessing Photo Viewer
Open Photo Viewer by: 1. Double-clicking any photo thumbnail in search results 2. Right-clicking image(s) in Windows Explorer, selecting "Open in TTP Photo Viewer" 3. Batch mode: Select multiple images in Explorer, right-click, choose "Open in TTP Photo Viewer for batch tagging"
Photo Viewer workspace enhancements:
- Automatically opens on a second monitor when one is available
- More reliably activates to the foreground when launched
- Refreshes viewer and face gallery content automatically after background scans complete

Photo Viewer Layout
The interface includes:
- Main Display: Full-size photo with face region outlines
- Face Thumbnails (Right Panel): All detected faces in this photo
- Navigation (Top): Previous/next photo buttons
- Tabs (Bottom): Faces and Tags
- Menu Bar: File, View, and other options
Viewing and Tagging Faces
Face Panel Overview
The right panel shows all faces detected in the current photo:
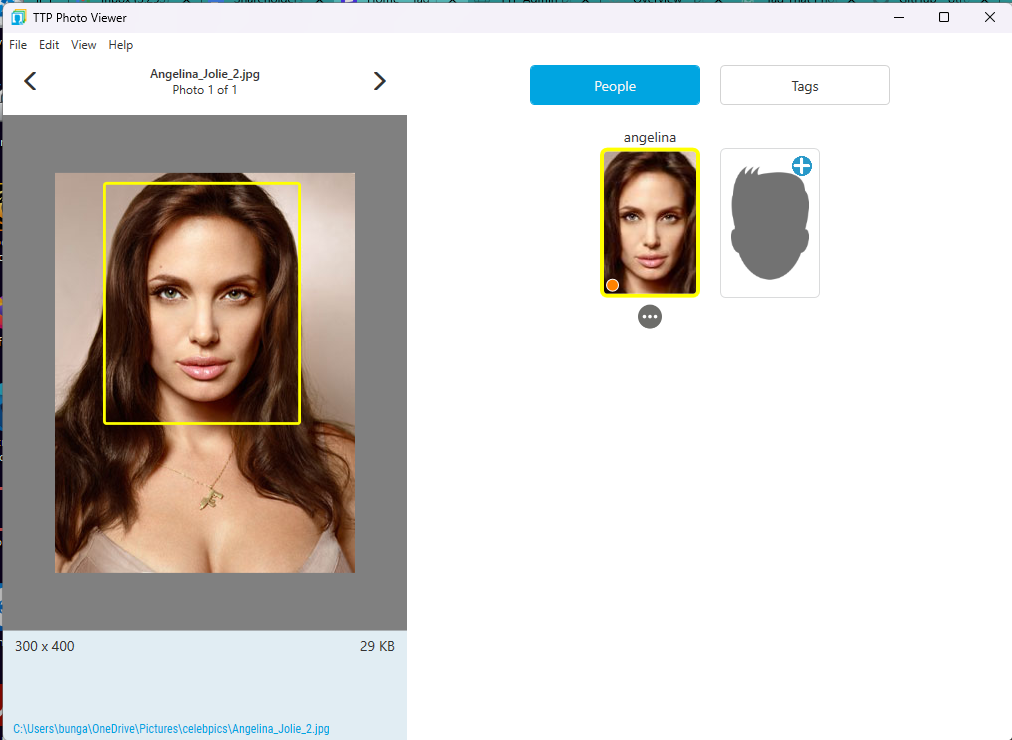
Face Frame Colors: - Yellow: Currently selected face - Green: Tagged (named) face - Red: Untagged (unknown) face - Grey: Deleted face (when "Show Deleted Faces" enabled)
Navigating Between Faces
Enhanced Navigation:
When Photo Viewer opens, the first face is automatically highlighted:
Keyboard Navigation: - CTRL-Left Arrow: Previous face - CTRL-Right Arrow: Next face - First untagged face is selected automatically on load
Mouse Navigation: - Click any face thumbnail to select it - Selected face zooms/highlights in main display
Tagging Faces in Photo Viewer
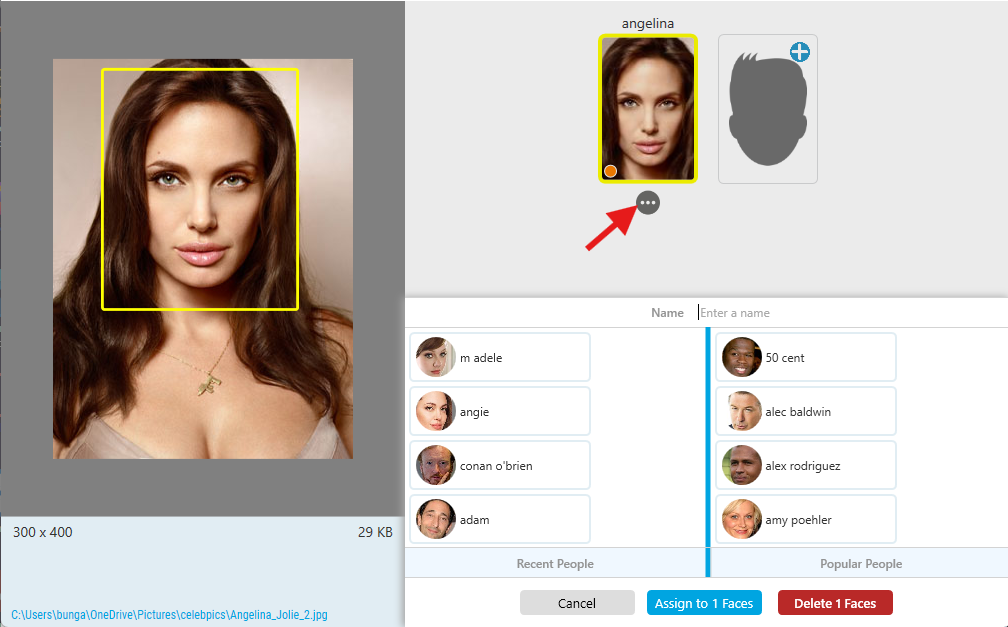
For any untagged face:
- Select the face (click thumbnail or navigate with CTRL-Arrow)
- Press CTRL-N OR click the 3-dot menu icon
- Person Selector appears
- Type or select person's name
- Press Enter or click Save
Batch Tagging: - CTRL-N: Opens Person Selector for selected face - CTRL-D: Deletes all remaining unknown faces - DEL: Deletes only current face
Viewing Suggestions in Photo Viewer
Suggestions also display within Photo Viewer.
When TTP has a suggestion for an unknown face: 1. The suggested name appears near the face 2. Options display: - Confirm: Accept suggestion (CTRL-K) - Reject: Decline suggestion (CTRL-X) - Name: Assign different name (CTRL-N) 3. Process suggestions without leaving Photo Viewer
This streamlines the workflow when reviewing photos individually.
Manual Face Tagging
Manual Face Tool
Sometimes TTP doesn't detect a face that you want to tag. You can manually add it.
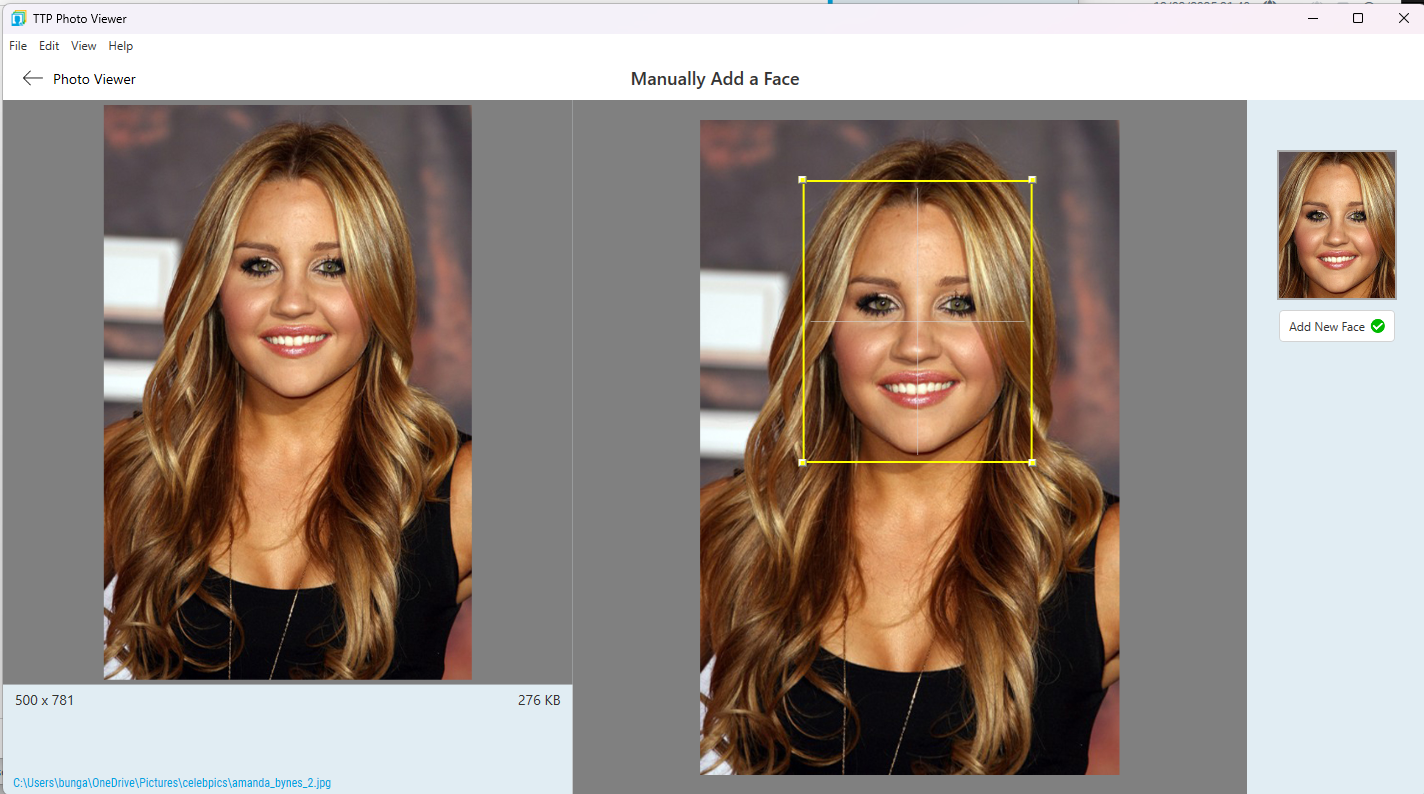
To manually add a face:
- Click the blank face thumbnail (or + icon) in the face panel
- A selection box appears on the main image
- Reference image on left displays showing existing faces for context
- Drag the box corners to resize
- Drag the box to reposition over the face
- Click "Add new face" button below the thumbnail
- Person Selector appears
- Enter the person's name
- Press Enter to save
Features of the Manual Tool: - Improved visual feedback during selection - Reference images help ensure correct positioning - Better box controls for precise face framing - Clear visual confirmation before committing
Note: Manually tagged faces are marked with a red dot and are not used for face recognition/suggestions, but are fully searchable and included in all other TTP features.
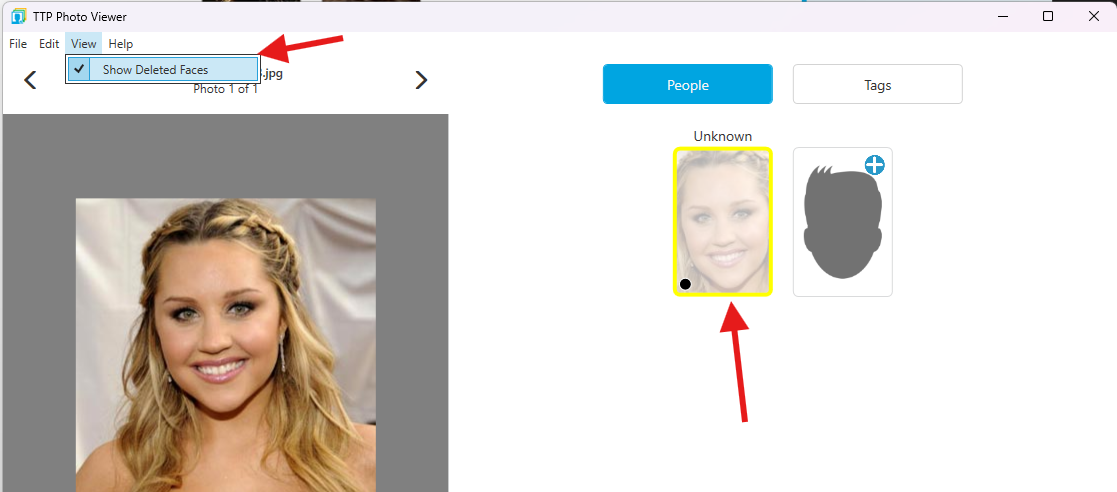
Viewing Deleted Faces
If you've deleted faces and want to restore them:
- Open the photo in Photo Viewer
- Select View > Show Deleted Faces from menu
- Deleted faces appear as greyed-out thumbnails
- Right-click any deleted face
- Select Restore to bring it back
Working with Tags (Keywords)
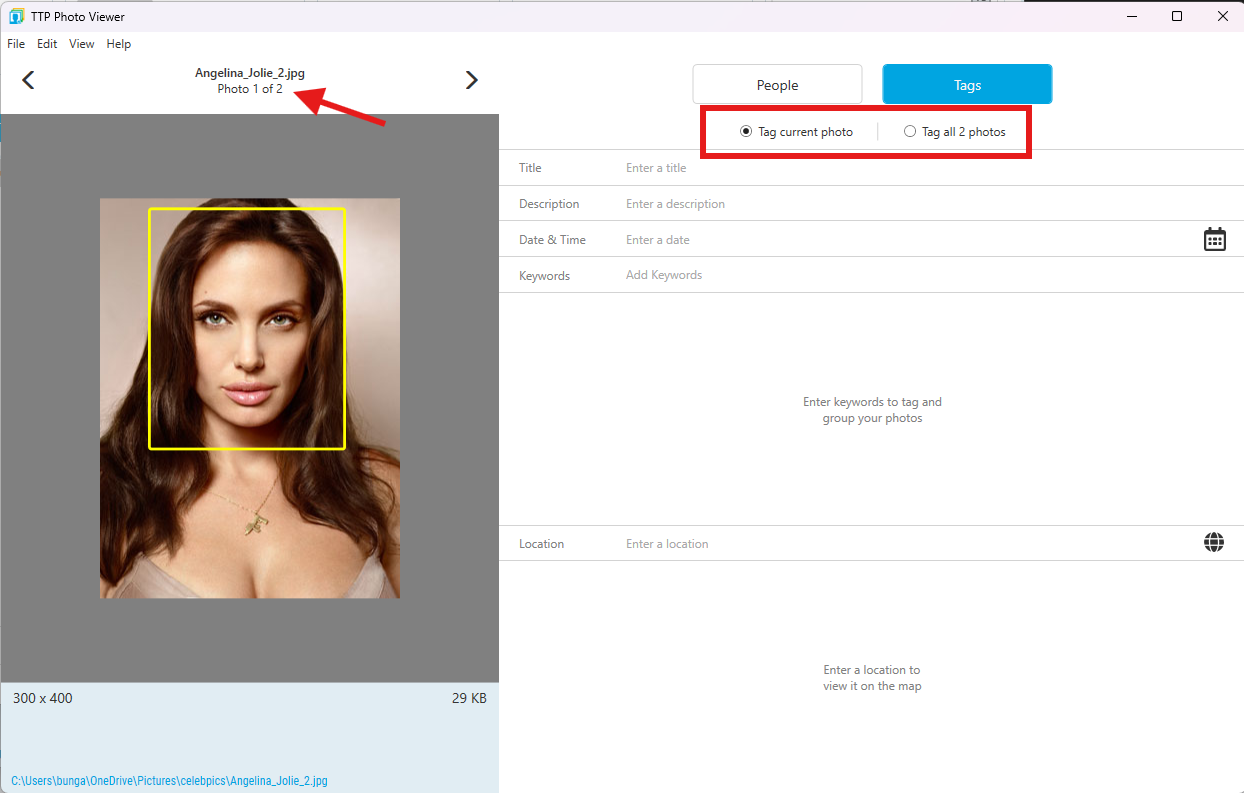
Switch to the Tags tab to manage keywords, GPS location, and other metadata.
Adding Keywords
- Click the Tags tab
- Type keyword in text field
- Press Enter or click Add
- Choose scope:
- Tag Current Photo: Apply to this photo only
- Tag All: Apply to all photos in current batch
Batch Context: When viewing multiple photos (batch tagging mode), only keywords consistent across all photos are displayed. This prevents accidentally removing keywords from some photos.
Removing Keywords
- Click the Tags tab
- Select keyword(s) to remove
- Click Remove button
- Choose scope (current or all)
Keyword Best Practices
Use keywords for: - Events: "birthday party 2024", "graduation", "wedding" - Locations: "beach house", "Paris trip", "grandma's house" - Categories: "landscape", "food", "pets" - Projects: "2024 photo book", "family history", "vacation memories" - Activities: "hiking", "skiing", "swimming"
Tip: Be consistent with keyword spelling and format. "beach house" and "beach-house" are different keywords.
Geo-Tagging
Adding GPS Coordinates
The Tags tab includes GPS location features:
- Click Tags tab
- Locate the GPS section
- Choose input method:
- Search by Address: Type location name
- Click on Map: Place pin directly
- Enter Coordinates: Input lat/long values
- Apply to current photo or all in batch
Requirements: - Internet connection required for map display and address lookup - Uses OpenStreetMap (open-source mapping service)
Rate Limiting
OpenStreetMap limits transaction frequency. If you see "no Internet connection" warnings: - You may have exceeded the rate limit - Wait a few minutes before continuing - Consider batching location additions
Offline Work
Without Internet connection: - Cannot view maps visually - Cannot perform address lookups - Can still view existing GPS coordinates - Can manually enter coordinates if known
Photo Viewer Navigation
Moving Between Photos
When viewing multiple photos (from search results or batch mode):

- Left Arrow: Previous photo
- Right Arrow: Next photo
- Keyboard: Use arrow keys
Photos cycle through your current result set or selected batch.
Closing Photo Viewer
- Click X button
- Press ESC key
- Select File > Close
Changes are saved automatically as you work.
Windows Explorer Integration
TTP integrates with Windows Explorer for convenient access to features.
Accessing TTP Menu
Windows 10: Right-click on any folder or image(s) to see TTP submenu directly.
Windows 11: 1. Right-click on folder or image(s) 2. Select "Show More Options" 3. TTP submenu appears in expanded menu
Tip: You can restore the full Windows 10 right-click menu in Windows 11. Search online for "Windows 11 restore classic context menu" for instructions.
Folder Operations
Right-click on any folder to access:
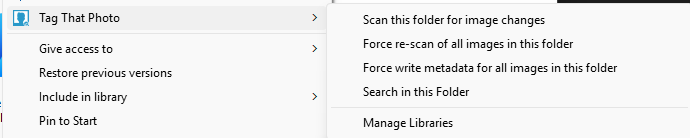
Scan This Folder for Image Changes
Searches for image modifications (new or changed) not automatically detected by TTP. Use when: - You've disabled live monitoring - Added many new photos at once - Used another program to modify images - Want to force a refresh
Force Rescan of All Images
Detects faces in all images as if scanning for the first time. Use when: - Changing minimum face size setting - Suspecting missed faces - Testing different detection settings - Running Update Existing Faces Only mode to avoid re-adding intentionally deleted faces - Force rescan will NOT restore faces deleted after v3.2 installation (deleted faces are tracked). Faces deleted before v3.2 upgrade will be restored.
Force Write Metadata for All Images
Immediately writes any pending metadata updates to images. Use when: - Preparing to back up or export images - Ensuring all tags are saved before migrating - Want to guarantee metadata is current
Search in This Folder
Opens TTP search with this folder pre-selected. Quick way to search specific locations.
Manage Libraries
Opens TTP folder selection utility. Shortcut to Settings > Add Folders.
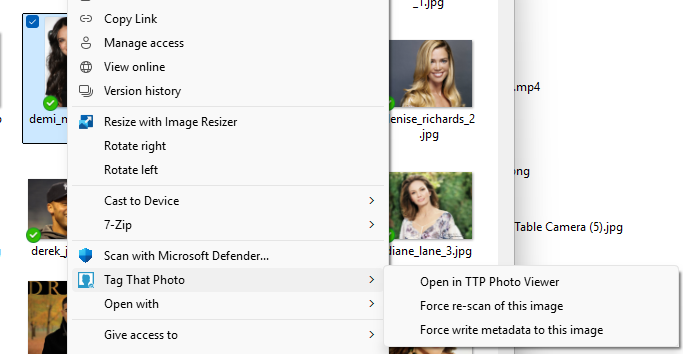
Image Operations
Select one or more images in Windows Explorer, then right-click:
Open in TTP Photo Viewer
Opens selected image(s) in Photo Viewer: - Single image: Standard view - Multiple images: Batch viewing mode (navigate between photos)
Open in TTP Photo Viewer for Batch Tagging
Same as above but explicitly enables batch tagging mode for applying tags to all selected images.
Force Rescan of Selected Images
Rescans only the selected images for faces: - Removes previous face detections - Treats images as first-time scan - Applies current detection settings - Supports scan modes that can update existing face data without restoring intentionally deleted faces
Note: Will NOT restore faces deleted in v3.2 or later. Use "View > Show Deleted Faces" in Photo Viewer to restore deleted faces.
End of Part 4: Search & Photo Viewer
Continue to Part 5: Metadata, Archiving & Technical Details...