Tag That Photo User Guide - Part 3
Working with People and Statistics Dashboard
Working with People
The People tab is your main hub for viewing and managing all identified individuals in your photo library.
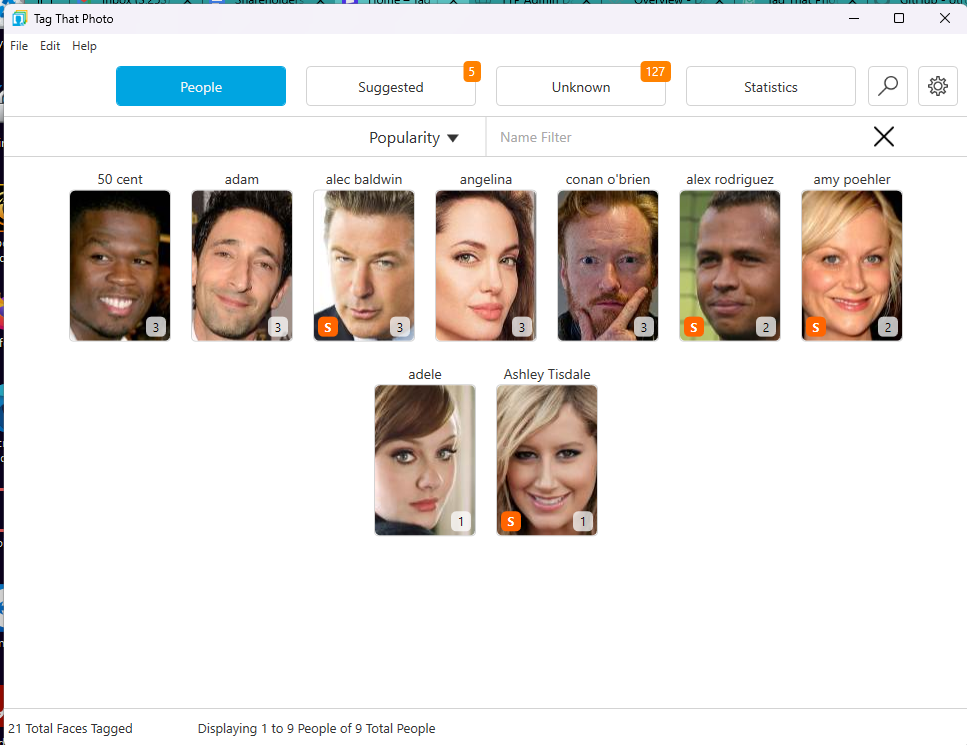
Tip: An "S" icon will be displayed at the bottom left of each person's main thumbnail if they have Suggestions. The count of how many tagged faces will be shown at the bottom right of each thumbnail.
Person Groups (New in Sept 2026)
Use groups when you want to work with a set of people together — a sports team, a family branch, coworkers — without hunting for each person.
Colored group tiles sit at the top of the People view, above All people. Each tile shows the group color, the group name, and a member thumbnail. If the group has no thumbnail yet, the tile shows the group’s initial on the group color. Tile text switches between light and dark so the name stays readable, including in dark mode.
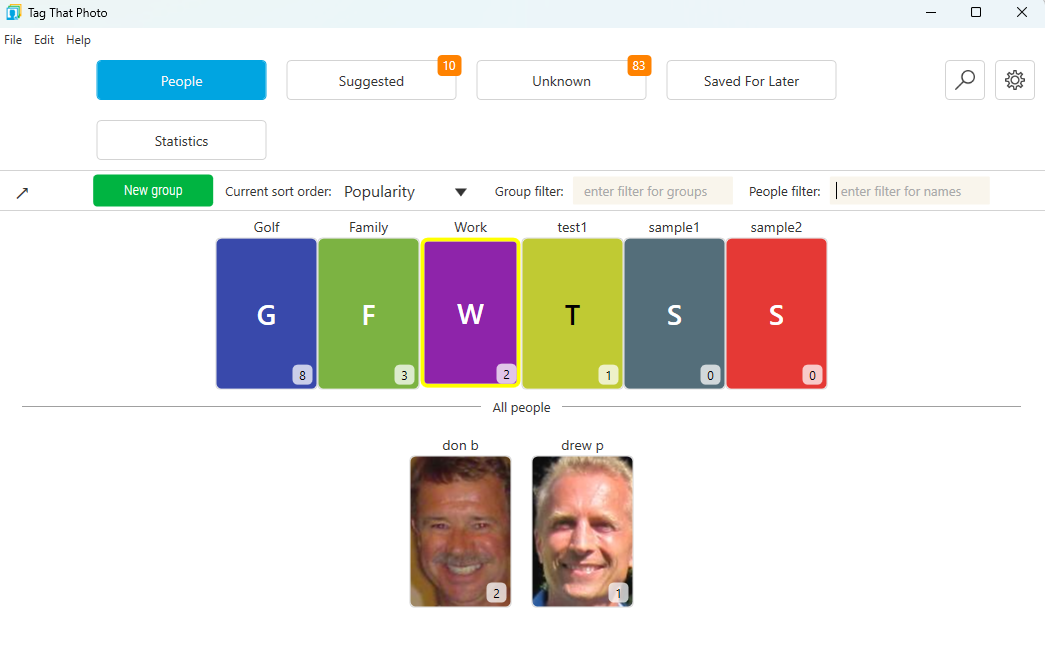
Create, rename, and delete a group
- Click New group
- Enter a name and confirm
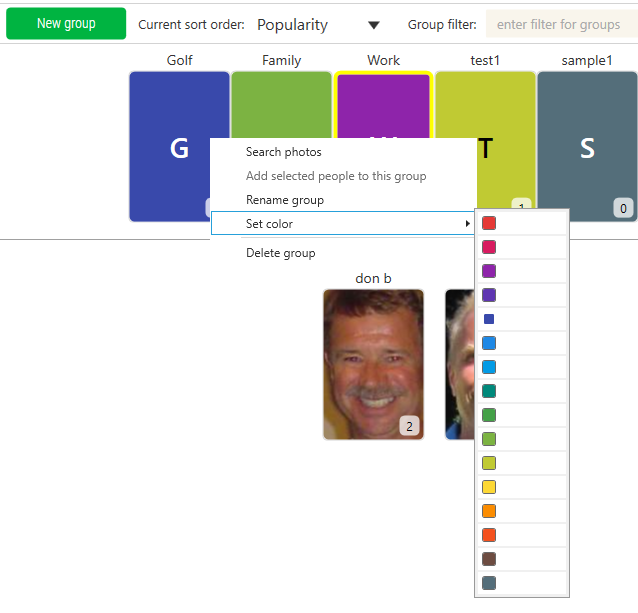
To change a group later, right-click its tile:
- Search photos — open Search for photos of anyone in the group (double-click the tile does the same)
- Add selected people to this group — available when one or more people are selected
- Rename group
- Set color — pick a swatch from the built-in palette of sixteen colors
- Delete group — Tag That Photo asks you to confirm. People in the group are not deleted; they only leave the group
A group cannot use a name that already belongs to another group or to a person. If you try, Tag That Photo shows: That name is already used by a group or a person.
Use Group filter (watermark: enter filter for groups) to narrow the group tiles. People filter still filters people by name.
Add and remove people
- Select one or more people, then right-click the group and choose Add selected people to this group
- Or drag the selected people onto the group tile
- Click a group to select it. The people grid then shows only members of that group. Click the same group again to show everyone
- With a group selected, right-click a person and choose Add to selected group or Remove from selected group
Merging two people keeps their group memberships, so combining duplicates does not drop them from a team or family group.
Assign unknown faces to a group
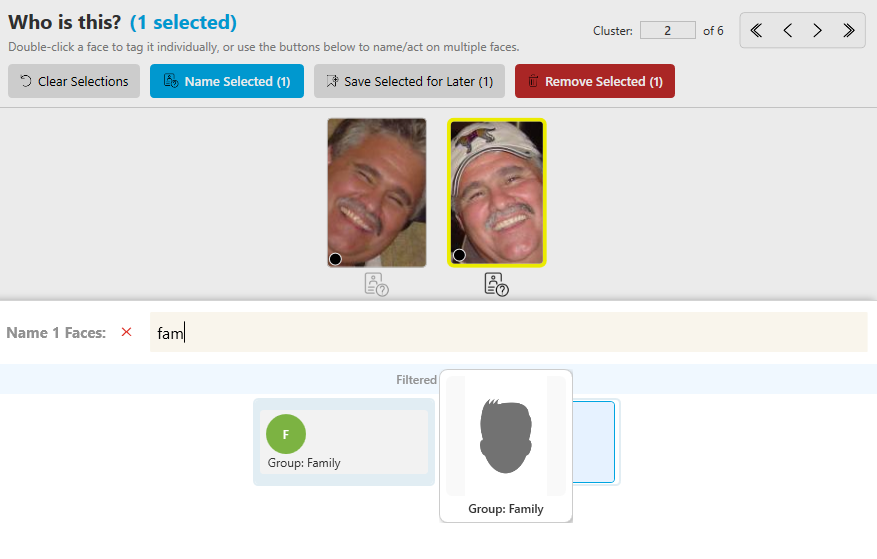
From the person chooser — on Unknown, Suggested, and other naming prompts — each group appears as Group: Name in the group color.
Choosing a group does not merge those faces into one person. Each selected face becomes its own person inside the group, named automatically, for example Golfing_person_0001, Golfing_person_0002. Those faces are enrolled for recognition under the group. Rename a person later the same way you rename anyone else.
Viewing a Person's Faces
Double-click any person thumbnail to view all their tagged faces. On the People grid, use arrow keys to move among people on the current page and Page Up / Page Down (or the mouse wheel) to change pages. Enter opens the highlighted person.
Standalone People Window & Workspace Coordination (New in June 2026)
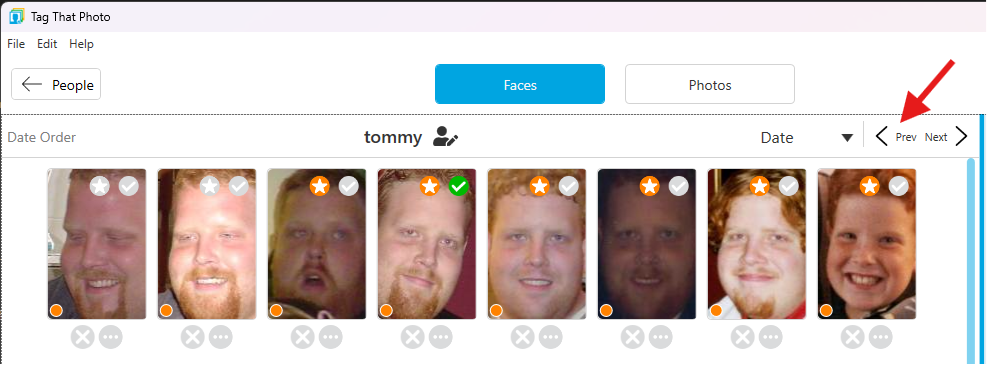
When you click on the small arrow at the top left, the app launches a standalone, dedicated People Window to view and organize previously tagged faces.
Intelligent Workspace Coordination: The main Tag That Photo workspace dynamically synchronizes with the standalone window. If you have the standalone window open and click on the "People" tab in the main application, the main workspace will automatically redirect to the Unidentified or Unknown tab, keeping your workflow optimally organized for tagging new faces rather than duplicating views.
The popout window remains fully functional, letting you review tagged faces in one window while processing Unknowns/Suggestions in the main app.
Person Detail Navigation Improvements
Person detail Faces and Photos pages now include:
- More visible paging controls
- Keyboard paging with Page Up / Page Down (and the mouse wheel)
- Arrow keys to move among thumbnails on the current page (CTRL + arrows does the same)
- On a person's Faces page, Shift+Left returns to the previous view
- Visible scrollbars for better discoverability in large galleries
- Cleaner headers with global Search and Settings controls
Exporting Photos from a Person's Photos Gallery
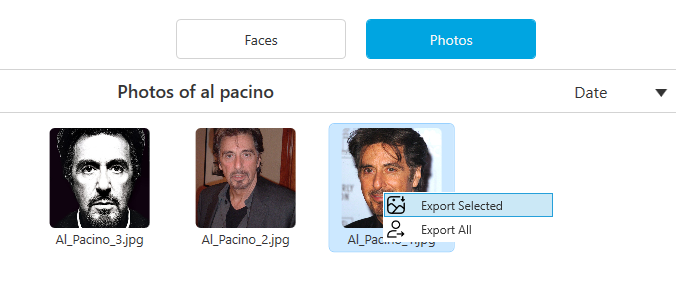
In addition to exporting face thumbnails, you can export the full photos linked to a person from their Photos gallery — using the same export wizard already familiar from Search.
- Open a person and switch to the Photos page
- To export a subset: select one or more photo thumbnails, right-click, and choose Export Selected
- To export everything for that person: right-click a photo and choose Export All
- Choose a destination folder (outside your TTP monitored libraries)
Tip: Face-thumbnail export (cropped faces) is still available from the Faces page and People view menus. Photo export copies the original image files with metadata.
Face Organization
Default View: Faces display in image date order, showing chronological progression. This makes it easy to: - See how someone has changed over time - Identify photos from specific time periods - Spot duplicate or near-duplicate photos
Alternative View: Switch to Favorites view to see favorite faces (used for suggestions) displayed first. Favorites are important for recognition purposes.
Face Thumbnail Indicators
Each thumbnail may display several indicators:

- Checkmark (✓): Profile/default thumbnail for this person
- Orange Star (★): Favorite face used for generating suggestions
- Colored Dot (bottom left):
- Black: Face detected by TTP only
- Orange: No matching metadata tag
- Red: Manually created face
- Purple: Metadata tag exists but no matching TTP face found
Managing People
Renaming a Person
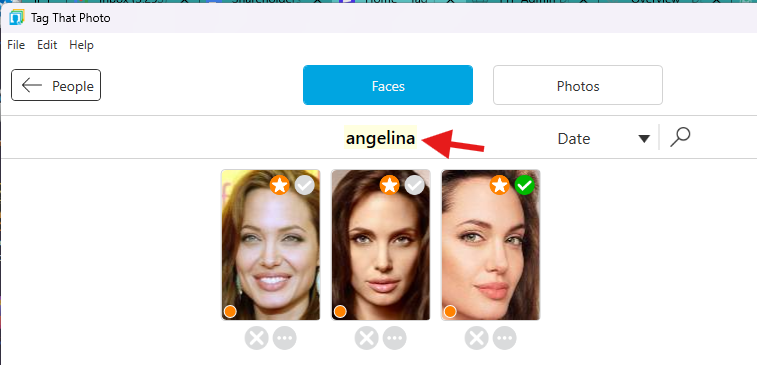
- Double-click the person's thumbnail to view their faces
- Click the Edit (pencil) icon beside their name in the title bar
- Enter the new name
- Press Enter to save
Changing the Default Thumbnail
The default thumbnail represents the person in the People view and search results.
To change it: 1. View the person's faces 2. Click the small green arrow at the top right corner of any face thumbnail 3. That face becomes the new default thumbnail
Merging Duplicate People
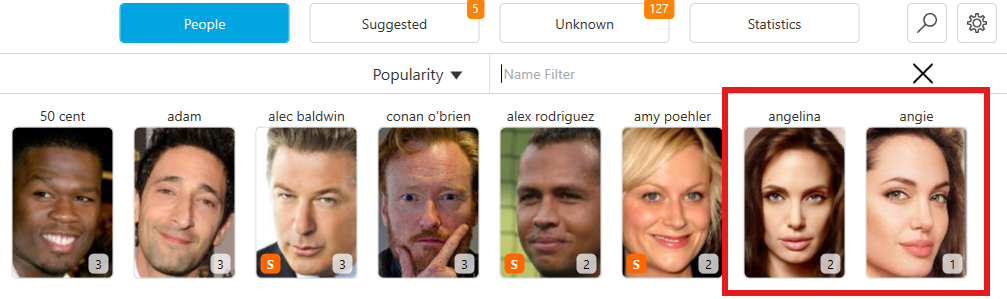
Sometimes you'll discover you've created duplicate entries for the same person (e.g., "John Smith" and "Smith, John").
To merge duplicates:
- In the People view, select the duplicate person thumbnails (CTRL-click to select multiple)
- Right-click on any selected thumbnail
- Select "Merge the selected People into [name]"
- TTP combines all faces into a single person entry
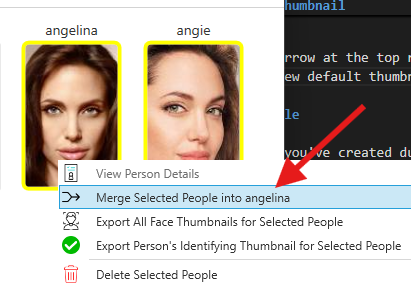
Tip: The resulting name will be the name of the person you right-clicked on. Choose wisely if the names differ. Group memberships from both people are kept.
Managing Favorite Faces
Favorite faces are crucial to TTP's suggestion system. Understanding and managing them properly leads to better suggestions.
What Are Favorite Faces?
- Face templates used specifically for generating suggestions
- Limited to maximum of 100 per person
- Initially auto-selected (up to 50 high-quality faces)
- Manually adjustable by you
Why Limit Favorites?
- Performance: Smaller template database = faster suggestion generation
- Quality: Focus on best face examples improves accuracy
- Variety Management: Your library may contain widely varying image qualities (old scans, social media images, high-res photos, etc.)
Viewing Favorite Faces
When viewing a person's faces, favorite faces are shown first by default (when sorted by Favorites).
Toggling Favorites
Click the star icon at the top right of any face thumbnail:
- Orange Star (★): Currently a favorite (used for suggestions)
- Grey Star (☆): Not a favorite
- No Star: Face is not suitable for recognition (manually tagged or low quality score)
Best Practices for Favorites
Good Favorite Faces: - Front-facing or slight angle - Well-lit and in focus - Clear facial features - Eyes open and visible - Minimal obstructions (no sunglasses, hands, etc.) - At least 150 pixels wide
Poor Favorite Faces: - Profile shots (side view) - Blurry or out of focus - Heavily shadowed - Sunglasses or masks - Extreme angles - Low resolution
Regular Review: If you notice poor suggestions for a person, check their favorites: 1. View the person's faces 2. Sort by Favorites 3. Look for blurry, profile, or poor-quality images 4. Toggle off (deselect) poor favorites 5. Toggle on (select) better quality alternatives
Face Thumbnail Operations
Regenerating Face Thumbnails
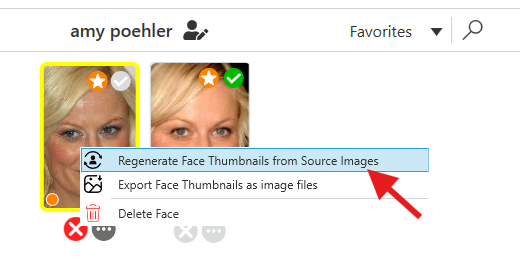
If a face thumbnail doesn't display properly, you can regenerate it:
- View the person's faces
- Select one or more face thumbnails
- Right-click on any selected thumbnail
- Select "Regenerate face thumbnails"
Exporting Face Thumbnails
Export face images for creative projects, collages, or backup purposes.
For a Specific Person:
- View the person's faces
- Select one or more face thumbnails
- Right-click on any selected thumbnail
- Select "Export selected face thumbnails"
- Choose destination folder (must be outside TTP monitored folders)
For Multiple People:
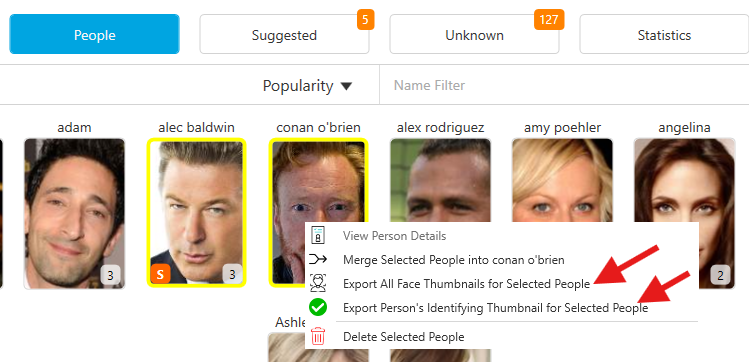
- In People view, select multiple person thumbnails
- Right-click on any selected person
- Choose:
- "Export all face thumbnails" (all faces for each person)
- "Export profile thumbnails" (one face per person)
For All People:
From the File menu, select "Export All Face Thumbnails (profile only)"
Creative Projects: - Create aging time-lapse GIFs (faces export in date order) - Build photo collages - Generate family tree visualizations - Make birthday slideshow materials
Important: Always export to a folder outside your TTP monitored library to prevent TTP from detecting the exported faces as new images.
Statistics Dashboard
TTP provides a comprehensive Statistics Dashboard providing insights into your photo library.
Accessing Statistics
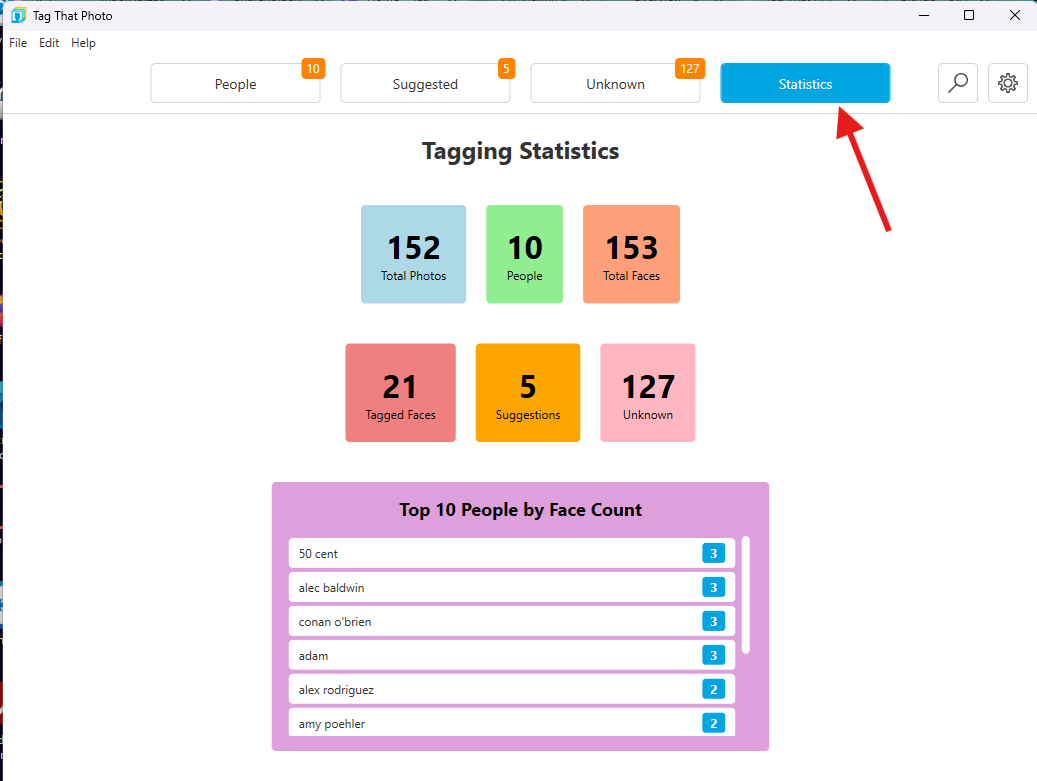
Click the Statistics tab in the main TTP window to view your library insights.
Available Statistics
The dashboard cards summarize your library at a glance:
- Total Photos — Photos currently in your TTP library across monitored folders
- People — Identified people
- Total Faces — All detected faces (often higher than the photo count, because many photos contain more than one person)
- Tagged Faces — Faces already identified
- Suggestions — Faces waiting for you to confirm a suggested name
- Unidentified — Faces with no name and no suggestion yet (your remaining tagging backlog)
- Saved for Later — Unidentified faces you marked to handle later
- Top people by face count — Who appears most often in your library
Use Unidentified (and Suggestions) to estimate a tagging session. A rough pace is 100–200 faces per hour, depending on cluster size.
Data Quality Dashboard (Stats > Data Quality)
Use the Data Quality panel to find and fix common catalog problems. Each row shows a count and, when relevant, Review, Fix / Retry, or Delete.
October 2026: Each section can be expanded or collapsed, so you can focus on the issue you are fixing. While a fix or delete runs, that action shows Working…. When it finishes, the button shows a check mark and the list refreshes with the new counts. A long Data Quality scan appears on the status bar as Quality Scan.
Review vs export: Review opens a sample of affected photos in Photo Viewer (about 50). For Metadata Write Failures, that sample is the most recently failed photos—not a filter by JPEG vs HEIC/RAW. Export Report writes the full list, including file paths, so you can follow up outside TTP. Refresh recalculates counts and Data Quality without leaving the Statistics tab—use it after Review (or after a Retry / re-scan has finished in the background).
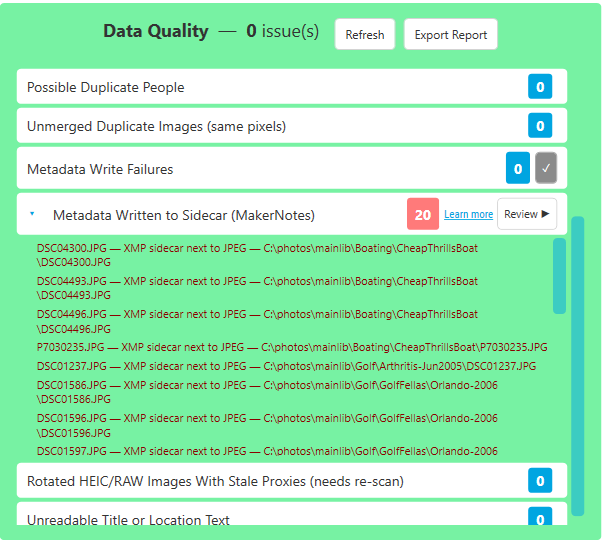
Metadata Write Failures
This count is photos where TTP tried to write metadata to the file (ExifTool) and the write did not succeed. That write can include face regions, Tags-panel fields (title, keywords, date, location, and similar), or both—whatever was waiting to be saved at the time.
- The export line includes an error category, the error message, and the full file path.
- These are current failures. They stay on the list until a later write succeeds. TTP does not keep retrying them on every background metadata pass (unless the original file or its sidecar has changed). A lasting failure also stores the reason and the file’s last-write time. Locked files that were only in use temporarily are retried automatically and are not included here. A missing file is parked in the backlog and is tried again if the file comes back.
- Review opens the newest 50 failures. Retry queues every remaining failed photo, not just the Review sample.
Unreadable Title or Location Text
This is not a live write error. It flags catalog fields (title, description, author, copyright, location title, and address parts) that look like camera MakerNotes binary data rather than real text—often from older imports. Fix clears those TTP fields so they can be rewritten cleanly. It does not rewrite hidden camera MakerNotes inside the file.
Rotated HEIC/RAW Images With Stale Proxies (needs re-scan)
TTP displays HEIC and RAW files using a JPEG proxy. An older issue could leave those previews wrongly rotated for some 90°/270° images.
- Review only opens a sample of those photos; it does not change files.
- Fix & Re-scan deletes the bad proxy JPEGs (not the original HEIC/RAW), marks those photos for reprocessing, and force-rescans the affected library folders so proxies are rebuilt. After you use Fix, this check is turned off so it does not keep reappearing.
Date Discrepancies
Photos whose Date Taken tags do not agree (EXIF vs IPTC/XMP, or a file date that differs from the catalog).
- Review opens affected photos in Photo Viewer. On the Tags tab, choose Yes (keep camera/EXIF date), No (use the other metadata date), or Cancel (leave it flagged).
- Fix dates applies that same choice to every flagged photo. Cancel on the Fix dialog leaves the list unchanged.
- The chosen date is written to all date tags when metadata export runs. Refresh Data Quality after Review or Fix.
Other checks
Other rows may include orphaned faces, missing thumbnails, people with no faces, images still pending processing, overlapping face regions, duplicate people, and unmerged duplicate images (same pixels stored as separate photos). Use the button on each row for the matching one-click repair.
Inspecting problem files with ExifTool
Export Report gives you full paths. To see why a file failed, or whether title/location in the catalog is real text vs camera binary, inspect the file with ExifTool—the same engine TTP uses.
Use TTP’s copy when you can, so the version matches what TTP ran:
"C:\Program Files\Tag That Photo\exiftool.exe"
Replace PHOTO.jpg with the path from the export. Prefer read-only commands first. TTP already retries MakerNotes writes with ExifTool’s -m (ignore minor errors), then -F (try to fix offsets), then (for JPEG) an XMP sidecar. Manually rewriting with -F can make offset errors worse. See ExifTool FAQ #15.
The same steps are listed under Troubleshooting.
Two different MakerNotes problems
| Data Quality row | What is wrong |
|---|---|
| Metadata Write Failures | ExifTool could not write into the image file (often bad MakerNotes offsets). Face names and tags may still be in an .xmp sidecar. |
| Unreadable Title or Location Text | TTP’s catalog stored camera MakerNotes binary as title or location (common on older Panasonic imports). Fix clears those TTP fields; it does not rewrite hidden MakerNotes in the file. |
Start here
-G1 -a -s shows which group each tag comes from (Panasonic vs IPTC vs XMP vs EXIF). That is how you tell leaked MakerNotes from a real title. If TTP wrote a sidecar, inspect both:
Write failures (offsets)
Look for messages such as Bad MakerNotes offset or Incorrect MakerNotes offset. Open the HTML dump in a browser to inspect IFD pointers. To read the file while ignoring minor errors:
If you need to test whether a write is possible, copy the file first—do not experiment on the original.
Unreadable title or location
Show every copy of the text fields, not just the first:
exiftool -G1 -a -s -Title -XPTitle -Headline -ObjectName -Description -ImageDescription -Caption-Abstract -Artist -Author -Creator -Copyright -XPAuthor -Country -Country-PrimaryLocationName -State -Province-State -City -Location -Sub-location -LocationShown "PHOTO.jpg"
On many Panasonic cameras the binary lives in the Panasonic group:
exiftool -G1 -a -s -Panasonic:Title -Panasonic:Country -Panasonic:Location -Panasonic:BabyName "PHOTO.jpg"
If the group is Panasonic (or another camera make) and the value looks like punctuation and dots rather than words, that matches Unreadable Title/Location. Real titles usually appear under XMP-dc, IPTC, or EXIF (XPTitle).
JSON in a form close to what TTP reads:
Faces, keywords, date, GPS, orientation
exiftool -j -struct -G1 -RegionInfo -RegionInfoMP -ImageRegion -PersonInImage "PHOTO.jpg"
exiftool -G1 -a -s -Keywords -Subject -XPKeywords -HierarchicalSubject "PHOTO.jpg"
exiftool -G1 -a -s -DateTimeOriginal -CreateDate -ModifyDate -OffsetTimeOriginal -GPSDateTime "PHOTO.jpg"
exiftool -G1 -a -s -n -GPSLatitude -GPSLongitude -GPSAltitude -Orientation -ImageWidth -ImageHeight "PHOTO.jpg"
Stale HEIC/RAW proxies are a preview/orientation issue, not MakerNotes. Still useful:
Suggested order: validate and grouped dump → sidecar check → -v2 / HTML dump if the write failed → Panasonic (or camera) title/location tags if catalog text looks wrong → only then a write test on a copy.
Using Statistics to Guide Your Work
Before a Tagging Session
Check Statistics Dashboard to: 1. See current unknown face count 2. Estimate time needed (roughly 100-200 faces per hour depending on cluster sizes) 3. Set realistic goals for the session
During Major Projects
Monitor statistics when: - Importing new photo batches - Merging folders from different sources - Verifying face detection quality across folders
After Tagging Sessions
Review statistics to: - Celebrate progress (unknown count decreased!) - Verify expected face detection (does face count seem reasonable for photo count?) - Identify if you need another session
Understanding Your Collection
Statistics reveal patterns: - Who dominates your photo collection - How many people you've photographed over time - The scale of your archival project
Statistics Accuracy
Refresh timing: Counts and Data Quality are recalculated when you open the Statistics tab, when you click Refresh, and after a Data Quality Fix/Retry. Leaving the tab cancels a load that is still running.
Exporting a Data Quality Report
Use Export Report on the Statistics dashboard for a saved HTML copy of Data Quality. The report includes every item in each section (not the Review sample of 50). Each detail line is numbered so you can match the list to the section count. Full file paths are clickable: they open the photo in Tag That Photo’s Photo Viewer (Edge may ask you to allow the tagthatphoto link). Tag That Photo should be running, or Windows will start it. Metadata write failures include ExifTool warning text when it was stored (not only “0 image files updated”) and which sections TTP was trying to write. If the report cannot open automatically, Tag That Photo still shows the saved file location so you can open it yourself.
Working with Metadata
Photo Metadata Settings
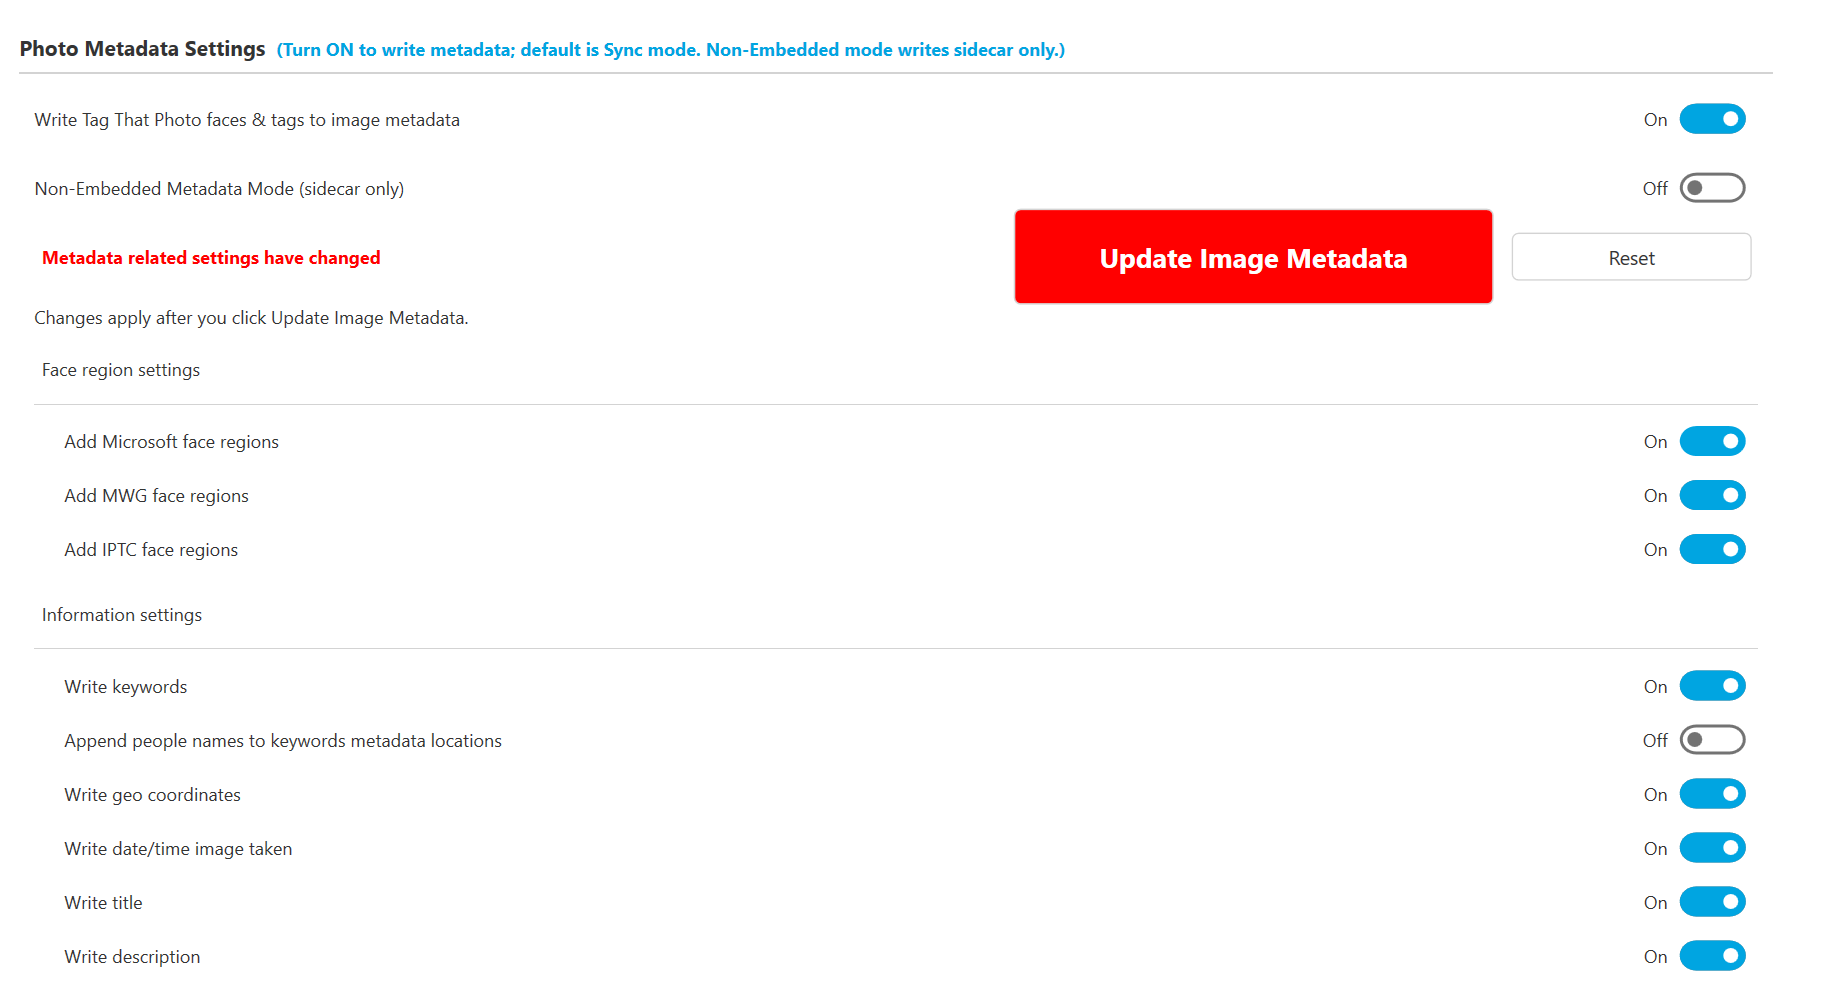
Tag That Photo offers granular control over which metadata fields are updated by TTP.

Access these settings from the Settings page.
Write Tag That Photo Faces & Tags
Master Control: This primary setting enables or disables all metadata writing. Turn this OFF if: - You don't want TTP to write to your images - Your image drive is write-protected - You're using TTP for browsing only
When this setting is OFF, TTP performs no metadata writes at all (neither Sync mode nor Non-Embedded mode).
When enabled, TTP writes metadata using industry standards (behavior depends on whether Non-Embedded Metadata Mode is on or off — see Part 5 for details): - JPEG / TIFF: Metadata embedded directly in image files (Sync mode); XMP sidecar only (Non-Embedded mode) - HEIC: Both embedded XMP and XMP sidecar (Sync mode); XMP sidecar only (Non-Embedded mode) - PNG / RAW: Metadata always written to XMP sidecar files only
Important distinction: Non-Embedded Metadata Mode means sidecar-only writing. It is not a soft “prefer sidecar” option.
Metadata workflow improvements in recent releases:
- Newly scanned images are marked for export only when current settings require metadata writes
- Pending metadata changes appear only when values actually differ
- After a folder scan you start yourself, TTP can ask whether to write pending metadata now. OK starts export; Cancel leaves files unchanged (they stay marked until you export later).
- A Reset option in Settings can revert metadata export choices to values from the start of your current session
Important Notes:
- Moving Images: When moving RAW, HEIC, PNG, or TIFF images — and JPEG images if Non-Embedded mode is enabled — always move the
.xmpsidecar file with them: - Always copy the .xmp file along with the image
- The sidecar contains your valuable face tags and metadata
-
JPG thumbnails (for RAW/HEIC) are less critical and will be recreated if missing
-
For Fotobounce Users: If replacing Fotobounce completely:
- Turn ON TTP metadata writing
- This writes standard XMP face tags
- Fotobounce will see these as brand new images and rescan them
-
This prevents loss of tags but means Fotobounce database won't sync
-
For Picasa Users:
- TTP replaces existing XMP face tag regions with TTP tags
- For two-way compatibility: Configure TTP to write only MS face tags
- Picasa writes MWG tags and reads MS tags
- This allows both programs to read each other's tags
Face Region Settings
TTP supports three face region metadata standards:
- MS XMP Face Region
- Used by MS Photo Gallery
- Windows Explorer reads names from these regions
-
Good compatibility with Windows ecosystem
-
Metadata Working Group (MWG)
- Broadest industry support
- Active standards organization
-
Recommended for long-term compatibility
-
IPTC Extension (ImageRegion)
- Increasing support in modern photo applications
- Improves interoperability for long-term metadata preservation
Recommendation: Enable all three for maximum compatibility with other software.
Important: We do NOT recommend using multiple software programs to write face regions simultaneously. This can cause: - Data corruption if two programs write at the same time - Conflicting face region definitions - Loss of tagging work
Choose one primary tool for face tagging (TTP), and use others for viewing only.
Information Settings
Control which IPTC metadata fields TTP manages:
Write Keywords
Mirrors TTP keywords to image metadata. Enables name searching in keyword fields in other applications.
Append People Names to Keywords
Critical for Adobe Lightroom compatibility.
When enabled: - Writes people names to IPTC Core "Keywords" field - Writes to XMP dc:subject - Lightroom requires matching keyword + face region to recognize people - Makes names visible in most other photo applications
Recommendation: Turn ON if you use Lightroom or want maximum compatibility.
Write Geo Coordinates
Controls whether TTP writes GPS location data.
Recommendation: Turn OFF if you use another dedicated tool for managing geotags.
Write Time Image Taken
Controls whether TTP writes date/time metadata.
Recommendation: Turn OFF if you use other tools for managing photo dates.
Write Description (Caption)
Enables TTP to write image descriptions/captions.
Recommendation: Turn OFF if using another tool to manage descriptions.
Write Title
Enables TTP to write image titles.
Recommendation: Turn OFF if using another tool to manage titles.
General Philosophy
If you want names visible in virtually all other software packages, "appending people names to keywords" is your friend!
However, for any field managed by another tool you regularly use, disable TTP writing for that field to avoid conflicts and confusion.
End of Part 3: Working with People & Statistics
Continue to Part 4: Search and Photo Viewer...