
|
|
|
|
|
|
|
Do you want to be a better CNC'er in 37 Seconds? Get Better Tool Life, Surface Finish, and Material Removal Rates Fast. It's that easy. You can install and get results now. |
 |
Slitting Saws Feeds and Speeds & TechniquesCNC Feeds and Speeds Cookbook |
Introduction to Slitting Saws
Here's your comprehensive guide to Slittings Saws from the basics, to Feeds and Speeds, to Tips and Techniques.
Slitting saws are handy but somewhat delicate tools for certain kinds of cuts. They come in a variety of sizes and are typically made from either HSS or Carbide:
.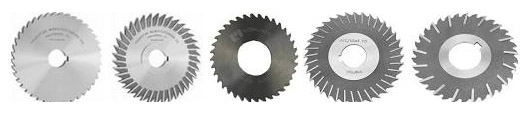
Slitting Saws come in a variety of sizes and are typically made of either HSS or Carbide...
To use a slitting saw, you put it on an arbor that's designed to fit your toolholder or the spindle taper of your CNC machine.
Very fine toothed slitting saws are sometimes referred to as "Jeweler's Saws" or "Jeweler's Slotting Saws." Another variation are Woodruff Key Cutters, which use the same feeds and speeds as slitting saws because the cutting action is the same.
We typically use slitting saws to cut very narrow through slits or slots in material. If you are going more than about 4-6x the slot width in depth, an endmill will have rigidity and deflection problems, whereas with a slitting saw, the cutting forces are directed more advantageously and the saw will do a faster and better job.
They can also be seriously handy for performing certain kinds of undercut operations.
You need an arbor to mount the slitting saw blade on. Here are some typical slitting saw arbors:
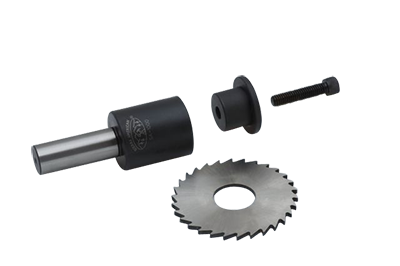
Here is a typical slitting saw arbor from Sierra American...
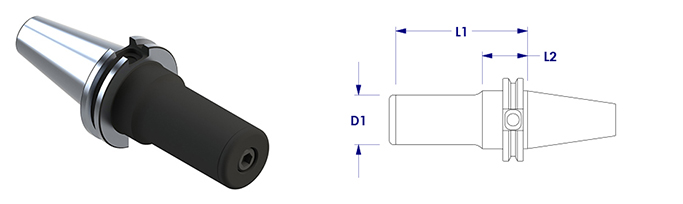
Here is a semi-flush slitting saw arbor with a CAT-40 taper from Command Tooling...
For small saws, these arbors that pop into an ER Collet chuck are pretty slick. They're made by Martindale, who manufacture slitting saws and accessories...
Slitting Saw Feeds and Speeds
Our G-Wizard Feeds and Speeds Calculator has special support for slitting saws. To set up the Slitting Saw cut in the Calculator, we go left to right, top to bottom:
1. Select the Machine
2. Select the Material
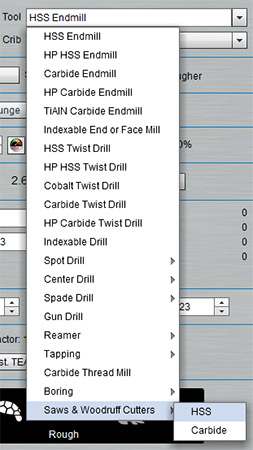
3. Select the Slitting Saw from the tool menu, either HSS or Carbide:
4. Enter your saw's diameter and number of teeth
5. Enter your saw's thickness
6. Enter the Depth of Cut. A word about depth of cut:
There are two schools of thought. One holds that you want to get the whole slot in one pass so that chips don't bind up in the slot on subsequent passes. I can see the value of this for work hardening materials, but not so much otherwise. The other school suggests multiple passes at much more modest depths of cut. For example, RobbJack suggests no more than 2 to 4 saw thicknesses per pass. In the video below, Oxtool suggests that he prefers to do it all in one pass. After considerable research on the matter, I found the majority prefer the shallower multiple passes, so G-Wizard will recommend that style in the Tips:
Here is the finished result:
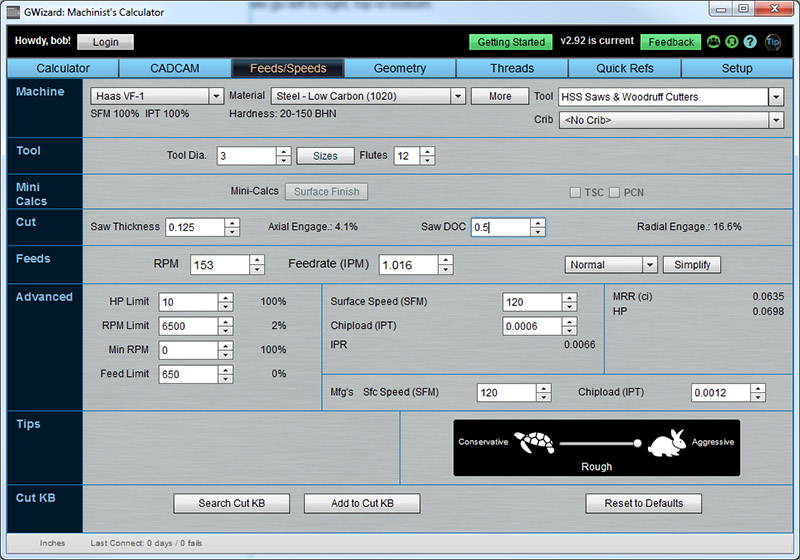
Typical setup to find Feeds and Speeds for a Slitting Saw...
If you're not a registered G-Wizard user and you'd like to try our free 30-day trial, check it out on this page.
Slitting Saw Tips and Techniques
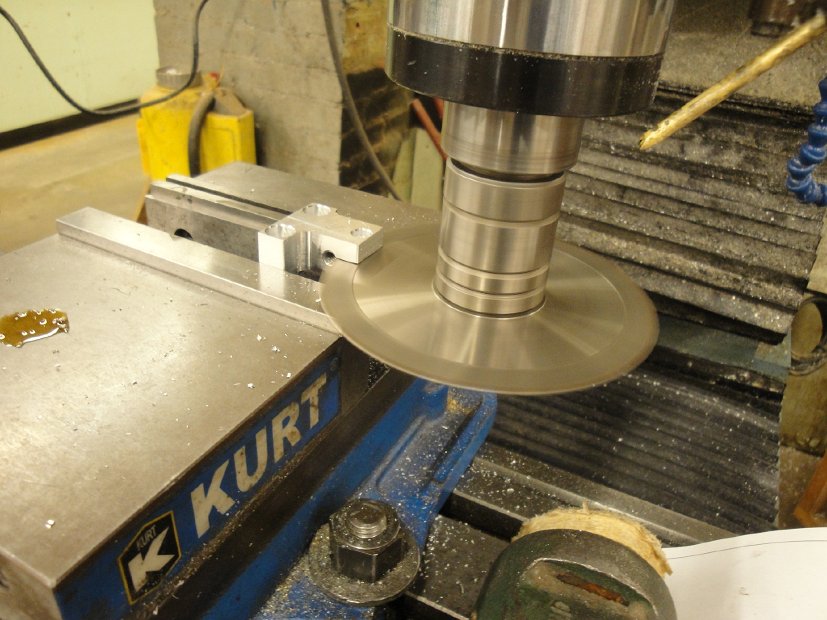
Here's a typical slitting saw in use...
Saw Thickness
Use the thickest saw your application will tolerate. The thicker the saw, the less delicate and the more well-behaved the saw will be. If you're just starting out, try getting a 1/16" thick and a 1/8" thick saw and wait for special requirements to come up to try other sizes.
Slitting Saw Size or Diameter
The typical size is 3-4 inches in diameter. There are both larger and smaller saws. The larger the saw, the more runout and wobbling it will have, so use the smallest diameter that will work for your application.
Standard or Coarse Teeth
Standard Tooth Slitting Saws tend to be thinner and with more teeth than the coarse version. They provide a better finish and may be idea for finish passes. With more teeth, the feedrate can be higher too. They tend to be more expensive than coarse tooth saws.
Use a coarse tooth saw when finish is not critical or when having chip extraction problems with the cut. You can often cut to a greater depth with a coarse toothed slitting saw because of the improved chip extraction.
Carbide or HSS Slitting Saw?
Rigidity is always a problem for slitting saws, so prefer carbide slittings saw blades if you can afford them.
Feeds Speeds and Heat
Slitting saws have small teeth and not a lot of area, so they're very sensitive to heat. It's easy to run one at what may seem a sane Feed and Speed and have heat gradually build up until the tool is ruined. Be sure to use proper feeds and speeds such as those generated by our G-Wizard Calculator when using slitting saws!
How Many Passes and What Cut Depth?
As mentioned above, RobbJack suggests limiting cuts to 4x saw thickness. With that said, many have run production jobs that cut much deeper. Everything had better be working exactly right for that to turn out well, however.
Coolant for Slitting Saws
Here again, heat is the enemy along with the need to have lubrication for materials like aluminum to prevent chips welding to the saw teeth. Flood coolant is highly preferred as it is hard for enough mist to get down into the narrow slot and do the job properly.
Indexable Slitting Saws
Like most any other cutter, there are indexable models of slitting saws--these are slitting saws whose teeth are carbide inserts. it's hard to find them as thin (width of slot they cut) as for solid models, but if your application permits, they can be much more economical to run in the long-run.
Here is a typical model from Iscar:
A typical indexable slitting saw...
Saw Tooth Stickout
The arbor supports some fraction of the diameter of the saw. What's left is the "tooth stickout." If you have the option due to a variety of blade diameters and arbors, try to minimize the tooth stickout. Note that this stickout is different than the stickout used in G-Wizard, which is the distance from the saw tooth to where the shank goes into the toolholder.
Chip Clearance and Slitting Saws
You can tell by looking at a Slitting Saw how much chip clearance is available--if the teeth are small, there's little room between them for chips. They can't be used very far down in a slot because the chips will bind. Most Slitting Saws have some concavity, meaning the area below the teeth and towards the hub has been ground so it is thinner, but that concavity won't really accomodate chips. It's more to avoid binding with the walls of the material. If you've got to go deep, look for larger teeth with bigger gaps between them to carry the chips.
Arbor and Saw Hole Size
The larger the hole size in the saw, the larger arbor is needed (the part that holds the saw, the other end will be according to the spindle taper or shank size). Larger hole sizes are desirable because they provide a more rigid setup that reduces deflection. Consider that a 1 1/4" arbor is more than twice as rigid as a 1" arbor--it doesn't take much to help a lot where rigidity is concerned.
Side Collar
Different diameter side collars can be had for slitting saws. Always use the largest diameter that will clear your work. The role of the side collar is to support the saw blade, so the larger the diameter, the more of the blade that will be supported. When you assemble the saw, make sure all the components are free of dust, chips, and any other foreign material.
Keyways
Saws can have keyways, although solid carbide saws generally do not (it's brittle and the keyway is easily chipped). You also don't see them much on saws thinner than 0.125". They're there to let you drive the saw with more torque as needed.
Climb or Conventional Mill?
Slitting Saws are happier with climb milling because the cutting forces are lower. Make sure your machining has minimal backlash because if you're Climb Milling and the saw grabs it is going to grab hard and break the saw or possibly cause an injury!
The negative is that if the arbor and blade are not rigid enough, climb milling can allow the blade to grab and dig into the workpiece using all the flex the arbor will give it. Always use the largest arbor possible, and the smallest diameter and thickets saw blade possible.
Sneaky Insurance: Load Monitoring
When using slitting saws, start the cut and when you reach full engagement, not the spindle load. Set a limit about 5% higher. So if you are running 32% load, set your limit to 37%. If something goes wrong, hopefully the load limit stops everything before it gets too ugly.
Right Angle Heads and Slitting Saws for Lathes
It's often convenient to re-orient the slitting saw using a right-angle head on a mill or placing the saw on its arbor into the lathe chuck and then clamping the workpiece where the lathe tool would normally go.
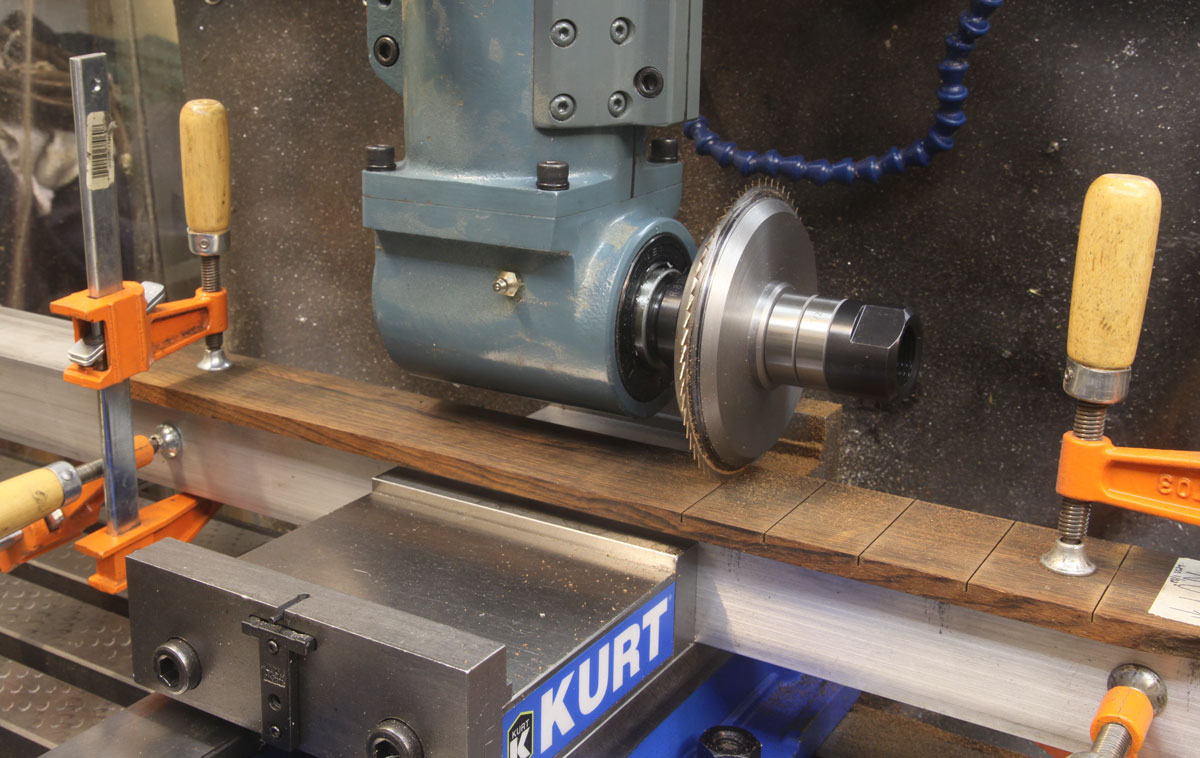
Right angle head slitting saw setup from Frets.com. Lots good to say about this. Love the big stabilizer collars that expose as little of the blade as possible to increase rigidity. They're custom made for the job. Click through to the Frets site for all kinds of great tips, tricks, and tooling...
A rig like this can be pretty easily used to automate cutting bar stock to shorter lengths if you don't have a lathe or automatic band saw for the task.
Don't Clamp the Saw in the Slot
Make sure your workholding won't apply pressure to try to close the slot you are cutting with the slitting saw. This is a quick way to damage the saw.
Sometimes slitting into a large hole will clamp the saw as stresses are relieved in the material. If this is happening, gently back the saw out (perhaps stopping it if needed) and start again to reopen the slot to proper thickness. Sometimes you will find Conventional Milling is less likely to clamp the slitting saw than Climb Milling.
Never Stop and Start the Saw in the Middle of the Cut!
This is a good way to break a saw. Only start it after withdrawing from the cut.
Using a Slitting Saw to Cut Parts Into Two Pieces
First, always determining whether the pieces could be made individually. Slitting saws are delicate and have relatively slow material removal rates.
Second, realize that a portion of the part may be cut loose and flung out. Make sure both part halves are securely held.
Check for Runout for Maximum Reliability
Make sure the blade runs true to the spindle's axis. Check for runout by indicating the blade and spinning it gently by hand. If it isn't very true, you can try to tap on the arbor to get it right, index its position in the arbor (assuming it isn't keyed), or try to face the arbor in a lathe to true it up.
Oxtool's Slitting Saw Video
Here's a great YouTube introduction to Slitting Saws:
Next Article: INFOGRAPHIC: 4 Ways Geometry Affects Your Machining and What to Do About It
Try the Free Trial Version of G-Wizard Speeds and Feeds Calculator...
![]()
No credit card required--just your name and email.
CNC Milling Feeds and SpeedsContents


|
Do you want to be a better CNC'er in 37 Seconds? Get Better Tool Life, Surface Finish, and Material Removal Rates Fast. It's that easy. You can install and get results now.

|
||||||||||||||||||
| ||||||||||||||||||


