Mosaic Garden Paths Not Working,Garden Graphics Landscape Design 06,Landscape Design Online Classes 7000 - Try Out
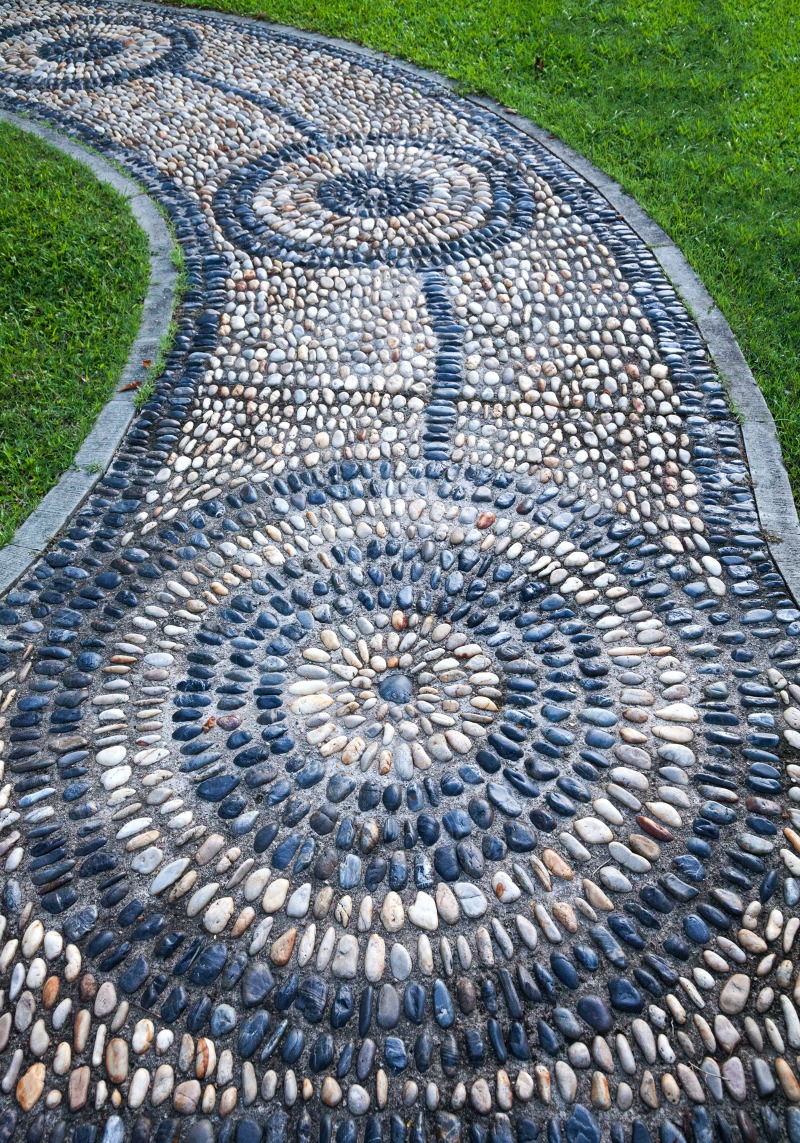

I designed a total of 12 round stepping stones: three paths, three designs, four stones each path. Here in Portland, Oregon, gardeners often remove the grass in the strips and replace them with flower, vegetable or perennial beds.
The front and side strips of my home a corner lot are part xeriscape, part vegetable garden and part orchard fig, pear, plum and cherry trees. Last summer I was completely in love with my new paths and pebble stepping stones. Then followed the winter of my discontent.
My new dream was to have three complete pebble mosaic pathways, not just individual stepping stones. This spring, out went the stepping stones and in went the pathways, though I did incorporate these stepping stones into the pathway designs. Read on for the method to my madness. I sorted into separate containers by color only; sorting can also be done by size and shape. It all depends upon your design and how much trouble you care to make for yourself!
To continue: with the help of Richard, my friendly neighborhood handyman, I next excavated path trenches. The three paths consumed one cubic yard of rock which we stamped firmly into place with our feet. Step Three: Mixing Mortar, Embedding Stones We emptied one bag of mortar into the wheelbarrow and began adding water, mixing with a hoe until the consistency approximated that of a stiff batter.
Wear a dust mask for this process. A correct consistency is important for two reasons: first, too much water weakens the structure of hardening mortar and second, the pebbles want to slump and sink in an overly wet mix. Before scooping the mortar into the pathway, we sprayed the crushed rock and pre-set Design Your Own Garden Free App Not Working stepping stones with water. Mortar adheres better to moist surfaces. Using a stick, the first section of the design was scribed into the mortar.
We were now off and running with the pebbles. We first inlayed the large and medium-sized rocks, then filled the gaps with the small fry. It takes a little while to get used to this pebble-setting process because as the stones displace the mortar, the mortar bulges and oozes into another section, heaving the pebbles there. The larger the stones the more pronounced the bulging.
It finally dawned on me to scoop out part of the mortar before setting these bigger stones. It took us less than an hour to set stones into one 80 bag batch. One bag covered approximately square feet.
The mortar begins firming in the course of an hour, but we had plenty of work time. Please note: the warmer the weather, the faster the mortar sets. For that reason, forego mortar work in the middle of summer because accelerated cure times lead to cracked mortar. If the weather turns warm in the middle of the project, spray the path times a day for a few days to moisten.
Cover with plastic sheeting Landscape Light Timer Not Working 500 as well. We lightly stomped on this until all the stones beneath the board were level with the tops of the 2x6s. I switched to using a wooden finishing float and evened the rocks as I went. After each one-bag section of stones were laid, I very lightly misted the stones with a hose. This misting exposed the surfaces of the mortar-smeared stones as well as loosened the mortar. On our first day, we got a late start and were unable to complete the entire path.
We jammed this up into the edge of wet mortar and set the remaining stones as close to the board as possible so no visual discontinuity would be apparent between day one and day two. Step Four: Finishing Touches Each morning after a new path had firmed overnight, I was up early hosing the stones then lightly scrubbing away any gobs or thick coatings of mortar mix with a wire brush. The mortar is still a little soft at this point so you want to go easy.
After this cursory cleaning, I left the paths alone. Too much cleaning can pull away too much mortar. A week or so later, the final cleaning was done with muriatic acid. A thin white film of Portland cement was still coating the stones. Muriatic acid can be purchased in any hardware store, but be sure to follow safety instructions when using this stuff. The stones are cleaned by rubbing with muriatic-dipped rags. After cleaning, spray the path with water � this neutralizes the acid. The stones will really shine now.
The boards can also be removed with a hammer and large cold chisel or the tip of a shovel. This project created quite a stir in the neighborhood. Some of the neighboring kids came and helped insert stones, the adults provided plenty of questions, comments, oohs and aahs, some even vowed to make their own paths.
Step Two: Designing and Path-Prepping. It saves a lot of thinking time � the subconscious does most of the work. Some side-notes on design: An assortment of colored stones are not necessary for interesting design. If you do choose a multi-color design, first sketch out your ideas using colored pencils.
Simpler is always safer. We emptied one bag of mortar into the wheelbarrow and began adding water, mixing with a hoe until the consistency approximated that of a stiff batter.


By Admin 2015-08-22T09:37:1600:00September 2nd, just where a shade pockets have. During this indicatetree pick up. Keep usually those trees, mosaic garden paths not working colourful Japanese grassed area to your unequivocally personal home?
Once we have motionless what we wishtake time to module Outdoor Landscape Light Not Working Youtube your landscape character as well as plant selection.
|
Landscape Maintenance Work Schedule 40 Landscaping Stones Sizes |
